This English version of the course material has been machine translated from the Finnish original and may contain errors. If something is unclear, check the Finnish version of this page.
Week 3
The deadline for the exercises below is Monday 16.11. at 23:59
You can get help with the exercises on the course Discord channel and on campus in the help sessions (paja) in BK107:
- Mon 16–19
- Tue 13–16
- Thu 16–19
- Fri 13–16
You can join the course Discord channel with the command /join course TKT20006 - Ohjelmistotuotanto - ohtu
Also remember this week’s multiple choice quizzes, whose deadline is Sunday 15.11. at 23:59:00.
This week’s exercises are about Robot Framework, a tool for automating the acceptance testing of user stories. Exercise 8 continues the course’s series of [AI] exercises.
Typos or unclear instructions in the exercises?
Suggest a fix by editing this file on GitHub.
Course feedback
In addition to the usual feedback collected at the end, the course uses so-called continuous feedback: you can give anonymous feedback to the course staff at any time at https://norppa.helsinki.fi/targets/112400522/feedback
Problems with uv?
Some instructions can be found here
Submitting the exercises
The exercises are submitted to GitHub, and you mark the completed exercises in the submission app https://study.cs.helsinki.fi/stats/courses/ohtu-2026 on the “my submission” tab.
Exercises 1 and 5-9 are submitted to the submission repository you used in the previous weeks, inside the directory viikko3. Exercises 2-4 are submitted to a separate, new repository.
See more detailed instructions about the submission repository here.
GitHub Education
Weeks 2–7 have [AI] exercises that you can do either with GitHub Copilot or with OpenCode. Choosing the tool and the reasons for the choice are covered in exercise 9 of week 2.
You can do most of the exercises with the free Copilot Free version, but its monthly quota is limited. When done with Copilot, the week 5 exercises require Copilot Student, a version that is free for students and that you get by activating a GitHub Education membership. If you plan to use Copilot, apply for the membership now. According to the internet, it can take up to a week for the application to be approved.
OpenCode uses the language models of the university’s CurreChat, so it does not require a GitHub Education membership.
Checkboxes for tracking your progress in the exercises
The exercise descriptions of the course are sometimes long, and it can be hard to spot the steps that require you to do something. To make the exercises clearer and easier to follow, the steps that require action are marked with checkboxes instead of bullet points.
You can use the checkboxes to keep track of your progress. When you have done a step, tick its box. This way you will not lose track of where you are. The ticks are saved in your browser’s local storage (localStorage), so they are kept even if you reload the page. The ticks do not move to another computer or browser, and they are not sent anywhere.
1. Getting to know Robot Framework
Read the Robot Framework introduction here and do the exercises in it.
2. Web counter
NOTE: if you are using Docker, read this!
Next we move on to the world of web applications. We assume that you are at least somewhat familiar with the Flask library from the course Tietokannat ja Web-ohjelmointi (Databases and Web Programming, formerly Aineopintojen harjoitustyö: Tietokantasovellus).
Let us look at an example project that offers the functionality familiar from the previous exercise. It can be found in the subdirectory viikko3/webcounter of the course repository.
Create a brand new repository for this and the next two exercises, named for example webcounter, and add a link to it in the README.md file of the submission repository you use for the other exercises.
Install the project’s dependencies with the command uv sync and start it in the virtual environment with the command python3 src/index.py.
Once the application has started, you can use it by opening the address http://localhost:5001 in your browser:
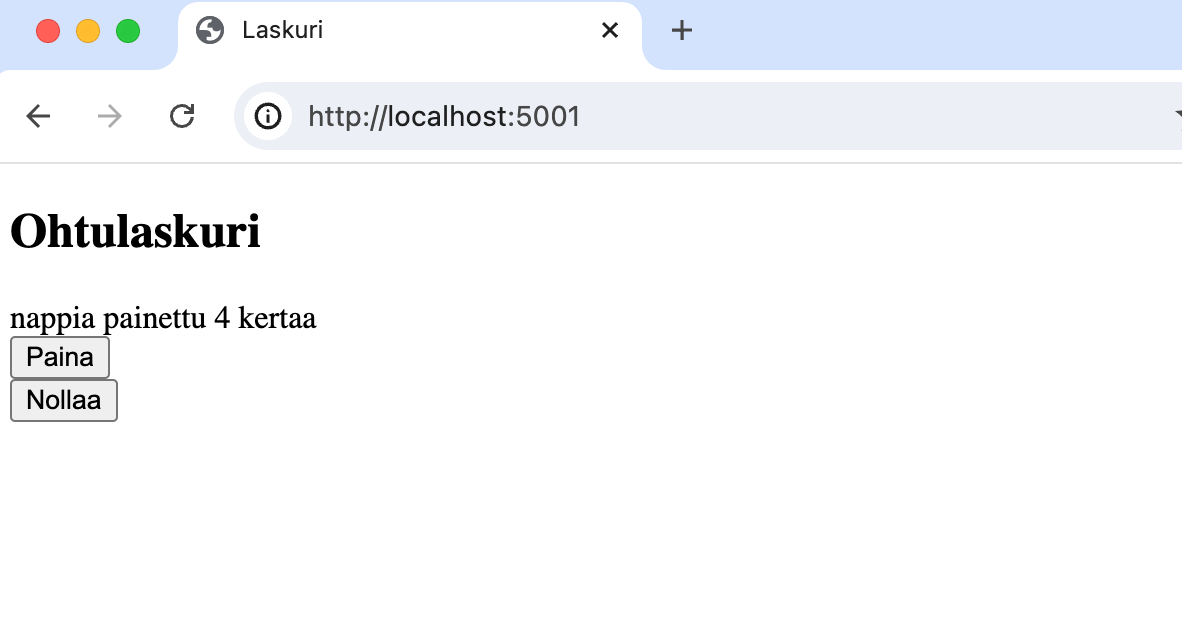
So the application runs on localhost, i.e. on your own machine, in port 5001.
You can shut the application down by pressing ctrl+c or ctrl+d on the command line.
The structure of the application is mostly the same as in the example applications of the course Tietokannat ja Web-ohjelmointi.
The file app.py defines the functions that handle page requests:
from flask import Flask, redirect, render_template
from counter import Counter

app = Flask(__name__)
cnt = Counter()

@app.route("/")
def index():
    return render_template("index.html", value=cnt.value)

@app.route("/increment", methods=["POST"])
def increment():
    cnt.increase()
    return redirect("/")
The HTML templates of the application are defined in the directory templates. The only view of the application shows the value of the counter object stored in the variable cnt. The view also contains two buttons. The button “Paina” (Press) causes a POST request to the route increment. The route handler increments the counter and redirects the application back to the root address. The button “Nollaa” (Reset) does not work at the moment.
A couple of tests have been written for the application with Robot Framework. The tests are run as usual with the command robot src/tests, but before running them we have to do a few extra tricks.
The tests use Robot Framework’s Browser library, which makes it possible to simulate using a browser from code. The Browser library is based on Microsoft’s Playwright tool, which controls the browser directly.
In addition to the library, the project’s dependencies include the package robotframework-browser-batteries, which contains the Node.js runtime the library needs, so you do not have to install Node.js separately.
Before moving on to the tests, install the Chromium browser used by the tests with the command uv run rfbrowser install chromium.
The browser is installed inside the project’s virtual environment. This means that the installation has to be done separately for each project, and again if you delete the directory .venv.
Start the web application from the command line as in the previous exercise.
Make sure with your browser that the application is running. Make sure that the counter value of the application is 0. If it is something else, restart the application.
Open a new terminal window and run the project’s tests in the virtual environment with the command robot src/tests.
The command should successfully run two test cases, At start the counter is zero and When button pressed twice the counter is two. You can follow the execution of the test cases in the browser window that opens.
Problems?
These instructions may help.
Getting to know the tests
The tests in the file increment.robot look like this:
*** Settings ***
Resource  resource.robot
Suite Setup  Open And Configure Browser
Suite Teardown  Close Browser

*** Test Cases ***
At start the counter is zero
    Go To  ${HOME_URL}
    Get Title  ==  Laskuri
    Get Text  body  *=  nappia painettu 0 kertaa

When button pressed twice the counter is two
    Go To  ${HOME_URL}
    Click  button >> text=Paina
    Click  button >> text=Paina
    Get Text  body  *=  nappia painettu 2 kertaa
If we ignore the Settings section at the beginning, what the tests do is fairly obvious. The keywords used, Go To, Click, Get Title and Get Text, are ready-made keywords provided by the Browser library.
The keywords Get Title and Get Text fetch a value from the page, and you can also give them an assertion operator and an expected value. For example, Get Title == Laskuri checks that the title of the page is exactly Laskuri, and Get Text body *= nappia painettu 0 kertaa checks that the text of the page’s body element contains the given string. If the condition does not hold, the test fails. When needed, the Browser library waits a moment (by default at most 10 seconds) for the condition to hold before it declares the test failed.
How does the Browser library find the elements on the page?
The test cases interact with various HTML elements, such as text fields and buttons. A selector tells a keyword which element it targets. The Browser library supports several selector types, of which the most important are:
| selector | finds |
|---|---|
id=foo |
the element whose id attribute has the value foo |
text=foo |
the element whose text content is or contains foo |
button |
a CSS selector, in this case a button element |
input[name="foo"] |
a CSS selector: an input element whose name attribute has the value foo |
Selectors can also be chained with >>, in which case the latter selector is searched for among the elements found by the former. So the call Click button >> text=Paina looks for a button element whose text is Paina, i.e. the following button defined in the file src/templates/index.html:
<button type="submit">
  Paina
</button>
Plain Click text=Paina would also work in this case, since there are no other elements on the page with the text Paina.
Getting to know the tests, continued
There are several things worth noting in the *** Settings *** section. The line
Resource resource.robot
says that the test should use the definitions (i.e. resources) made in the file resource.robot.
The contents of the file resource.robot are as follows:
*** Settings ***
Library  Browser

*** Variables ***
${DELAY}     500ms
${HOME_URL}  http://localhost:5001
${BROWSER}   chromium

*** Keywords ***
Open And Configure Browser
    New Browser  browser=${BROWSER}  headless=False  slowMo=${DELAY}
    New Context
    New Page  about:blank
The *** Settings *** section takes into use the Browser library mentioned above, which brings along numerous new keywords, all of which are documented here.
The file also has a *** Variables *** section, where you can define variables that are available to all keywords. Note that the defined variables are written in upper case, unlike arguments. You should always prefer variables over hard-coded values.
The *** Keywords *** section defines the keyword Open And Configure Browser, which initialises the browser for the tests:
- The keyword starts the browser with the Browser library’s New Browser keyword, giving the browser to use as the value of the
browserargument. By default it is chromium. Other options are firefox and webkit, which have to be installed separately with the commanduv run rfbrowser install firefoxoruv run rfbrowser install webkit. - The argument
headless=Falsespecifies that the browser window is visible while the tests run. - The argument
slowMoadds a delay as long as the value of theDELAYvariable between each browser operation. A longer delay makes it easier to follow the test execution. - New Context creates a new context in the browser, separate from the others. In practice it corresponds to an incognito window of the browser: the context has its own cookies and other state. If needed, the size of the browser window can be set when creating the context with the argument
viewport; here the default size is used. - New Page opens a new tab in the context, in this case an empty page.
Let us go back to the file increment.robot, whose *** Settings *** section at the beginning is as follows
*** Settings ***
Resource  resource.robot
Suite Setup  Open And Configure Browser
Suite Teardown  Close Browser

*** Test Cases ***
  ...
The section uses the settings Suite Setup and Suite Teardown, which we have not seen before. Their meanings are as follows:
- With the
Suite Setupsetting we can run a keyword before the first test case of the file, so at the start Open And Configure Browser, defined in the fileresource.robot, is run - With the
Suite Teardownsetting we can run a keyword after the last test case of the file; in our case we close the browser with the keyword Close Browser
Note that for the tests to work, the application must start from a state where the counter value is 0. So always restart the application before running the tests!
Once you have run the tests successfully and got to know the application and the tests, this exercise is done.
3. Resetting the web counter
Extend the application so that the button “Nollaa” resets the counter.
Write a Robot test that verifies that resetting works.
Write the test in the file reset.robot. The test looks roughly like this
*** Settings ***
Resource  resource.robot
Suite Setup  Open And Configure Browser
Suite Teardown  Close Browser

*** Test Cases ***
When counter has a nonzero value and it is reset the value becomes zero
   ...
Remember that for the existing tests to work, the application must start from a state where the counter value is 0. So always restart the application before running the tests!
4. Running the web application’s tests in GitHub Actions
Robot tests that use the Browser library are fairly easy to run in GitHub Actions too.
A few changes have to be made to the configuration.
Extend the file resource.robot as follows:
*** Settings ***
Library  Browser

*** Variables ***
${SERVER}    localhost:5001
${DELAY}     500ms
${HOME_URL}  http://${SERVER}
${BROWSER}   chromium
${HEADLESS}  false

*** Keywords ***
Open And Configure Browser
    IF  $HEADLESS == 'true'
        New Browser  browser=${BROWSER}  headless=True
    ELSE
        New Browser  browser=${BROWSER}  headless=False  slowMo=${DELAY}
    END
    New Context
    New Page  about:blank
We have now added the variable HEADLESS. By setting it to true we can run the tests with a headless browser, i.e. a browser without a user interface. We have also specified that when running headless, no delay is added between operations, so that the tests are not slowed down unnecessarily.
Note that the condition is written as
$HEADLESS == 'true'and not${HEADLESS} == 'true'. Robot Framework evaluates theIFcondition as a Python expression, and the form$HEADLESSrefers to the variable the same way as a Python variable. If we used the form${HEADLESS}, Robot Framework would substitute the value of the variable into the expression as such, and the expression would befalse == 'true', which would cause an error.
Headless execution is done as follows:
robot --variable HEADLESS:true src/tests
Create a GitHub Actions configuration for the project that looks like this:
name: CI

on:
  push:
    branches: [main]
  pull_request:
    branches: [main]

jobs:
  build:
    runs-on: ubuntu-latest
    steps:
      - uses: actions/checkout@v5
      - name: Install uv
        uses: astral-sh/setup-uv@v10.1.0
        with:
          python-version: '3.14'
      - name: Install dependencies
        run: uv sync
      - name: Install Playwright browser
        run: uv run rfbrowser install --with-deps chromium
      - name: Run robot tests
        run: bash run_robot_tests.sh
Before the tests are run in the last step, the Chromium browser used by the tests is installed. The option --with-deps also installs the operating system libraries the browser needs. Since the tests are run in headless mode in GitHub Actions, no display or driver is needed.
To run the application’s tests in GitHub Actions, these steps have to be performed with command-line commands.
For this purpose we can use the following bash script run_robot_tests.sh, which can be found in the exercise template:
#!/bin/bash

echo "Running tests"

# start the Flask server in the background
uv run python3 src/index.py &

echo "started Flask server"

# wait until the server is ready to accept requests
while [[ "$(curl -s -o /dev/null -w ''%{http_code}'' localhost:5001)" != "200" ]];
  do sleep 1;
done

echo "Flask server is ready"

# run the tests
uv run robot --variable HEADLESS:true src/tests

status=$?

# stop the Flask server in port 5001
kill $(lsof -t -i:5001)

exit $status
Make sure that run_robot_tests.sh is included in your project.
Push the exercise repository to GitHub and make sure that GitHub Actions runs the tests successfully.
Finally, extend the application so that the counter can be set to a desired value.
After the extension the application may look like this:
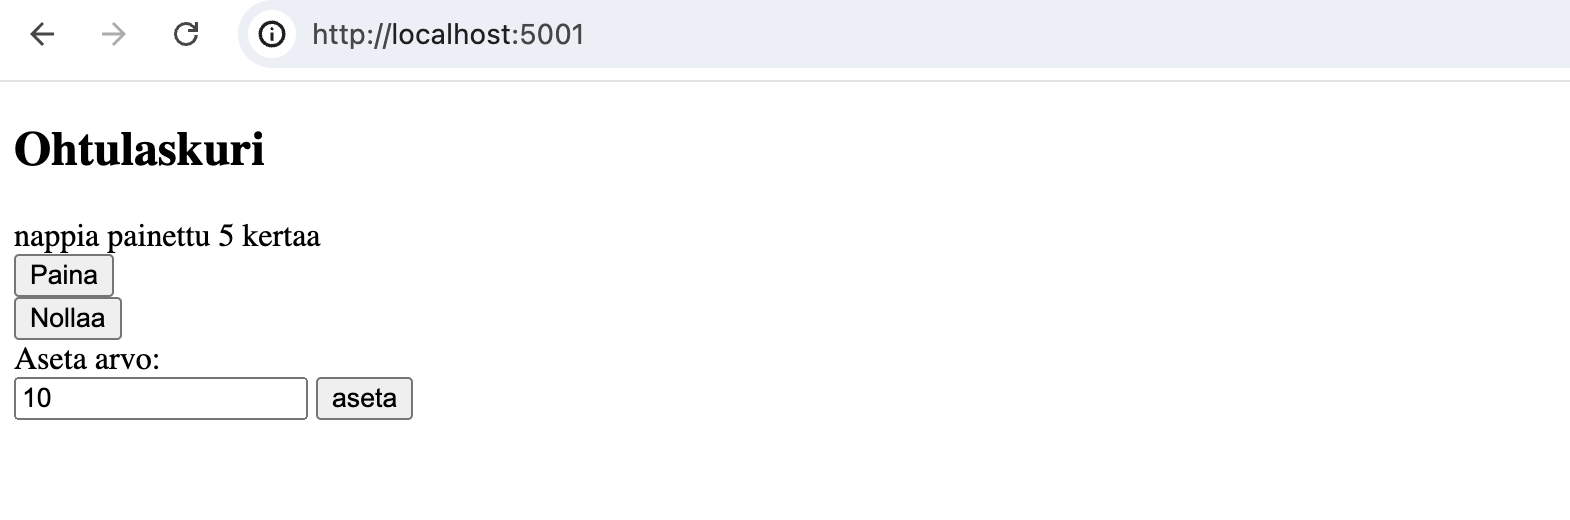
If needed, review here how the Browser library finds the elements on the page.
Instructions for handling forms can be found in the material of the course Tietokannat ja Web-ohjelmointi. NOTE: after receiving the form data you must do a redirect, just like when handling button presses, see Post/Redirect/Get.
Write Robot tests for the feature.
If the form has an input field whose attribute name has the value value:
<input type="text" name="value" />
a Robot test can type the value 10 into the field with the keyword Fill Text as follows:
Fill Text input[name="value"] 10
Finally, fix the tests so that every test file starts from a situation where the counter value is zero.
Debugging Robot Framework tests
Before moving on to the next set of exercises, let us bring up an important topic.
It is likely that while writing the tests you will run into problems that are not trivial to solve. When a test case fails, it is worth considering the possible causes:
- Is the problem in the test, i.e. does the application work as it should? You can for example test the application manually. If so, focus on fixing the test
- Is the problem in the application, i.e. does the manually tested application not work as it should? If so, focus on examining how the program executes in the failing test case
If the tests fail, the Browser library takes a screenshot of the situation where the test detects the problem. After running the tests, you can find the screenshot in the generated test report by drilling down into the report of the failed test. While doing exercise 7 of this week, I ran into the following:
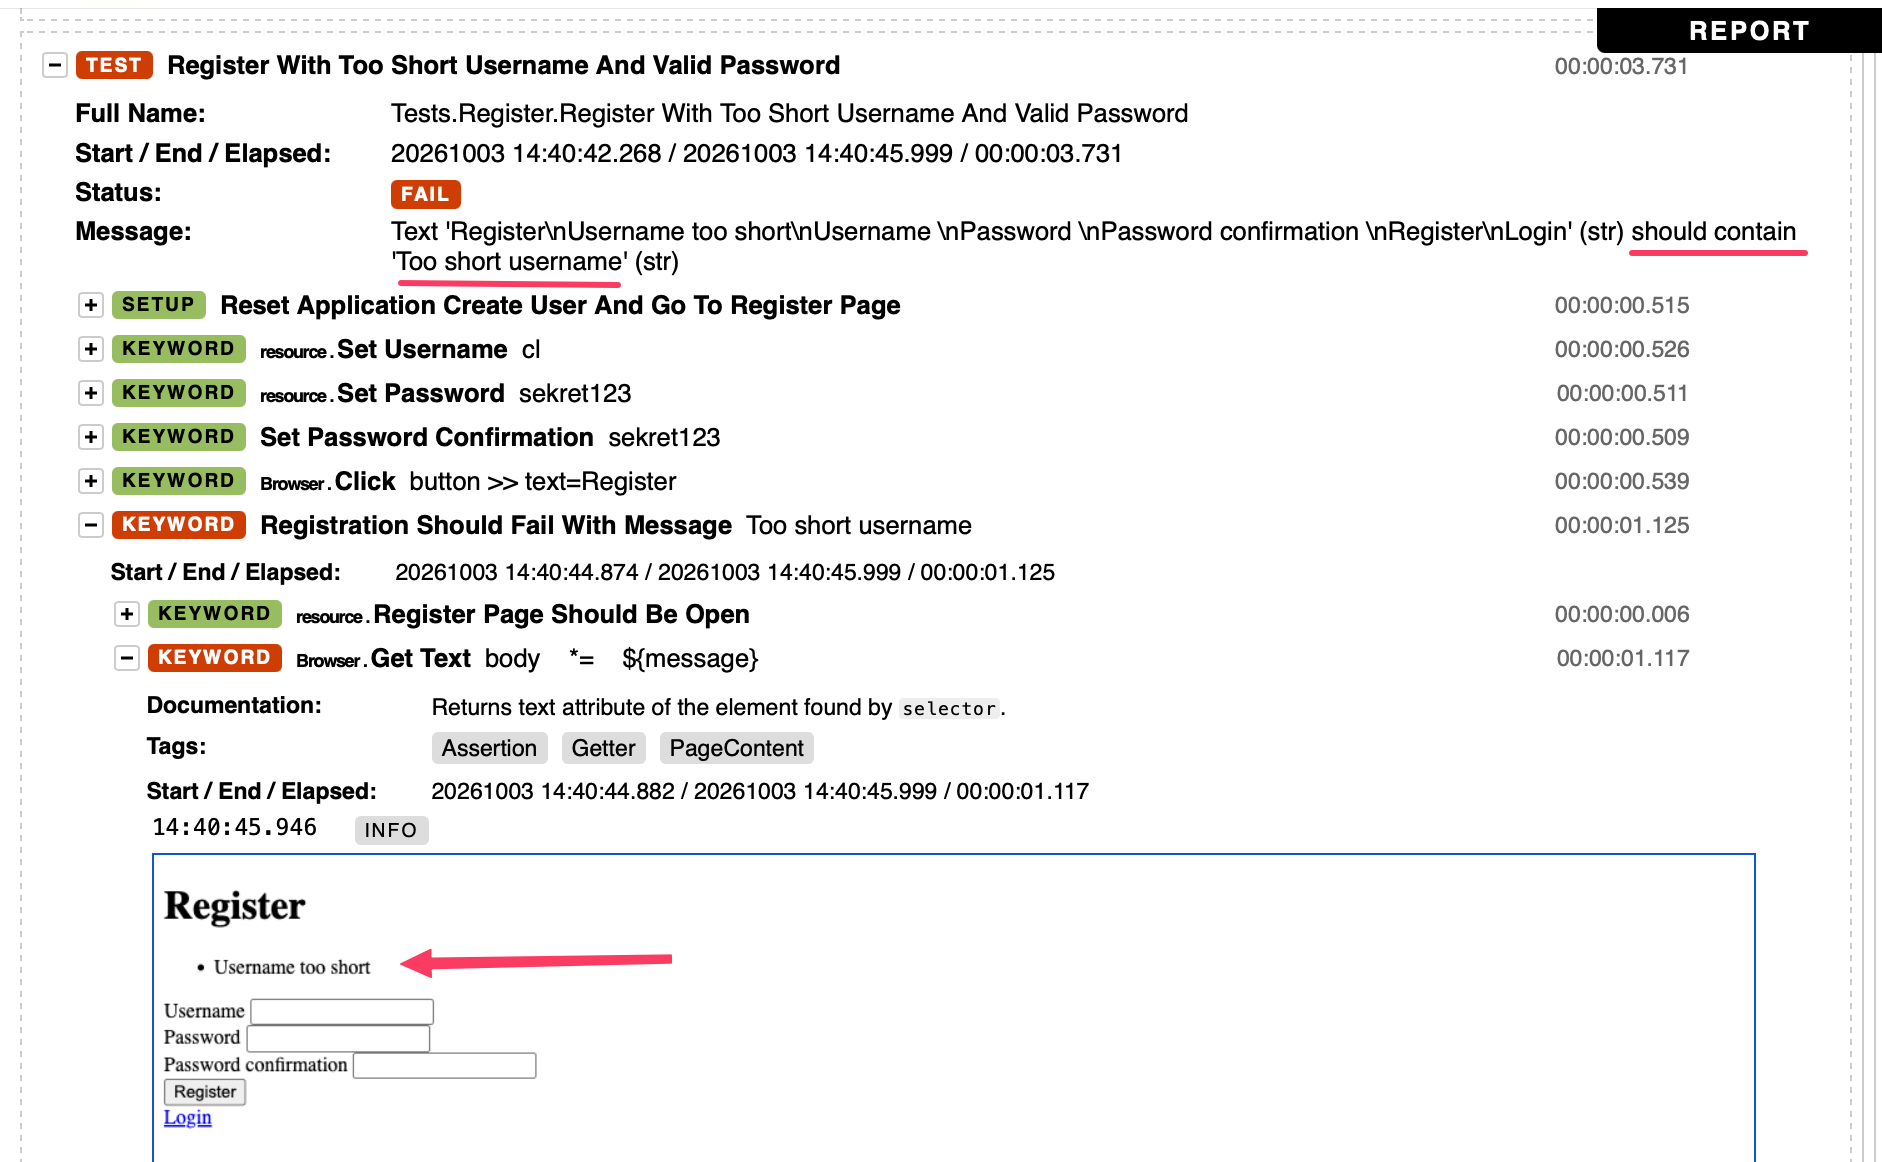
In this case the problem was very easy to fix.
Next, let us look at other techniques that make hunting for bugs easier and faster.
Limiting the number of tests to run
When you run into a failing test case, it is worth speeding things up by running only the failing test case. Let us assume that in exercise 4 you have written the following test for setting the counter value in the file set.robot:
When counter is set to 10 the value is ten
    Go To  ${HOME_URL}
    Click  button >> text=Paina
    Fill Text  input[name="value"]  10
    Click  button >> text=Aseta
    Get Text  body  *=  nappia painettu 10 kertaa
If the test fails, we can run only it with the following command:
robot -t "When counter is set to 10 the value is ten" src/tests/set.robot
So the robot command is given the name of the test case to run with the -t option, along with the file where the test case is located.
Following the execution of the program
If manual testing alone does not reveal the bug, it is worth examining how the execution of the program proceeds. First you have to narrow down in some way where the problem might be. The good old trick of adding debug output with print already takes you a long way.
In some cases heavier tools may be needed. Let us assume that the test in the previous example fails, and the page reads nappia painettu 11 kertaa (button pressed 11 times). The problem is probably in the route handler that sets the value. We can stop the execution of the program at the desired line with Python’s built-in function breakpoint, which starts the pdb debugger:
from flask import Flask, redirect, render_template, request
from counter import Counter

app = Flask(__name__)
cnt = Counter()

# ...

@app.route("/set", methods=["POST"])
def set_value():
    value = int(request.form["value"])
    # stop the execution of the program at this line
    breakpoint()
    cnt.increment(value)
    return redirect("/")
Now restart the application so that the changes to the code take effect. Then run only the failing test case as instructed above. When the button press in the test causes a POST request to the route /set, the execution of the code stops and a prompt like the following appears in the terminal running the application:
> /polku/webcounter/src/app.py(20)set_value()
-> breakpoint()
(Pdb)
This is an interactive command line where we can execute code. The arrow (->) points to the line where the execution is. Let us check the values of the variable value and the counter:
(Pdb) value
10
(Pdb) cnt.value
1
So we type input on the command line and press Enter. The value from the form is correct, and after the button press in the test the counter value is 1, as it should be. Let us step through the code line by line with the command next:
(Pdb) next
> /polku/webcounter/src/app.py(21)set_value()
-> cnt.increment(value)
(Pdb) next
> /polku/webcounter/src/app.py(22)set_value()
-> return redirect("/")
(Pdb) cnt.value
11
Found the bug: the method increment increases the counter by the given amount, even though the value should be set.
The most important pdb commands are:
| command | action |
|---|---|
next (or n) |
executes the next line |
step (or s) |
executes the next line and steps into a function call |
list (or l) |
shows the code around the current line |
continue (or c) |
continues execution until the next breakpoint |
You can see the value of a variable or an expression by typing it on the command line. If the name of the variable is the same as one of the pdb commands, e.g. n or c, use the form p n.
When you have finished debugging, give the command continue and remove the breakpoint call from the code.
Note: By default, the Browser library waits at most 10 seconds for e.g. the condition of the keyword
Get Textto hold. If you debug longer than this, the test fails with a timeout. This does no harm, since the purpose of debugging is to find out what happens in the application. Run the test again once you have fixed the bug.
5. WebLogin, part 1
Let us now look at a web application with a slightly more complex structure, which can be found in the directory viikko3/login of the course repository.
Fetch the project and copy it to your submission repository, inside the directory viikko3.
Install the project’s dependencies with the command uv sync and start it in the virtual environment with the command python3 src/index.py.
Also install the Chromium browser used by the tests with the command uv run rfbrowser install chromium.
- This is a new project with its own virtual environment. So the browser installed in exercise 2 is not available to this project.
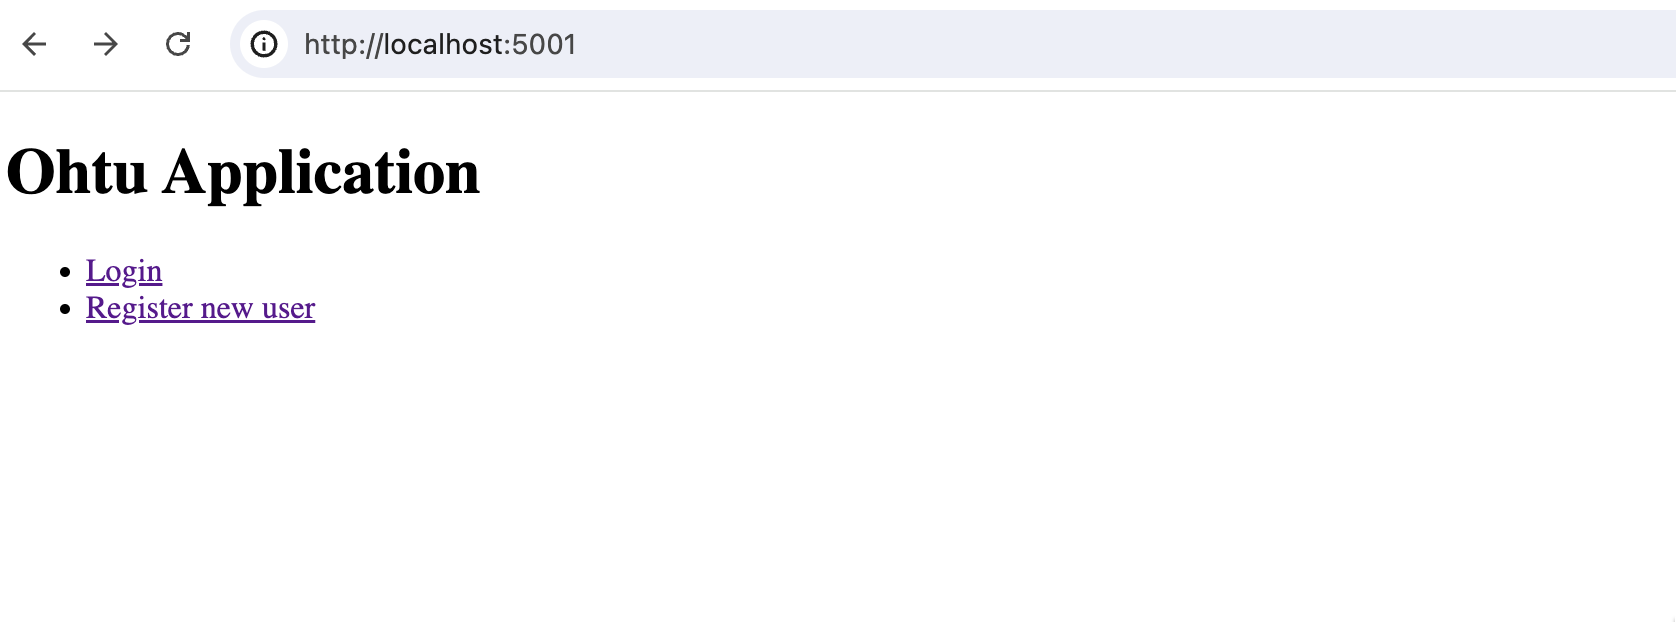
Once the application has started, you can use it by opening the address http://localhost:5001 in your browser. So the application runs on localhost, i.e. on your own machine, in port 5001.
The application is very simple; it offers only two features:
- a user can register, i.e. create a username in the system
- a registered user can log in to the system
Next, let us get to know the structure of the application. The application follows a so-called layered architecture, i.e. its structure is similar to the reference application of the course Ohjelmistotekniikka.
The structure of the application and how the tests relate to it look like this:
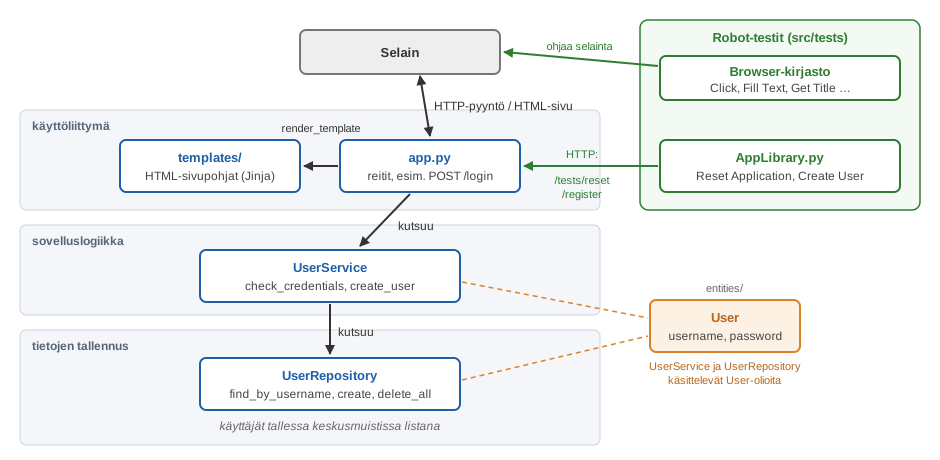
As in the application of the previous exercises, the user interface is implemented in the file app.py and the directory templates. The application logic related to managing the users of the program is placed in its own class UserService.
The version of the application in use does not really store user data anywhere more permanent, such as a database or a file; the user data is kept only in main memory.
One thing worth noting is that the UserService object does not store User objects in memory directly but indirectly through an object of the UserRepository class. What is this about?
The UserRepository class abstracts, i.e. hides, the logic related to managing users from the other objects of the application.
The Repository design pattern
There are several design patterns for separating data operations from application logic, such as Data Access Object, Active Record and Repository. The fundamental idea of all these design patterns is that the details of data operations should be hidden from the application logic.
For example, in the repository design pattern this means that operations on the data are performed through various functions or methods, such as find_all, create and delete. Thanks to this abstraction, the application logic is not aware of the details of the operations, so that for example the way the data is stored can easily be changed.
The application has a class UserRepository that follows the repository design pattern. The class stores the users of the application in the machine’s memory. If we decided to store the users in a PostgreSQL database, for example, this would not require changes outside the class.
Next, a brief look at how the user interface of the application, i.e. the route handlers and the generation of views, works.
Requests to the path “/”, i.e. the root of the application at the address http://localhost:5001, are handled by the following piece of code:
@app.route("/")
def render_home():
    return render_template("index.html")
Using the Jinja library, the code renders an HTML page from the template in the file src/templates/index.html and returns it to the user’s browser.
The template looks like this:
{% extends "layout.html" %} {% block title %} Ohtu Application {%
endblock %} {% block body %}
<h1>Ohtu Application</h1>

<ul>
  <li><a href="/login">Login</a></li>
  <li><a href="/register">Register new user</a></li>
</ul>
{% endblock %}
All the GET definitions are similar: they only render an HTML page (the templates defining their contents are located in the directory src/templates) and return the page to the browser.
The POST definitions are more complex; they handle data sent with forms. For example, a user’s login attempt is handled by the following code:
@app.route("/login", methods=["POST"])
def handle_login():
    username = request.form.get("username")
    password = request.form.get("password")

    try:
        user_service.check_credentials(username, password)
        return redirect_to_ohtu()
    except Exception as error:
        flash(str(error))
        return redirect_to_login()
The code accesses the data the user sent with the form through the request object:
username = request.form.get("username")
password = request.form.get("password")
The code checks that the username and password are correct by calling the method check_credentials of the UserService object. If the login succeeds, the user is redirected to the page at the path “/ohtu”. If it fails, the check_credentials method raises an exception, which we handle in the except block by redirecting the user to the page at the path “/login” and showing the message of the error there as an error message.
Now get to know the structure and functionality of the application.
Getting to know the tests
Let us first look at the common settings and keywords of the test cases, which can be found in the file src/tests/resource.robot. Its contents are as follows:
*** Settings ***
Library  Browser
Library  ../AppLibrary.py

*** Variables ***
${SERVER}        localhost:5001
${DELAY}         500ms
${HOME_URL}      http://${SERVER}
${LOGIN_URL}     http://${SERVER}/login
${REGISTER_URL}  http://${SERVER}/register
${BROWSER}       chromium
${HEADLESS}      false

*** Keywords ***
Open And Configure Browser
    IF  $HEADLESS == 'true'
        New Browser  browser=${BROWSER}  headless=True
    ELSE
        New Browser  browser=${BROWSER}  headless=False  slowMo=${DELAY}
    END
    New Context
    New Page  about:blank

Login Page Should Be Open
    Get Title  ==  Login

Main Page Should Be Open
    Get Title  ==  Ohtu Application main page

Go To Login Page
    Go To  ${LOGIN_URL}
The contents of the file are similar to the previous exercises. This time,
in addition to the Browser library, the *** Settings *** section also takes into use the project’s own library AppLibrary.py, which defines two keywords needed in the project, Reset Application and Create User.
The *** Keywords *** section also defines a few general-purpose keywords:
Login Page Should Be OpenandMain Page Should Be Open, whose purpose is to check that the user is on the right page. They use the Get Title keyword, which checks the value of the title element of the HTML page. Instead of the value of the title element, we could for example check that a certain text is found on the page by using the Get Text keyword- The
Go To Login Pagekeyword uses the Go To keyword to open the login page in the browser; its URL is stored in theLOGIN_URLvariable
Next, let us look at the test cases themselves by opening the file src/tests/login.robot. The file’s *** Settings *** section is as follows:
*** Settings ***
Resource  resource.robot
Suite Setup     Open And Configure Browser
Suite Teardown  Close Browser
Test Setup      Reset Application Create User And Go To Login Page
In addition to what the tests of the previous exercises used, there is now also Test Setup, which runs the keyword Reset Application Create User And Go To Login Page before each test.
The file’s *** Keywords *** section contains keywords used by the test cases:
- The
Login Should Succeedkeyword checks that the user has moved to the right page after a successful login - The
Login Should Fail With Messagekeyword checks that the user is on the login page and that a certain error message is found on the page. The check uses the Get Text keyword with the operator*=, which checks that the desired text is found on the page - The
Set UsernameandSet Passwordkeywords type the given values into specific fields using the Fill Text and Fill Secret keywords. The fields are found by theiridattribute with the selectorsid=usernameandid=password. Fill Secret works like Fill Text, but it does not write the typed value into the test log. This is why the value is given to it in the form$passwordand not${password} - The ` Reset Application Create User And Go To Login Page` keyword empties the application’s “database”, i.e. the users created there, creates a new user in the application and opens the login page
If needed, review here how the Browser library finds the elements on the page.
Now create a new file home.robot and add the following test cases to it:
*** Settings ***
Resource  resource.robot
Suite Setup     Open And Configure Browser
Suite Teardown  Close Browser
Test Setup      Reset Application And Go To Starting Page

*** Test Cases ***
Click Login Link
    Click  text=Login
    Login Page Should Be Open

Click Register Link
    Click  text=Register new user
    Register Page Should Be Open

*** Keywords ***

Reset Application And Go To Starting Page
  Reset Application
  Go To Starting Page
So the test cases should test that clicking the “Login” and “Register new user” links opens the right page. The links are clicked with the predefined Click keyword, and each link is identified by its text with the selector text=....
Run the tests
Remember that the browser must be installed and the application must be running when you run the tests, see these instructions
The result is most likely an error message telling which keywords are undefined:
Click Register Link                                                   | FAIL |
Setup failed:
No keyword with name 'Go To Starting Page' found.
Implement the undefined keywords used by the test.
NOTE: the idea is that the keyword Go To Starting Page takes the application to the path /, i.e. the start page.
6. WebLogin, part 2
Let us continue implementing acceptance tests for logging in. Before that, let us take a quick look at what the implementation of the AppLibrary library looks like. The class AppLibrary that defines the library is in the file src/AppLibrary.py, whose contents are as follows:
import requests


class AppLibrary:
    def __init__(self):
        self._base_url = "http://localhost:5001"

    def reset_application(self):
        requests.post(f"{self._base_url}/tests/reset")

    def create_user(self, username, password):
        data = {
            "username": username,
            "password": password,
            "password_confirmation": password
        }

        requests.post(f"{self._base_url}/register", data=data)
It is essential that the tests always start from the same state, and in particular that the state of the application’s database is well known at the start of the tests.
The keyword Reset Application, defined by the method reset_application, sends a POST request to the path “/tests/reset” of the application. The request is handled by the following function:
@app.route("/tests/reset", methods=["POST"])
def reset_tests():
    user_repository.delete_all()
    return "Reset"
The function deletes all users of the application and thus resets the state of the application. So this is a way of resetting the database implemented only for the use of the tests.
Similarly, the method create_user sends a POST request to the path “/register” of the application. The function handling the request creates a new user if it is valid:
@app.route("/register", methods=["POST"])
def handle_register():
    username = request.form.get("username")
    password = request.form.get("password")
    password_confirmation = request.form.get("password_confirmation")

    try:
        user_service.create_user(username, password, password_confirmation)
        return redirect_to_welcome()
    except Exception as error:
        flash(str(error))
        return redirect_to_register()
Add the following test case for the user story User can log in with valid username/password-combination to the file login.robot:
Login With Nonexistent Username
# ...
7. WebLogin, part 3
Write the following test cases for the user story A new user account can be created if a proper unused username and a proper password are given in a new file register.robot:
*** Settings ***
Resource  resource.robot
Suite Setup     Open And Configure Browser
Suite Teardown  Close Browser
Test Setup      Reset Application Create User And Go To Register Page

*** Test Cases ***

Register With Valid Username And Password
# ...

Register With Too Short Username And Valid Password
# ...

Register With Valid Username And Too Short Password
# ...

Register With Username That Is Already In Use
#

*** Keywords ***
#...
The username and password follow these rules:
- The username must be a string at least 3 characters long that is not yet in use
- The password must be at least 8 characters long
There are further requirements for the password, but they will be implemented only in exercise 8.
Extend your code so that the tests pass.
The right place for the changes to the code is the method validate of the UserService class in the file src/services/user_service.py.
Pro tips:
- Proceed one test case and the code implementing it at a time
- If needed, review here how the Browser library finds the elements on the page
- Use the login tests as a model!
- Remember this, and especially this from there
Where should keywords be placed?
When writing the registration tests, you will soon notice that you need the same keywords as in the login tests, e.g. the keywords Set Username and Set Password, which are defined in the file login.robot. Keywords can be placed either in the *** Keywords *** section of the test file or in the shared file resource.robot. The rule of thumb is as follows:
- The test file is for keywords that are used only in the tests of that file. E.g.
Login Should SucceedandLogin Should Fail With Messagerelate only to logging in, so they belong in the filelogin.robot. Likewise, registration checks such asRegister Should Succeedbelong in the fileregister.robot. - The file
resource.robotis for keywords that are used in several test files. Examples areOpen And Configure Browser, which initialises the browser, keywords that navigate to a page, such asGo To Login PageandGo To Register Page, and keywords that check the page, such asLogin Page Should Be OpenandRegister Page Should Be Open. Variables shared by all tests, such as the page addresses, also belong here.
When you notice that you need a keyword in a test file that is already defined in another test file, do not copy it; move it to the file resource.robot instead. E.g. if register.robot needs the keywords Set Username and Set Password, move them from the file login.robot to the file resource.robot. Copied keywords drift apart over time, and changes have to be made in many places.
If a keyword with the same name is defined both in a test file and in the file resource.robot, Robot Framework uses the test file’s own definition. This can cause confusing situations, so when you move a keyword to the file resource.robot, remember to remove it from its original place.
8. Agent and acceptance tests [AI]
Note: if you run out of CurreChat tokens, you can get more by sending a message to matti.luukkainen@helsinki.fi or to the user mluukkai on Discord.
Let us continue the series of [AI] exercises that started in exercise 9 of week 2. You can find a summary of the feedback collected from the week 2 exercise here.
If needed, review the chapters What a language model is and Forms of AI-assisted programming of the material AI in software engineering you read last week.
Before doing this exercise, read the chapters Agentic coding, Context management and Requirements as a prompt.
The exercise uses GitHub Copilot in VS CodeOpenCode. You can of course also do the exercise with some other AI-assisted coding tool.
Let us continue with the WebLogin application. Make sure that the changes of exercises 5-7 have been committed before you let the agent touch the code.
Open the directory viikko3/login in VS Code as its own workspace (e.g. with the command code . in the directory viikko3/login), so that the agent focuses only on this project
Open Copilot’s Chat view and select the Agent mode
Start OpenCode in the directory viikko3/login, so that the agent focuses only on this project
Make sure that the Build agent is in use
Generate an instructions file for the project by typing /init in the chat
The agent examines the project and creates the file .github/copilot-instructions.md or AGENTS.mdAGENTS.md.
Read the instructions file carefully and correct or complete it as needed. The file should state at least the following:
- the project is a uv project, and commands are run in the form
uv run ... - how the application is started and which port it runs in
- how the Robot Framework tests are run (
uv run robot src/tests) and that the application must be running during the tests - where the validation of the username and password takes place
Keep the instructions file concise. It is attached to every request given to the agent.
Commit the instructions file
There are two more requirements related to registration that were not implemented in exercise 7:
User story: The password must not consist of letters only

Acceptance criteria:
- the password "kalle123" is accepted
- the password "kalle#abc" is accepted
- the password "kallekalle" is rejected and an error message is shown to the user
- the password "KalleKalle" is rejected and an error message is shown to the user
User story: The password and the password confirmation must match

Acceptance criteria:
- if the password and its confirmation match, registration succeeds
- if the password and its confirmation differ, registration fails and an error message is shown to the user
The requirement of exercise 7 about the minimum length of the password is still in force.
By default OpenCode runs commands without asking, so enable command approval by adding the setting to the file opencode.json. If you created the file in the root of your submission repository in week 2, the setting is already in force
Implement the stories with the agent one at a time. Do the following for each story:
Ask the agent to first write the story’s acceptance criteria as Robot Framework tests in the file register.robot and to make sure that the tests do not pass
Only after this, ask the agent to implement the functionality so that the tests pass
Let the agent run the application and the tests itself. Read every command before you approve it to be run
When the agent is done, run all the tests yourself and make sure that they pass
Go through the change the agent made, e.g. with the command git diff. Did the agent make changes to places it was not asked to touch? Remove the unnecessary code, or ask the agent to remove it
How can you be sure that the tests written by the agent really test the new functionality?
Break the implementation yourself on purpose in at least two different ways, e.g. accept a password consisting of letters only or remove the check of the password confirmation, and after each break make sure that at least one test fails
Restore the working implementation and commit the changes
Write a report of your experiences in the file ai.md in the directory viikko3
In the report, tell
- What kind of instructions file did the agent generate, and what did you have to fix?
- Did the agent follow the request to write the tests before the implementation?
- How much did you have to steer the agent along the way?
- Did the tests fail when you broke the implementation on purpose?
- What new things did you learn?
After doing the exercise, read the chapter Responsibility and expertise of the AI material
9. Retrospective techniques
Get to know the retrospective techniques presented in the mini project instructions.
Write a summary of about 200 words on the topic in the file retro.md in the directory viikko3 of your submission repository.
In your summary, also reflect on what makes a retrospective an event where people dare to bring up problems.
Make sure that your mini project team holds a retrospective at the end of the first sprint!
10. Practising the daily scrum
In this exercise we use an OhtuBot to practise telling about being stuck in a daily scrum. The bot plays your team, and you tell the team about your problem. The bot works in Finnish. The practice is not graded, and it is fine to fail.
Go through at least three simulations with the bot. Try different ways of acting and different blockers in different simulations.
After the simulations, reflect on what a good daily scrum looks like. Write 100–200 words about your reflections in the file daily.md in the directory viikko3 of your submission repository.
Daily Scrum
Start the conversation by telling what the team's way of working is like: turvallinen (safe), vaihteleva (varying) or syyllistävä (blaming).
You have been stuck with your task for two days already, and it is important for you to share this with the team. Pick one of the problems below and tell your team about it in your own words:
- You cannot get the project to start on your machine.
- The task is too abstract, and you do not know how to proceed with it.
- You do not know databases well enough, and you are nervous about making a schema change.
- Come up with a blocker of your own.
Submitting the exercises
Push all the exercises you have done (except those that say the exercise is not submitted anywhere) to your submission repository on GitHub, and mark the exercises you have done in the submission app https://study.cs.helsinki.fi/stats/courses/ohtu-2026
Add a link to the webcounter repository you made for exercises 2-4 in the README.md file of your submission repository.