This English version of the course material has been machine translated from the Finnish original and may contain errors. If something is unclear, check the Finnish version of this page.
Week 7
Typos or unclear instructions in the exercises?
Suggest a fix by editing this file on GitHub.
Submitting the exercises
The exercises are submitted to GitHub and by marking the completed exercises in the submission app https://study.cs.helsinki.fi/stats/courses/ohtu-2026 on the “my submission” tab.
This week’s exercises 3-8 are submitted to the submission repository you have already used in previous weeks, inside the directory viikko7. Exercises 1 and 2 do not need to show up in the submission; it is enough that you do them.
See more detailed instructions on the submission repositories here.
The ticks in the exercise checkboxes are saved in your browser’s local storage.
1. Git: stash [version control]
Exercises 1 and 2 do not need to show up in the submission; it is enough that you do them
Read https://git-scm.com/book/en/v2/Git-Tools-Stashing-and-Cleaning up to the section Creative stashing, or find the corresponding information elsewhere.
Let us assume that you are in a repository that has at least two branches: main and some other one (let us call it experimental here).
While in the main branch, make changes to the files in the branch, some of which you add to the staging area and some of which you do not add yet.
Make sure that the output of the command git status looks roughly like this
$ git status
On branch main
Changes to be committed:
  (use "git restore --staged <file>..." to unstage)
	modified:   src/index.py

Changes not staged for commit:
  (use "git add <file>..." to update what will be committed)
  (use "git restore <file>..." to discard changes in working directory)
	README.md
Your boss orders you to immediately make a couple of changes to the branch experimental. However, you do not want to commit the changes in main yet. If you switch to the branch experimental without committing, you get a terrible mess, since the changes stay as changes in the other branch too. git stash saves you from this situation:
Stash the changes in main
Try the command git status before and after the stash command
Switch to the branch experimental, make some change there and commit it
Return to main
Restore the stashed changes with the command git stash apply
Make sure that the changes came back
As you notice, the change that was already added to the staging area does not return to the staging area, but you have to add it again. If the previous command had been given in the form git stash apply --index, the situation would have been restored completely.
2. Git: “moving” a branch [version control]
Exercises 1 and 2 do not need to show up in the submission; it is enough that you do them
Create a branch called haara in your repo
Make commits to main and haara so that you get the following kind of situation:
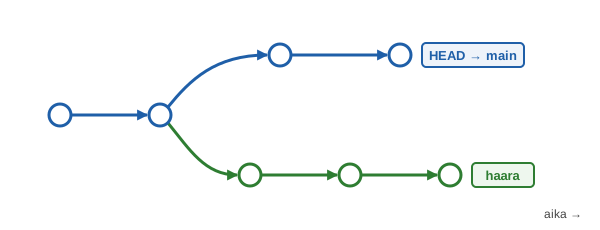
So both main and haara have moved on by a few commits after the branching. Note: with the command gitk --all you can see all branches, try it!
Suddenly you notice that the things you did in main are not very good after all and haara has much better stuff, so you would like haara to become the new main. This works when you go to main and give the command git reset --hard haara
Make sure that the command works correctly
The contents of the old main branch do not disappear either, in case you for some reason want to go back to them. Going back to an old commit works if you know the commit’s id. If not, there are a few ways to find it out.
3. and 4. (a two-checkmark exercise) RPS single and two-player game
In the directory viikko7/kivi-paperi-sakset of the course repository there is a computer version of the familiar game rock-paper-scissors (kivi-paperi-sakset).
Copy the project to your submission repository, inside the directory viikko7.
- The program has three game modes: human vs. human, human vs. simple AI and human vs. complex AI
- The code contains plenty of copy-paste, and in general the original programmer had not yet mastered the principles of object-oriented design
Remove all repetition from the code and make it structurally sound in the spirit of Part 4 of the material
- The method
pelaamust be implemented as a template method - Creating a suitable game object (two-player game, easy single-player game, hard single-player game) must be implemented with a static factory method or a function
- The main program must not have dependencies on the concrete classes implementing the games
If you think you did the exercise following all the style rules, mark 2 checkmarks; if your solution is not elegant in every respect, mark one checkmark.
Tip: one way to get started is to create a superclass KiviPaperiSakset that contains the code common to all three game types:
class KiviPaperiSakset:
    def pelaa(self):
        tuomari = Tuomari()

        ekan_siirto = self._ensimmaisen_siirto()
        tokan_siirto = self._toisen_siirto(ekan_siirto)

        while self._onko_ok_siirto(ekan_siirto) and self._onko_ok_siirto(tokan_siirto):
            # ...

        print("Kiitos!")
        print(tuomari)

    def _ensimmaisen_siirto(self):
        return input("Ensimmäisen pelaajan siirto: ")

    # the implementation of this method varies between game types
    def _toisen_siirto(self, ensimmaisen_siirto):
        raise Exception("Tämä metodi pitää korvata aliluokassa")

    def _onko_ok_siirto(self, siirto):
        return siirto == "k" or siirto == "p" or siirto == "s"
The separate game classes inherit this class and specialise it according to their needs:
# the class inherits the class KiviPaperiSakset
class KPSPelaajaVsPelaaja(KiviPaperiSakset):
    # implement the method according to the game type
    def _toisen_siirto(self, ensimmaisen_siirto):
        tokan_siirto = input("Toisen pelaajan siirto: ")

        return tokan_siirto
NOTE depending on how you do the exercise, you may run into the following error:
ImportError: cannot import name 'KiviPaperiSakset' from partially initialized module 'kivi_paperi_sakset' (most likely due to a circular import) (/Users/mluukkai/opetus/ohtu2022/ohtu-s22-palautukset/viikko7/kivi-paperi-sakset/src/kivi_paperi
In my case the reason was that I imported as follows
In the file kivi_paperi_sakset.py:
from kps_pelaaja_vs_pelaaja import KPSPelaajaVsPelaaja

# ...

class KiviPaperiSakset:
    # ...

# factory function, needs imports
def luo_peli(tyyppi):
    if tyyppi == 'a':
        return KPSPelaajaVsPelaaja()
    if tyyppi == 'b':
        return KPSTekoaly()
    if tyyppi == 'c':
        return KPSParempiTekoaly()

    return None
and in the file kps_pelaaja_vs_pelaaja.py:
from kivi_paperi_sakset import KiviPaperiSakset


class KPSPelaajaVsPelaaja(KiviPaperiSakset):
    # ...
The two files ended up importing each other, i.e. a circular import was created, which Python cannot handle. I solved the problem by defining the factory function luo_peli in its own file.
5. Web user interface with an agent [AI]
Note: the OpenCode versions of the exercises have not been tested as thoroughly as the Copilot versions. If you find errors or unclear parts in the instructions, please report them, see Typos or unclear instructions in the exercises?
Note: if you run out of CurreChat tokens, you can get more by sending a message to matti.luukkainen@helsinki.fi or to the user mluukkai on Discord.
By default, OpenCode runs commands and edits files without asking for permission. Before you start, make sure that command approval is enabled, i.e. that the file opencode.json containing the setting is either in the project directory or in one of its parent directories, e.g. in the root of your submission repository
Let us make a web user interface for the rock-paper-scissors game of the previous exercise with the help of an agent.
In your submission repository, make a copy of the project directory called kivi-paperi-sakset-original, so that the state after the previous exercise is preserved, and commit
Open the directory viikko7/kivi-paperi-sakset in VS Code as its own workspaceStart OpenCode in the directory viikko7/kivi-paperi-sakset and create an instructions file for the project, AGENTS.md, e.g. with the command /init. Write at least the following in the instructions file:
- this is a uv project
- the existing code must be reused as much as possible, and the game logic must not be reimplemented
- if you are using a Mac, the application must not use port 5000, which is reserved on Macs
Let us build the application in a few phases. Commit after each phase, so that you can go back to the previous working state if needed.
Implement a web user interface for the application with the help of the agent. You can either plan the implementation first in Plan modewith the Plan agent like in week 6 or give the task directly in Agent mode (if Plan is missing from the menu, see this)to the Build agent
Ask the agent to write tests for the application with Robot Framework. Make sure that you can also run the tests yourself.
Ask the agent to change the game so that it ends when either side has reached five wins
Make one more change of your choice to the game with the help of the agent
Change the code without the help of the agent so that the game ends only when one player has at least three wins and a lead of two wins.
Ask the agent to fix the tests and extend them to take the new ending logic into account
Go through the code and the tests made by the agent. If there is something in the code that is unfamiliar to you, ask the agent to explain what it is about
Let us also review the code with the help of a reusable prompt file (in OpenCode a command).
Before continuing, read the introduction of the week 7 section Extending and customising the agent of the material AI in software engineering and the chapter Prompt files and custom agents.
Create the file .github/prompts/katselmointi.prompt.md.opencode/commands/katselmointi.md in the project, which instructs the agent to review the project’s code and report its findings. The review must look at at least the following:
- the design principles of Part 4, especially repetition and unnecessary dependencies
- the coverage and quality of the tests
- security, e.g. whether the application is started with the setting
debug=True, whether the code has hard-coded secrets and whether user input is validated
Agents easily take shortcuts: “review” is interpreted as reviewing only the latest changes, only some of the files are read, or the work is delegated to a subagent that is given a narrower task than the original. So also write the way of working and the format of the report into the prompt file:
- the review covers the whole project and must not be limited to git diff, i.e. the latest changes
- the agent first makes a list of all source code and test files of the project and goes through each one
- the agent does the review itself and does not delegate it to a subagent
- the agent does not change files during the review
- each aspect is handled in its own section, and if nothing worth remarking is found for some aspect, this is stated with a justification
- for each finding, the file and lines and a suggested fix are given
- at the end of the report, all files that were gone through are listed
Notes on using the prompt file:
- VS Code looks for prompt files in the directory .github/prompts at the root of the workspace, so the file must be created in the directory viikko7/kivi-paperi-sakset/.github/prompts, and VS Code must have the project directory open
- prompt files only work in VS Code’s Local harness (see this). In other harnesses, such as Copilot, the prompt file is not loaded, and the command does not do what the file asks
Select Local as the harness at the bottom of the Chat view and run the review in the chat with the command /katselmointi
Add a header to the beginning of the command file that defines the command’s description and runs the command with the Plan agent. This way the agent cannot change files during the review:
---
description: Reviews the code of the whole project
agent: plan
---

Review the project's code ...
Run the review with the command /katselmointi
Check whether the agent followed the instructions of the prompt file: did it go through all the files, and is the report in the requested format (you can ask the agent about this). If not, ask the agent to improve the prompt file if needed and to do a new review.
Fix (yourself or with the agent) at least one finding of the review and commit
Write a report on your experiences into a file agent.md stored in the directory viikko7
In the report, tell
- Did the agent arrive at a working solution, and how did you make sure of it?
- How much did you have to steer the agent along the way?
- How good were the tests made by the agent?
- Is the code made by the agent understandable, and how did the agent change the code you made in the previous exercise?
- Was it easy to make the change yourself?
- Did the agent follow the instructions of the prompt file? How did you make sure of it, and did the prompt file need to be changed?
- What did the review find, and were the findings justified?
- What new things did you learn?
6. MCP and skills [AI]
Note: the OpenCode versions of the exercises have not been tested as thoroughly as the Copilot versions. If you find errors or unclear parts in the instructions, please report them, see Typos or unclear instructions in the exercises?
Note: if you run out of CurreChat tokens, you can get more by sending a message to matti.luukkainen@helsinki.fi or to the user mluukkai on Discord.
By default, OpenCode runs commands and edits files without asking for permission. Before you start, make sure that command approval is enabled, i.e. that the file opencode.json containing the setting is either in the project directory or in one of its parent directories, e.g. in the root of your submission repository
An agent can only work with the tools it has available. VS Code’s agentOpenCode’s Build agent can read and edit files and run commands in the terminal, but it cannot, for example, see what the web user interface made in the previous exercise looks like in a browser. MCP (Model Context Protocol) is an open standard that allows new tools to be added to an agent as MCP servers.
Before starting, read the chapter MCP, the Model Context Protocol of the material.
The exercise has two parts:
- we take into use a ready-made MCP server that lets the agent use a browser and test the web user interface made in the previous exercise
- we save the instructions for testing the user interface as skills, so that from then on the agent can test the user interface on its own
In the next exercise we will also implement our own MCP server.
Using a ready-made server
Playwright is a browser automation tool that can be used to programmatically open web pages, click on them and fill in forms. The Playwright MCP server offers these operations as tools for the agent, i.e. it lets the agent use a browser like a human. Using the server requires that Node.js (version 18 or newer) is installed on your machine.
Installing Node.js
First check whether Node.js is already installed with the command
node --version. If the command prints version 18 or newer, you can continue. Note that robotframework-browser-batteries from the Robot Framework exercises of week 3 contains its own Node.js, which is not available from the command line, so you probably have to install Node.js separately.
- Mac: install it with Homebrew using the command
brew install nodeor download the installer (version LTS) from https://nodejs.org/- Windows: download the installer (version LTS) from https://nodejs.org/ or install it with the command
winget install OpenJS.NodeJS.LTS- Linux: the Node.js version in the distributions’ package managers is often old, so preferably install it with nvm: first install nvm following its instructions and then Node.js with the command
nvm install --ltsThe installation also includes the command
npx, which VS CodeOpenCode uses to start the server. Restart VS Codethe terminal after the installation so that it finds the commands.
VS Code reads the MCP server definitions (file .vscode/mcp.json) and skills (directory .github/skills) from the root of the workspace, just like prompt files. So keep working with the directory viikko7/kivi-paperi-sakset open in VS Code.
Add the file .vscode/mcp.json to the project of the previous exercise to take Playwright MCP into use:
{
  "servers": {
    "playwright": {
      "type": "stdio",
      "command": "npx",
      "args": ["-y", "@playwright/mcp@latest", "--browser", "chromium"]
    }
  }
}
The option -y accepts the package download automatically, and --browser chromium sets Playwright’s own Chromium as the browser to use.
Start the server by clicking the Start link shown above the server name "playwright" in the file, and check from the chat’s tools menu (Configure Tools, the tool icon in the bar below the input field) that the server’s tools are available to the agent
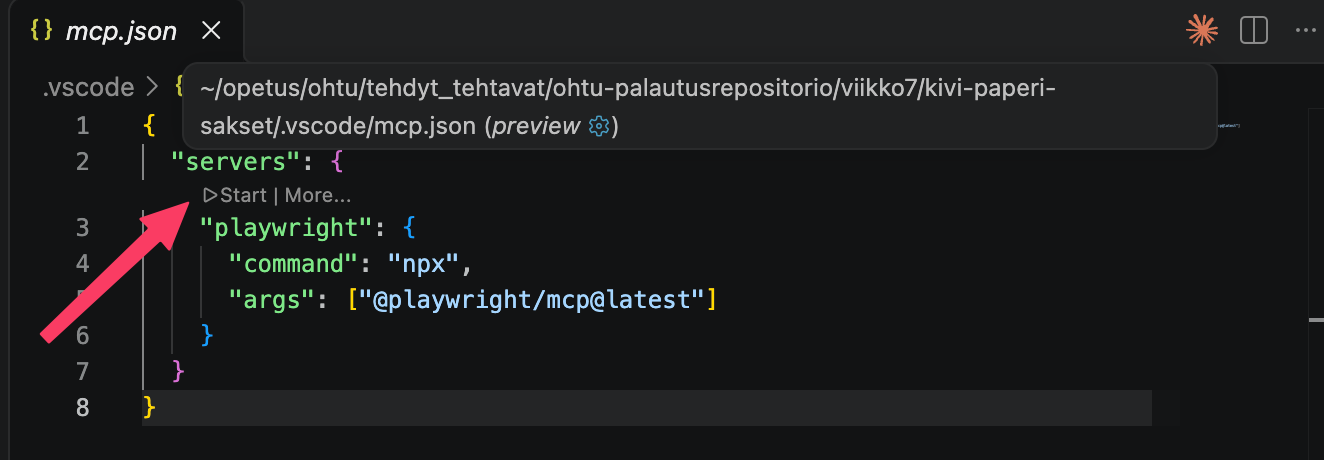
If the server does not start
You can see the server’s logs by selecting More… next to the Start link and then Show Output. The most common cause of problems is that VS Code does not find the command
npx. This happens especially if Node.js has been installed with nvm.Background: when a command such as
npxis given without a path, the operating system looks for it in the directories listed in the environment variablePATH.PATHis a list of directories separated by colons (semicolons on Windows), and you can see its value in the terminal with the commandecho $PATH. Every program inherits its environment variables from the program that started it. The terminal’sPATHis formed when the shell reads its initialisation files at startup, e.g. ~/.zshrc or ~/.bashrc. For example, nvm adds the Node.js directory toPATHprecisely in an initialisation file, sonpxis found in the terminal. However, VS Code and the MCP servers it starts do not necessarily get the samePATH, in which casenpxis not found.The problem is fixed by writing the full path of
npxinto the configuration. Find out the path in the terminal with the commandwhich npx(on Windowswhere npx). Sincenpxalso needs the commandnodeand other commands, also add anenvsection that definesPATH. Copy its value from the output of the commandecho $PATHin the terminal (in Windows PowerShell$env:PATH). Note that thePATHin theenvsection replaces the wholePATH, so it must also include the system’s own directories, such as /usr/bin and /bin. For example, on a Mac using nvm the configuration may look like this:{ "servers": { "playwright": { "type": "stdio", "command": "/Users/kayttaja/.nvm/versions/node/v24.21.0/bin/npx", "args": ["-y", "@playwright/mcp@latest", "--browser", "chromium"], "env": { "PATH": "/Users/kayttaja/.nvm/versions/node/v24.21.0/bin:/usr/local/bin:/opt/homebrew/bin:/usr/bin:/bin:/usr/sbin:/sbin" } } } }The
PATHin the example contains nvm’s Node.js directory, Homebrew’s directories (/usr/local/bin and /opt/homebrew/bin) and the macOS system directories. Replace the paths with your own. If the server starts but the browser does not open, install Playwright’s Chromium with the commandnpx playwright install chromium.
OpenCode reads the MCP server definitions from the file opencode.json at the root of the project and skills from the directory .opencode/skills. So keep working with OpenCode started in the directory viikko7/kivi-paperi-sakset.
Add the file opencode.json to the root of the project of the previous exercise to take Playwright MCP into use. If the file already exists, e.g. because of command approval, add the mcp section inside it:
{
  "$schema": "https://opencode.ai/config.json",
  "mcp": {
    "playwright": {
      "type": "local",
      "command": ["npx", "-y", "@playwright/mcp@latest", "--browser", "chromium"],
      "enabled": true
    }
  }
}
The option -y accepts the package download automatically, and --browser chromium sets Playwright’s own Chromium as the browser to use.
Restart OpenCode, since it starts the servers when it starts. Make sure in the terminal with the command opencode mcp list that the server is running
If the server does not start
The most common cause of problems is that OpenCode does not find the command
npx. This happens especially if Node.js has been installed with nvm.Background: when a command such as
npxis given without a path, the operating system looks for it in the directories listed in the environment variablePATH.PATHis a list of directories separated by colons (semicolons on Windows), and you can see its value in the terminal with the commandecho $PATH. Every program inherits its environment variables from the program that started it. The terminal’sPATHis formed when the shell reads its initialisation files at startup, e.g. ~/.zshrc or ~/.bashrc. For example, nvm adds the Node.js directory toPATHprecisely in an initialisation file. If OpenCode is started from somewhere other than such a terminal, it does not necessarily get the samePATH, in which casenpxis not found.The problem is fixed by writing the full path of
npxin thecommandsection. Find out the path in the terminal with the commandwhich npx(on Windowswhere npx). Sincenpxalso needs the commandnodeand other commands, also add anenvironmentsection that definesPATH. Copy its value from the output of the commandecho $PATHin the terminal (in Windows PowerShell$env:PATH). Note that thePATHin theenvironmentsection replaces the wholePATH, so it must also include the system’s own directories, such as /usr/bin and /bin. For example, on a Mac using nvm the definition may look like this:"playwright": { "type": "local", "command": ["/Users/kayttaja/.nvm/versions/node/v24.21.0/bin/npx", "-y", "@playwright/mcp@latest", "--browser", "chromium"], "environment": { "PATH": "/Users/kayttaja/.nvm/versions/node/v24.21.0/bin:/usr/local/bin:/opt/homebrew/bin:/usr/bin:/bin:/usr/sbin:/sbin" }, "enabled": true }Replace the paths with your own. If the server starts but the browser does not open, install Playwright’s Chromium with the command
npx playwright install chromium.
Start the rock-paper-scissors application and ask the agent to play one game in each game mode with the browser and to report whether the user interface works as expected
Follow what the agent does in the browser. Did the agent find problems in the user interface?
Skills for testing the user interface
Above, the agent had to be told separately that the user interface is tested with a browser and what should be checked. If the testing is to be done after every user interface change, repeating the instructions every time is laborious. The instructions could be written in the instructions file, but then they would be in the agent’s context in every request, even when they are not needed.
Skills solve this: at first the agent only sees the skill’s description and loads the full instructions into its context only when the task at hand matches the description.
Before continuing, read the chapter Skills of the material. Let us save the instructions for testing the user interface as a skill.
Create the file .github/skills/ui-testaus/SKILL.md.opencode/skills/ui-testaus/SKILL.md in the project, which instructs the agent to test the application’s user interface with a browser
The file begins with a YAML header that defines the skill’s name (name) and description (description). The name must be the same as the name of the skill’s directory, here ui-testaus. The header is followed by the instructions themselves as ordinary Markdown:
---
name: ui-testaus
description: 'Tests the web user interface of the application with a browser. Use when the user interface has been changed or when asked to test the user interface.'
---
1. Start the application with the command ...
2. ...
The description is the most important part of a skill, since at first the agent sees only it and decides based on it when the skill is used. So the description should tell both what the skill does and in which situations it should be used.
Write in the instructions at least
- how the application is started and on which port it runs
- that the testing is done with a browser using Playwright MCP
- which game modes and situations are tested, e.g. the game ending with a lead of two wins and invalid input
- how the agent should report the results, e.g. a list of the tested situations and their outcomes
Make sure that VS Code finds the skill. Type the command /skills in the chat; it lists the skills available to the agent:
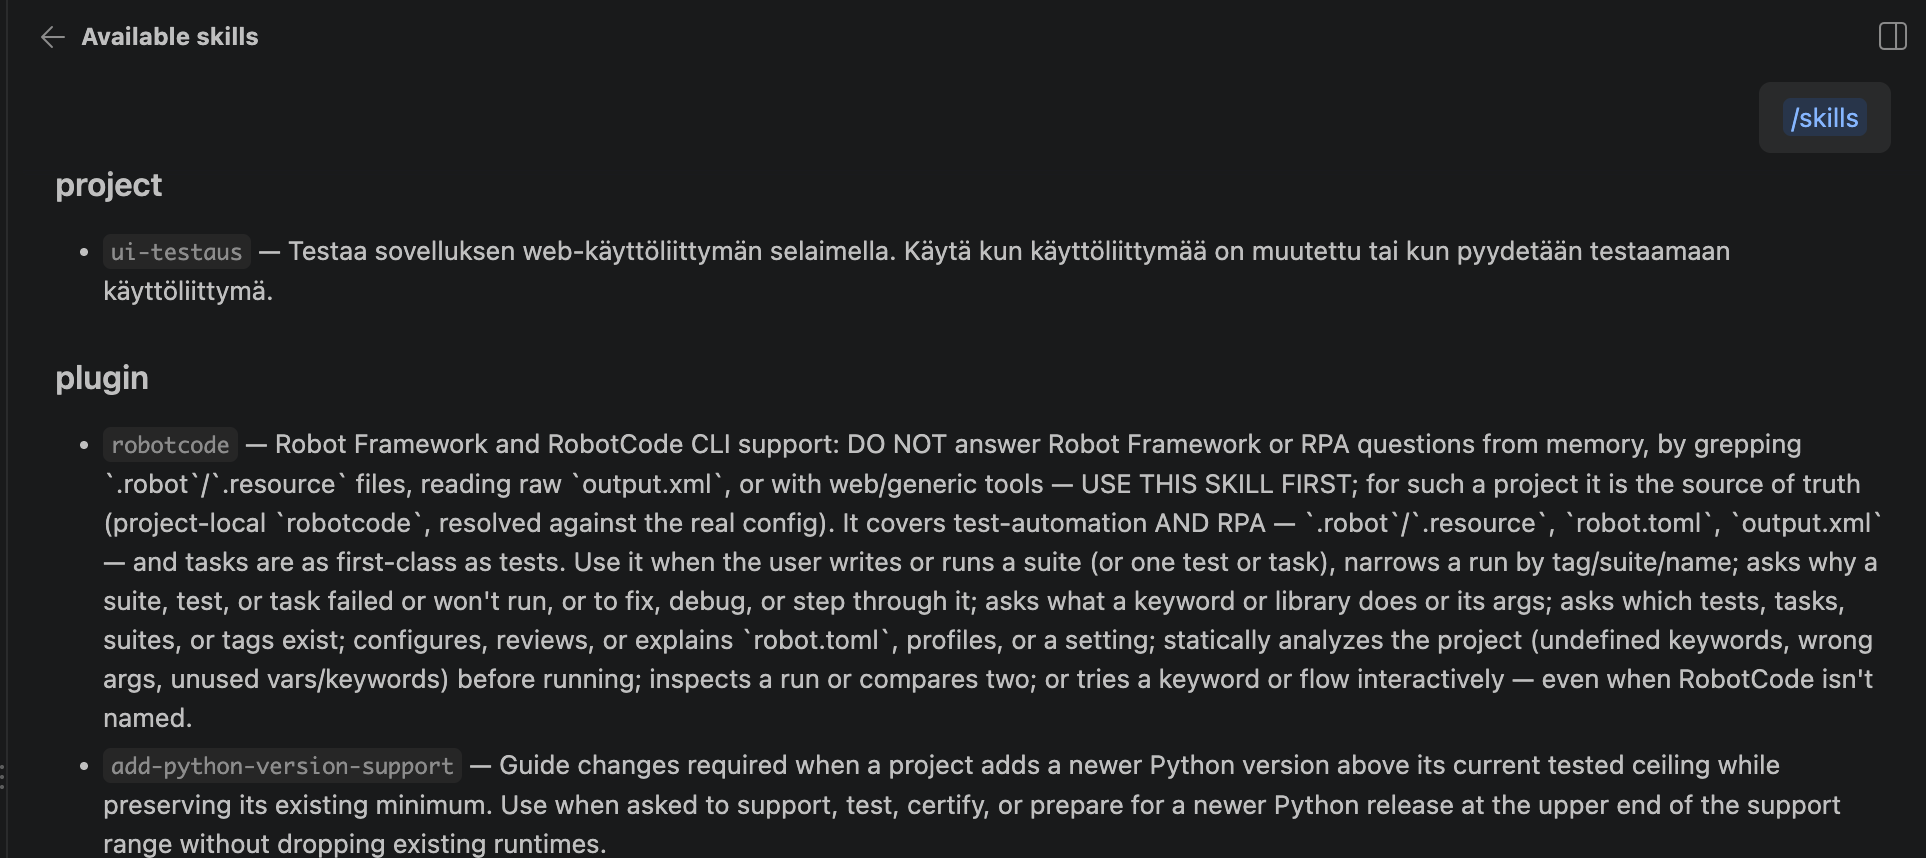
The project’s own skills are shown under the heading project. Under the heading plugin are the skills that come with VS Code’s extensions, so your list may look different from the one in the picture. If the skill is not found, check the location and name of the file and that name in the header matches the name of the directory.
Make sure that OpenCode finds the skill. OpenCode has no /skills command, so ask the agent which skills it has available. If the skill is not found, check the location and name of the file and that name in the header matches the name of the directory.
Start a new chat conversationconversation with the command /new and ask the agent e.g. to check whether the application’s user interface works, without mentioning the skill. Check from the steps in the chatthe conversation whether the agent loaded the skill (loading a skill shows up as a call of the skill tool). If it did not, improve the description and try again
You can also start a skill yourself by typing / and the name of the skill in the chat. Try the command /ui-testaus
You can also start a skill yourself by typing / and the name of the skill. In OpenCode this requires that the following is added to the skill’s header:
metadata:
  opencode/slash: "true"
Add the definition and try the command /ui-testaus
Make some small change to the user interface and ask the agent to make sure that the application still works. Does the agent use the skill?
Commit the changes
Write a report on your experiences into a file mcp.md stored in the directory viikko7
In the report, tell
- How did using the Playwright MCP server go, and did the agent find problems with the browser?
- Did the agent take the skill into use without a separate request? How did the wording of the description affect this?
- When would you use a skill, when a prompt file and when an instructions file?
7. Your own MCP server [AI]
Note: the OpenCode versions of the exercises have not been tested as thoroughly as the Copilot versions. If you find errors or unclear parts in the instructions, please report them, see Typos or unclear instructions in the exercises?
Note: if you run out of CurreChat tokens, you can get more by sending a message to matti.luukkainen@helsinki.fi or to the user mluukkai on Discord.
By default, OpenCode runs commands and edits files without asking for permission. Before you start, make sure that command approval is enabled, i.e. that the file opencode.json containing the setting is either in the project directory or in one of its parent directories, e.g. in the root of your submission repository
Before starting, read the chapter Your own MCP server of the material.
In addition to ready-made servers, you can also implement an MCP server yourself. This way you can give the agent access to e.g. the functionality of your own application or a company’s internal data. Let us implement our own MCP server that lets the agent make queries on NHL statistics using the code of week 6.
The server is an ordinary Python program whose functions are marked with the decorator @mcp.tool(). From the type definitions and docstrings of the functions, the MCP library forms descriptions of the tools, based on which the agent decides when and how the tools are called. VS CodeOpenCode starts the server in the background, and the agent communicates with it through standard input and output.
Copy the week 6 project query-language to your submission repository inside the directory viikko7 and open it in VS Code as its own workspace
Add the MCP library to the project with the command uv add "mcp[cli]"
Create the file src/mcp_server.py; you can use the following as its basis:
from mcp.server import MCPServer
from statistics import Statistics
from player_reader import PlayerReader

URL = "https://studies.cs.helsinki.fi/nhlstats/2024-25/players.txt"
stats = Statistics(PlayerReader(URL))

mcp = MCPServer("NHL-tilastot")


@mcp.tool()
def top_scorers(how_many: int) -> list[str]:
    """Return the players with the most points in the NHL 2024-25 season."""
    return [str(player) for player in stats.top_scorers(how_many)]


if __name__ == "__main__":
    mcp.run()
Note: the MCP library is evolving quickly. If the import above does not work, you have an older version of the library, in which the server class is FastMCP and it is imported with from mcp.server.fastmcp import FastMCP.
MCP Inspector is a browser-based tool for testing an MCP server without an agent. With the Inspector you can call the server’s tools by hand and see what the server offers to the agent: the names, descriptions and parameters of the tools.
Start the Inspector in the project directory with the command
npx @modelcontextprotocol/inspector uv run python src/mcp_server.py
The command starts the Inspector and opens it in the browser at an address of the form http://127.0.0.1:6274/?MCP_INSPECTOR_API_TOKEN=.... The token at the end of the address protects the Inspector so that other programs running on the machine cannot use it. If the browser does not open by itself, copy the address with the token from the terminal.
Connect the Inspector to the server
The Inspector opens on the Servers tab, which shows the server uv defined based on the start command. Connect to the server with the switch in the top right corner of the card, after which the card says Connected:
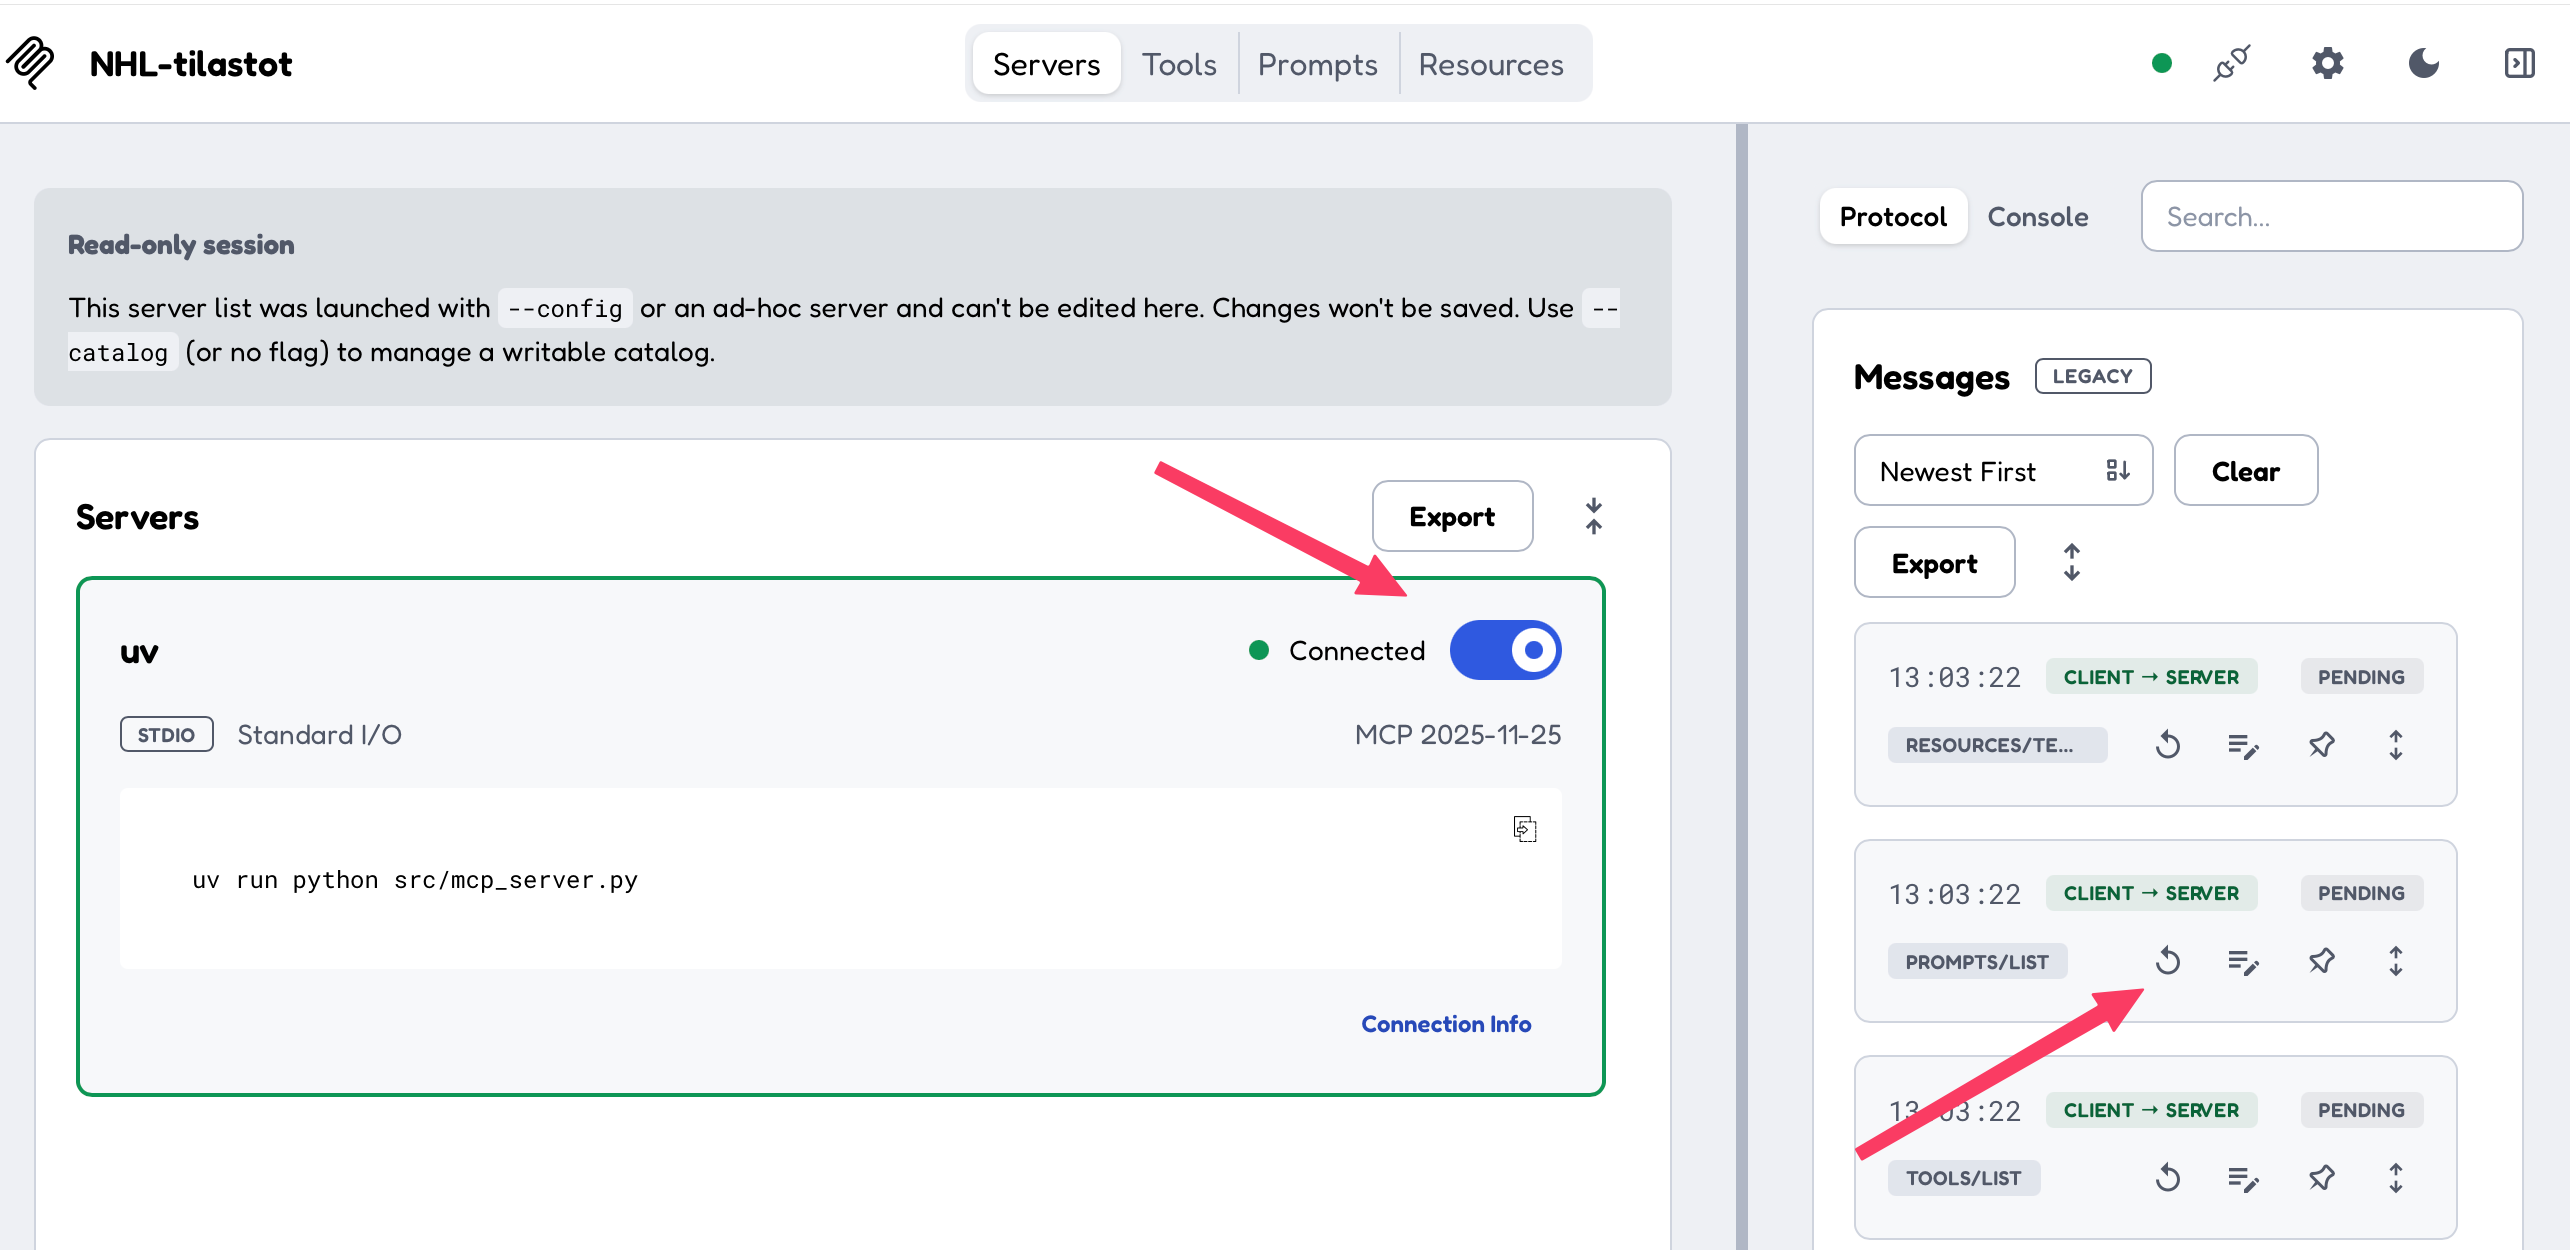
On the right edge, on the Protocol tab, you can see the JSON-RPC messages between the Inspector and the server. For example, the message tools/list is a request with which the client asks the server for the tools it offers. VS CodeOpenCode and the server exchange the same messages when the agent uses the server.
If the status of the messages stays PENDING and no tools appear on the Tools tab, send the message tools/list again from the ↻ icon of its card (the lower arrow in the picture).
Test the tool top_scorers
Go to the Tools tab and select top_scorers from the list. On the right, the tool’s description, i.e. the function’s docstring, opens along with a field for the parameter How Many. Give the parameter a value and press Execute Tool, and the result returned by the tool is shown below:
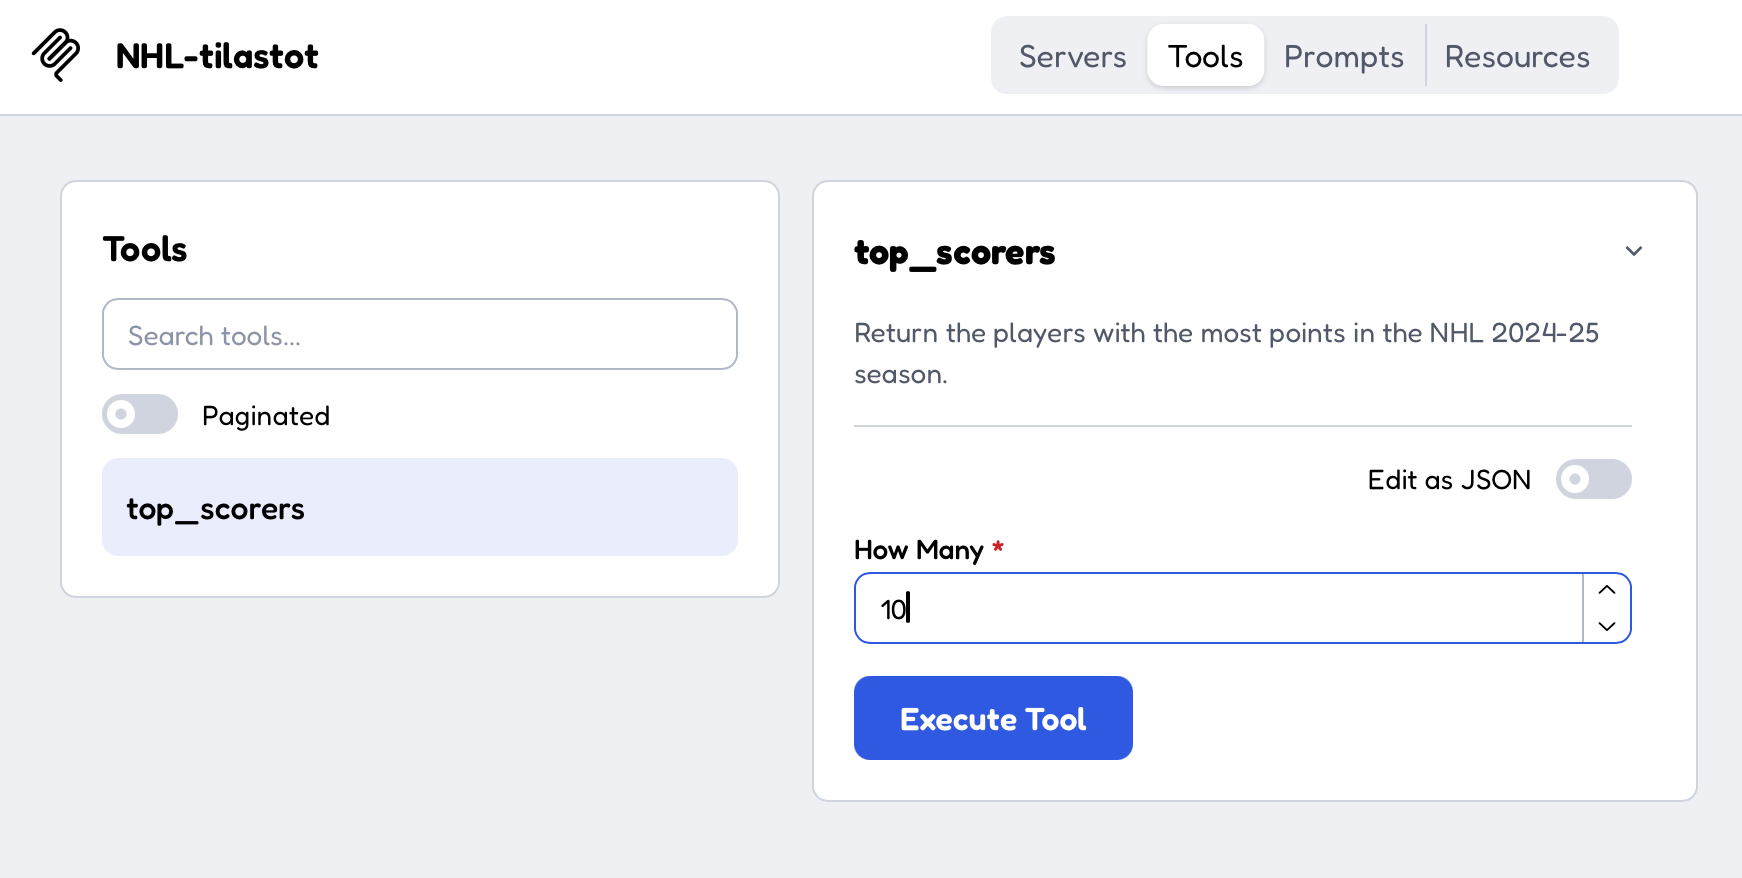
The description and the parameters are exactly the information based on which the agent decides when and how the tool is used.
If the server does not start or connecting fails, you can see the error message on the Console tab on the right edge. Typical causes are an error in the Python code or running the command in the wrong directory.
Remember that the server must not print anything to standard output, e.g. with an ordinary print command, since the output messes up the communication between the server and the Inspector. Printing to the standard error stream (print(..., file=sys.stderr)) is allowed, however.
Add at least the following tools to the server:
team_players, which returns the players of the given teamquery_players, which returns the result of a query given as a string, using theparsefunction of week 6 exercise 7. If you did not do exercise 7, you can implement the tool e.g. so that it is given a team and the minimum numbers of goals and assists, and the query is formed with theQueryBuilderclass
You can implement the tools yourself or with the agent, but make sure that you understand the server’s code. Write descriptive docstrings for the tools, since the agent decides based on them when and how the tools are used. Also write the syntax of the query language in the tool descriptions.
Register the server in VS Code by adding the file .vscode/mcp.json to the project:
{
  "servers": {
    "nhl": {
      "type": "stdio",
      "command": "uv",
      "args": ["run", "--directory", "${workspaceFolder}", "python", "src/mcp_server.py"]
    }
  }
}
If the server does not start because VS Code does not find the command uv, do as with the Playwright server in the previous exercise, i.e. write the full path of uv (which uv) into the configuration.
Register the server in OpenCode by adding it to the project’s file opencode.json (create the file if it does not exist yet):
{
  "$schema": "https://opencode.ai/config.json",
  "mcp": {
    "nhl": {
      "type": "local",
      "command": ["uv", "run", "python", "src/mcp_server.py"],
      "enabled": true
    }
  }
}
If the server does not start because OpenCode does not find the command uv, do as with the Playwright server in the previous exercise, i.e. write the full path of uv (which uv) into the configuration.
Start the server by starting OpenCode in the project directory and ask the agent questions in natural language for which it needs your server’s tools, e.g. “Which NYR players have at least 10 goals but fewer than 20 goals?” or “Which Edmonton player scored the most points?”
Follow which tools the agent calls and with which parameters
The tool calls made by the agent are shown in the chat among the steps of the agent’s response, e.g. query_players – nhl (MCP Server). By opening a tool call you can see what the server returned (Output). However, the parameters of the call are not necessarily shown under Input, which may contain only the name of the server and the tool.
You can make the parameters visible by adding logging to the server.
The tool calls made by the agent are shown in the conversation along with their parameters. Let us still add logging to the server, which shows the calls the server receives regardless of the agent.
Since the server must not print to standard output, let us write the log to a file:
from pathlib import Path

LOG_FILE = Path(__file__).parent.parent / "mcp.log"

def log(message: str):
    with open(LOG_FILE, "a", encoding="utf-8") as f:
        print(message, file=f)

@mcp.tool()
def team_players(team: str) -> list[str]:
    """..."""
    log(f"team_players(team={team!r})")
    # ...
The log is written to the file mcp.log in the project’s root directory. Also add the file to .gitignore.
The most convenient way to follow the log is in a separate terminal with the command
tail -f mcp.log
which shows the lines written to the file as they appear. In Windows PowerShell the corresponding command is Get-Content mcp.log -Wait.
Try how changing the docstrings affects the agent’s behaviour. The server has to be restarted after changes, e.g. with the Restart link shown above the server name in the file .vscode/mcp.jsoni.e. restart OpenCode
Write a report on your experiences into a file oma_mcp.md stored in the directory viikko7
In the report, tell
- Was the agent able to use the tools of your own server correctly?
- How did the docstrings affect the agent’s behaviour?
- What risks would be involved in a server that could also change data, or that fetched data from untrusted sources?
8. AI and me [AI]
Before doing the exercise, read the last chapter Conclusion of the material AI in software engineering, which brings together risks related to using AI and research on the effects of AI on software engineering.
Write a reflection of about one page (about 500 words) on using AI in software development into a file reflektio.md stored in the directory viikko7
In your text, reflect on at least the following:
- How did your use of AI change during the course?
- Where did AI help the most, and where was it a hindrance?
- Which of the software engineering practices learned on the course do you think are the most important when using agents?
- What kind of ground rules for using AI would you agree on with your mini project team, or at your future workplace?
- How did the use of AI affect how much you discussed the code and the solutions with your team?
9. Course feedback
Give course feedback at https://norppa.helsinki.fi/targets/112400522/feedback. You can also give the feedback after the exam. The checkmark for this exercise is a promise that you will give feedback at some point. Feedback can be given between 9 and 26 December 2026.
NOTE if you go to the feedback address before the start date of the final feedback, you will see the course’s “continuous feedback” form. This exercise, however, refers to the normal final feedback that opens on 9 December.
Submitting the exercises
Push all the exercises you have done (except those that say the exercise is not submitted anywhere) to your submission repository on GitHub, and mark the exercises you have done in the submission app https://study.cs.helsinki.fi/stats/courses/ohtu-2026