This English version of the course material has been machine translated from the Finnish original and may contain errors. If something is unclear, check the Finnish version of this page.
Week 1
The deadline for the exercises below is Monday 2.11. at 23:59
You can get help with the exercises on the course Discord channel and on campus in the help sessions (paja) in BK107:
- Mon 16–19
- Tue 13–16
- Thu 16–19
- Fri 13–16
You can join the course Discord channel with the command /join course TKT20006 - Ohjelmistotuotanto - ohtu
Also remember this week’s multiple choice quizzes, whose deadline is Sunday 1.11. at 23:59:00.
This week’s exercises first practise the use of a few important software development tools (the command line, version control, dependency management, automated testing, continuous integration).
At the end of the exercises you will practise dependency injection, a fairly simple but extremely useful technique that can be used to improve the testability of applications.
Pre-course survey
Before you start the exercises, please answer the course’s pre-course survey at https://norppa.helsinki.fi/targets/121576179/feedback
Typos or unclear instructions in the exercises?
Suggest a fix by editing this file on GitHub.
Course feedback
In addition to the usual feedback collected at the end, the course uses so-called continuous feedback: you can give anonymous feedback to the course staff at any time at https://norppa.helsinki.fi/targets/112400522/feedback
Submitting the exercises
The exercises are submitted to GitHub, and by marking the completed exercises in the submission app https://study.cs.helsinki.fi/stats/courses/ohtu-2026 on the “my submission” tab. The week’s exercises are submitted all at once, so only make the entry in the submission app when you are done with the week’s exercises.
In practice, this week you will create two separate GitHub repositories for the submissions:
- the first one (called ohtuvarasto) for exercises 2-13 and
- the second one for exercises 14-17 (we call this the submission repository)
The latter of the repositories (the one where exercises 14-17 are submitted) is also used as the submission repository for the exercises of the other weeks.
If you don’t yet know what GitHub and a repository are, you will soon learn.
Exercises 0 and 1 are not acually submitted anywhere. Exercise 0 is also not counted as an acual exercise; doing it does not affect your exercise points.
Checkboxes for tracking your progress in the exercises
The exercise descriptions of the course are sometimes long, and it can be hard to spot the steps that require you to do something. To make the exercises clearer and easier to follow, the steps that require action are marked with checkboxes instead of bullet points.
You can use the checkboxes to keep track of your progress. When you have done a step, tick its box. This way you will not lose track of where you are. The ticks are saved in your browser’s local storage (localStorage), so they are kept even if you reload the page. The ticks do not move to another computer or browser, and they are not sent anywhere.
0. Orientation
Now read once more what is said about submitting the exercises. So this week the exercises are submitted to two repositories…
1. Command line
This exercise is not submitted anywhere
Despite the existence of graphical user interfaces, mastering the command line, i.e. the terminal, is still extremely important in the software industry. In fact, the importance of the command line is even on the rise.
Make sure that you can use the command line “well enough” (see the list below).
If there are gaps in your skills, revise from a resource of your choice. A few examples:
- The command line material of the course Tietokone työvälineenä: komentorivimateriaali (in Finnish)
- Parts 2. Navigating Files and Directories and 3. Working With Files and Directories of Software Carpentry’s The Unix Shell guide. These parts cover almost everything listed below, and they have plenty of exercises. The guide’s setup instructions also help Windows users
- Ubuntu’s The Linux command line for beginners tutorial, a practical introduction that takes about an hour
- Generate material with AI, see the hint at the end of the exercise
If you already know the basics and want to deepen your skills, have a look at the first lecture Course Overview + Introduction to the Shell of MIT’s The Missing Semester of Your CS Education course. You can also practise using the command line in a game-like way with the first levels of the OverTheWire Bandit challenge series.
After this exercise you should master the following:
- Concepts
- Root directory
- Home directory
- Parent directory
- Child directory
- Working directory
..,~and*
- And be able to use the commands
pwdcdls,ls -a,ls -l,ls -tmkdirtouchcprm,rm -rmv
You will need command line skills on this course and elsewhere in your studies.
The exercise is not submitted in any way. You can mark the exercise as done once you master the things listed above.
Hint: using AI in the exercise
The topic of the exercise is making sure that you have sufficient command line skills. The exercise links to a few materials. Instead of going through them, you can ask an AI, e.g. CurreChat or Copilot Chat, for suitable learning material on the topic. Let’s take part of the exercise description and formulate a suitable prompt:

The AI creates the learning material:

You can also ask the AI to generate exercises on the topic:

The hints attached to the questions may spoil a bit too much. You can of course ask the AI to remove the hints.
You can of course also give your own answers to the AI to check. As always, when generating learning material and exercises it is possible that the AI hallucinates and says whatever. When asking about a topic such as the Linux command line, the probability of hallucination is not very high, and e.g. hallucinated incorrect forms of commands are quickly revealed when you try them out.
2. To GitHub [version control]
If for some reason you don’t yet have a GitHub account, create one now.
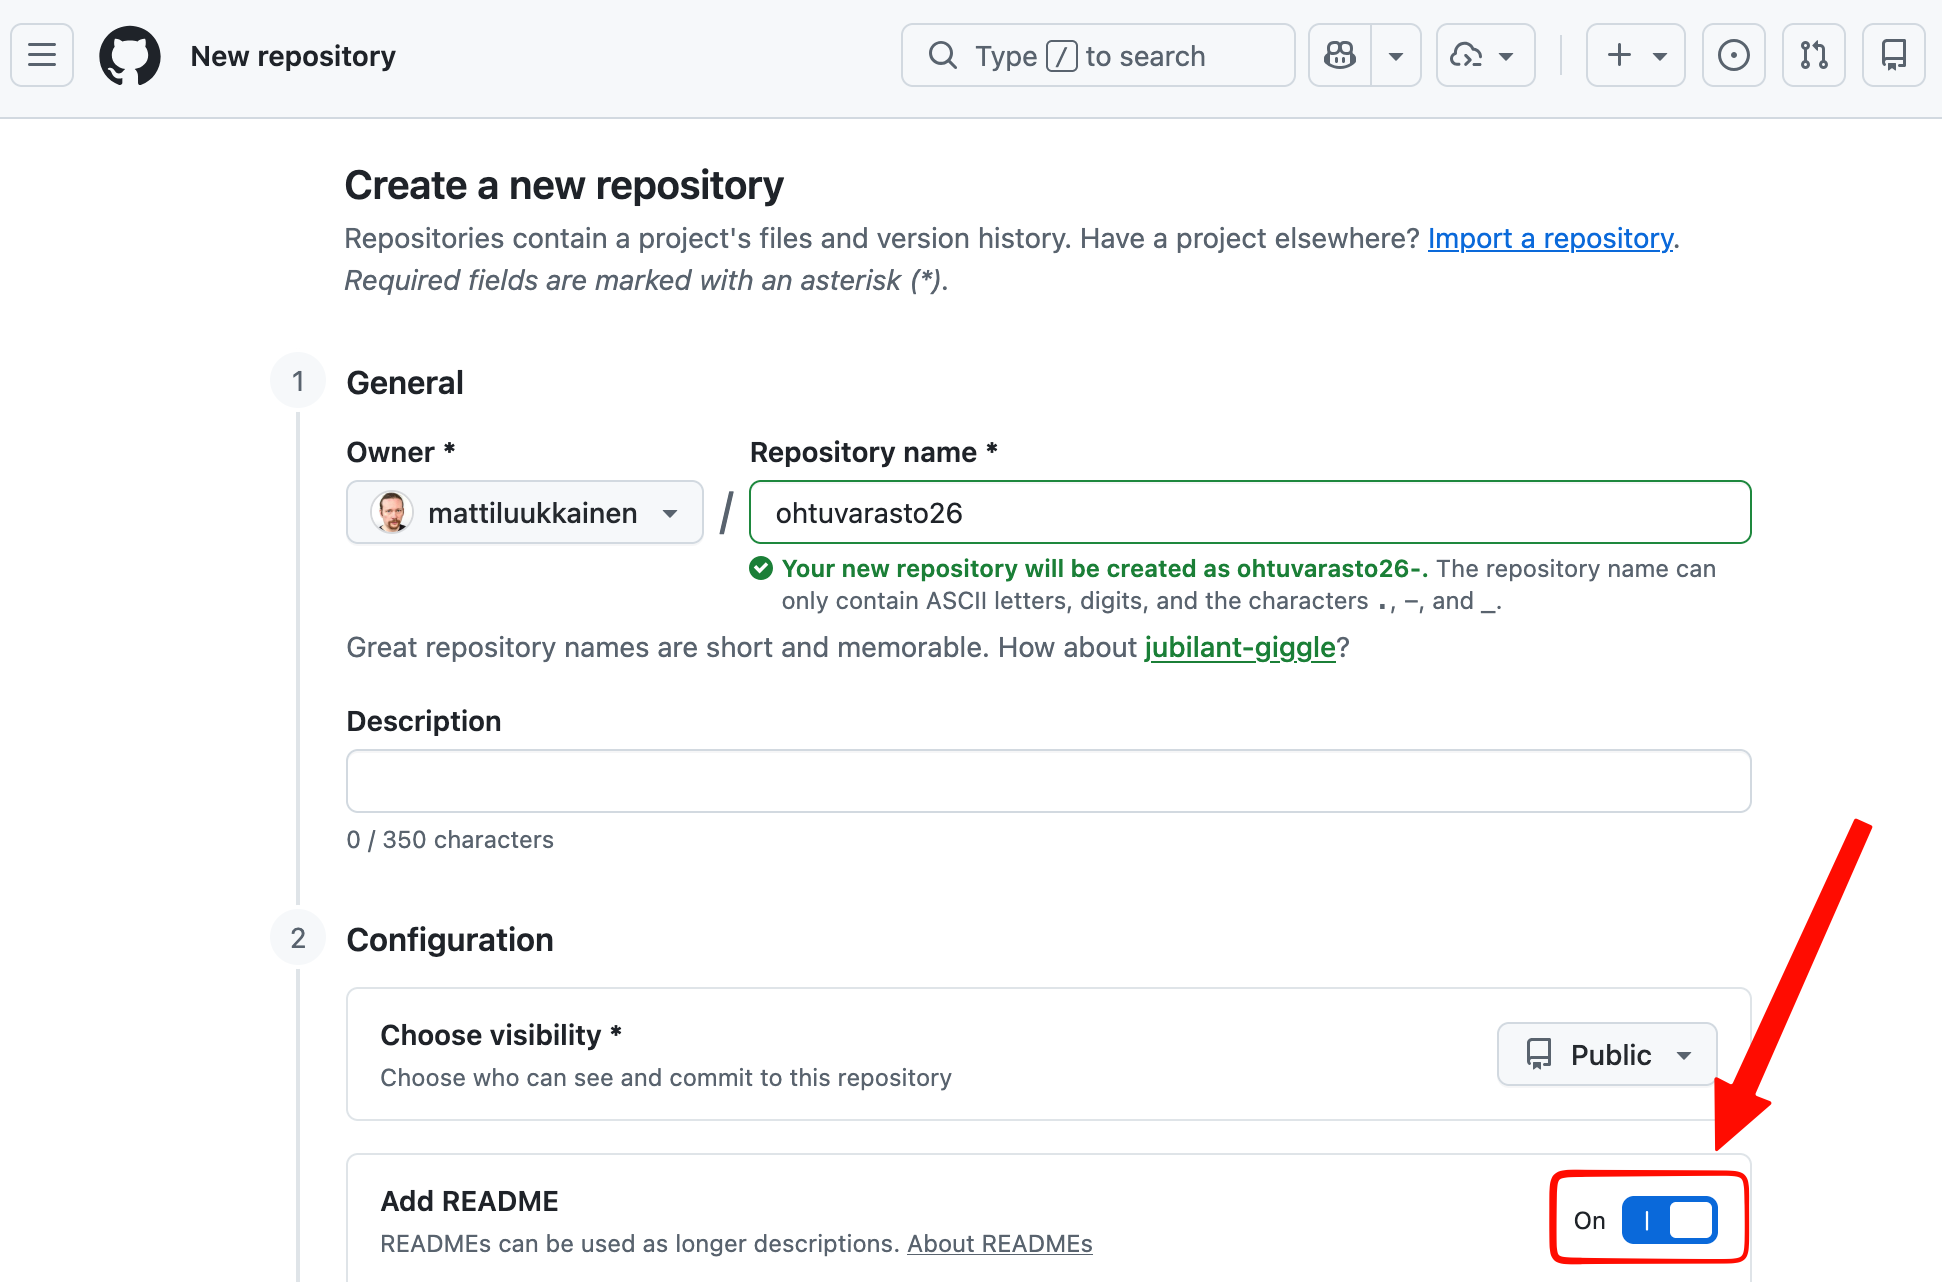
Create a repository named ohtuvarasto on GitHub
In addition to this exercise, exercises 3-13 are done in the ohtuvarasto repository you just created.
- Click the “Create a new repo” icon at the right end of the top bar
- Tick “Add a README file”
If you haven’t yet created an ssh key on your machine and added it to GitHub, do it now
- Instructions here
This lets you use GitHub without entering a password from the machine that holds the private half of the key you just created
If you haven’t done so before, configure your name and email address in Git on your local machine with the commands:
git config --global user.name "Your Name"
git config --global user.email my.address@gmail.com
On Linux and macOS, it is a good idea to configure nano as the default editor:
git config --global core.editor nano
and on Windows notepad:
git config --global core.editor notepad
If you are a vim user, though, you can skip this.
Now clone the repository you created on GitHub to your local machine. This is done by giving the following command on the command line:
git clone git@github.com:omatunnustahan/ohtuvarasto.git
where the parameter of the git clone command is the string shown on your repository’s page (note that the format must be SSH):

Your local machine now has the directory ohtuvarasto (the directory has the same name as your repository), which is a clone of the repository on GitHub.
GitHub Education
Weeks 2–7 have [AI] exercises that you can do either with GitHub Copilot or with OpenCode. Choosing the tool and the reasons for the choice are covered in exercise 9 of week 2.
You can do most of the exercises with the free Copilot Free version, but its monthly quota is limited. When done with Copilot, the week 5 exercises require Copilot Student, a version that is free for students and that you get by activating a GitHub Education membership. If you plan to use Copilot, apply for the membership now. According to the internet, it can take up to a week for the application to be approved.
OpenCode uses the language models of the university’s CurreChat, so it does not require a GitHub Education membership.
3. Git basics [version control]
You have probably already used Git on earlier courses. This exercise practises the following commands:
git addgit commitgit statusgit checkout -- filegit reset HEAD
If you don’t yet master the commands, go through the Git tutorial of the course Ohjelmistotekniikka. Instead of just reading it, you should also do the Git operations of the tutorial yourself.
There are lots of Git instructions on the internet, e.g.:
- Pro Git book, it’s a good idea to read chapter 2 at this point
- GitHub help
- https://www.atlassian.com/git/tutorials
- https://we.riseup.net/debian/git-development-howto
- http://www.ralfebert.de/tutorials/git/
Now do the following:
Go to the clone of the repository you created in the previous exercise (i.e. the directory created by the git clone command)
Add and commit to the repository two files and two directories that contain files
- Remember the useful command
git status
Change the contents of at least two files and commit the changes to the repository
Create a .gitignore file that makes Git ignore files ending in tmp in the root directory of the repository, as well as the following directories:
- .venv
- __pycache__
- .pytest_cache
Note that the names of the directories .venv and .pytest_cache start with a dot. Directories and files starting with a dot are not shown by default in the listings of the ls command; you can make them visible with the command ls -a
Add files ending in tmp to the directory and make sure that Git ignores them
- You can check this with the command
git status
Also add a directory named __pycache__ with some file inside it. Make sure that the directory and its contents do not end up under version control
Add and commit the .gitignore file to your repository
The following steps are about Git’s staging area. If you don’t know what it is, find out. The instructions linked above explain it
Make a change to some file. Do not add the file to the “staging” area
Undo the change (the git status command gives a hint on how to do this)
Make a change and add the file to the “staging” area, then make sure that the change no longer shows in the file
Undo the change (the git status command gives a hint on how to do this), and make sure that the change no longer shows in the file
git add -p
Unfortunately, the tutorials do not use the useful form git add -p of the git add command
Make changes to a few files and add the changes to the staging area with the command git add -p
- If you add new files to the project,
git add -pdoes not notice them, so they have to be added to the staging area separately - From now on, use the command
git add -pwhenever possible!
The command man git add gives more information about the option, including explanations of the answer choices.
Hint: using AI in the exercise
As you might expect, AI knows Git quite well. For example, you can easily get a suitable .gitignore file:

It may be more useful and/or educational to learn the topic the long way and in more depth from the documentation. Or not. What matters is probably understanding the principles of using .gitignore, but the exact syntax is the kind of thing whose learning mostly adds load, and outsourcing the details to AI makes sense. Of course, in this case too you have to make sure that the file is configured correctly and that the wrong files do not slip under version control.
4. Adding files to GitHub [version control]
In exercise 2 we created the repository “ohtuvarasto” on GitHub, which was attached as the “remote repository” of the repository created on the local machine. Let’s synchronise the state of the local repository and GitHub:
“Push” these to the remote repository on GitHub with the command git push
Make sure with your browser that the added files end up on GitHub
On GitHub it should look roughly like this

5. Many clones of the same repository [version control]
It is common practice to keep the repository on GitHub as the “central” location of the files, and to attach the repository on the local machine to it so that the GitHub repository is its remote repository, as we did in exercise 1.
If you work from several machines, there are many clones of the GitHub repository, and the clones have to be kept up to date.
For practice, let’s now create a second clone of the repository on the local machine:
Go to the command line and e.g. to your home directory (or some place that is not a Git repository)
Give the command git clone git@github.com:githubtunnus/repositorionNimi.git nimiKloonille
- you can find githubtunnus (your GitHub username) and repositorionNimi (the repository name) on GitHub, in the place of your repository shown in the second image of exercise 2
- nimiKloonille will be the name of the cloned repository; make sure that you give a name that no existing file or directory in the folder already has
Go to the cloned repository and add some files there. Finally, commit
“Push” the changes to GitHub
Make sure with your browser that the added files end up on GitHub
Now go to the clone of the GitHub repository you made in exercise 2.
The original local clone is no longer up to date, “pull” the changes there with the command git pull
Make sure that the contents of both local repositories are now the same
Add some files to the original clone and push them to GitHub
Go again to the clone made in this exercise and pull
6. Cleaning up the repository [version control]
Let’s prepare for the next exercise by cleaning the extra files out of our repository
Go to the original clone of your repository that you made in exercise 2
- You can delete the practice clone you made for exercise 5
Delete from your repositories all directories and other files except .git, .gitignore and README.md
Commit the changes
- Make sure with the command git status that all changes are in version control, i.e. that Git does not report any files as Changes not staged for commit
- You may need to revise the tutorials linked in exercise 3, or ask AI how files are removed from Git
Push the changes to GitHub. Check with your browser that everything is up to date on GitHub, i.e. that the repository contains nothing but the files .gitignore and README.md
Next, let’s fetch the code used in the following exercises:
Download the zipped package at https://github.com/ohjelmistotuotanto-hy/tehtavat/raw/main/viikko1/varasto.zip
Extract the package to a suitable place
Move the files inside the package into the cloned repository so that the files and directories of the package end up in the root of the repository
The directory containing your repository should now look like this:

Add and commit the files extracted from the zip to your repository and push them to GitHub
Check once more with your browser that everything is up to date on GitHub
Note that after the exercise your repository should look roughly like this:
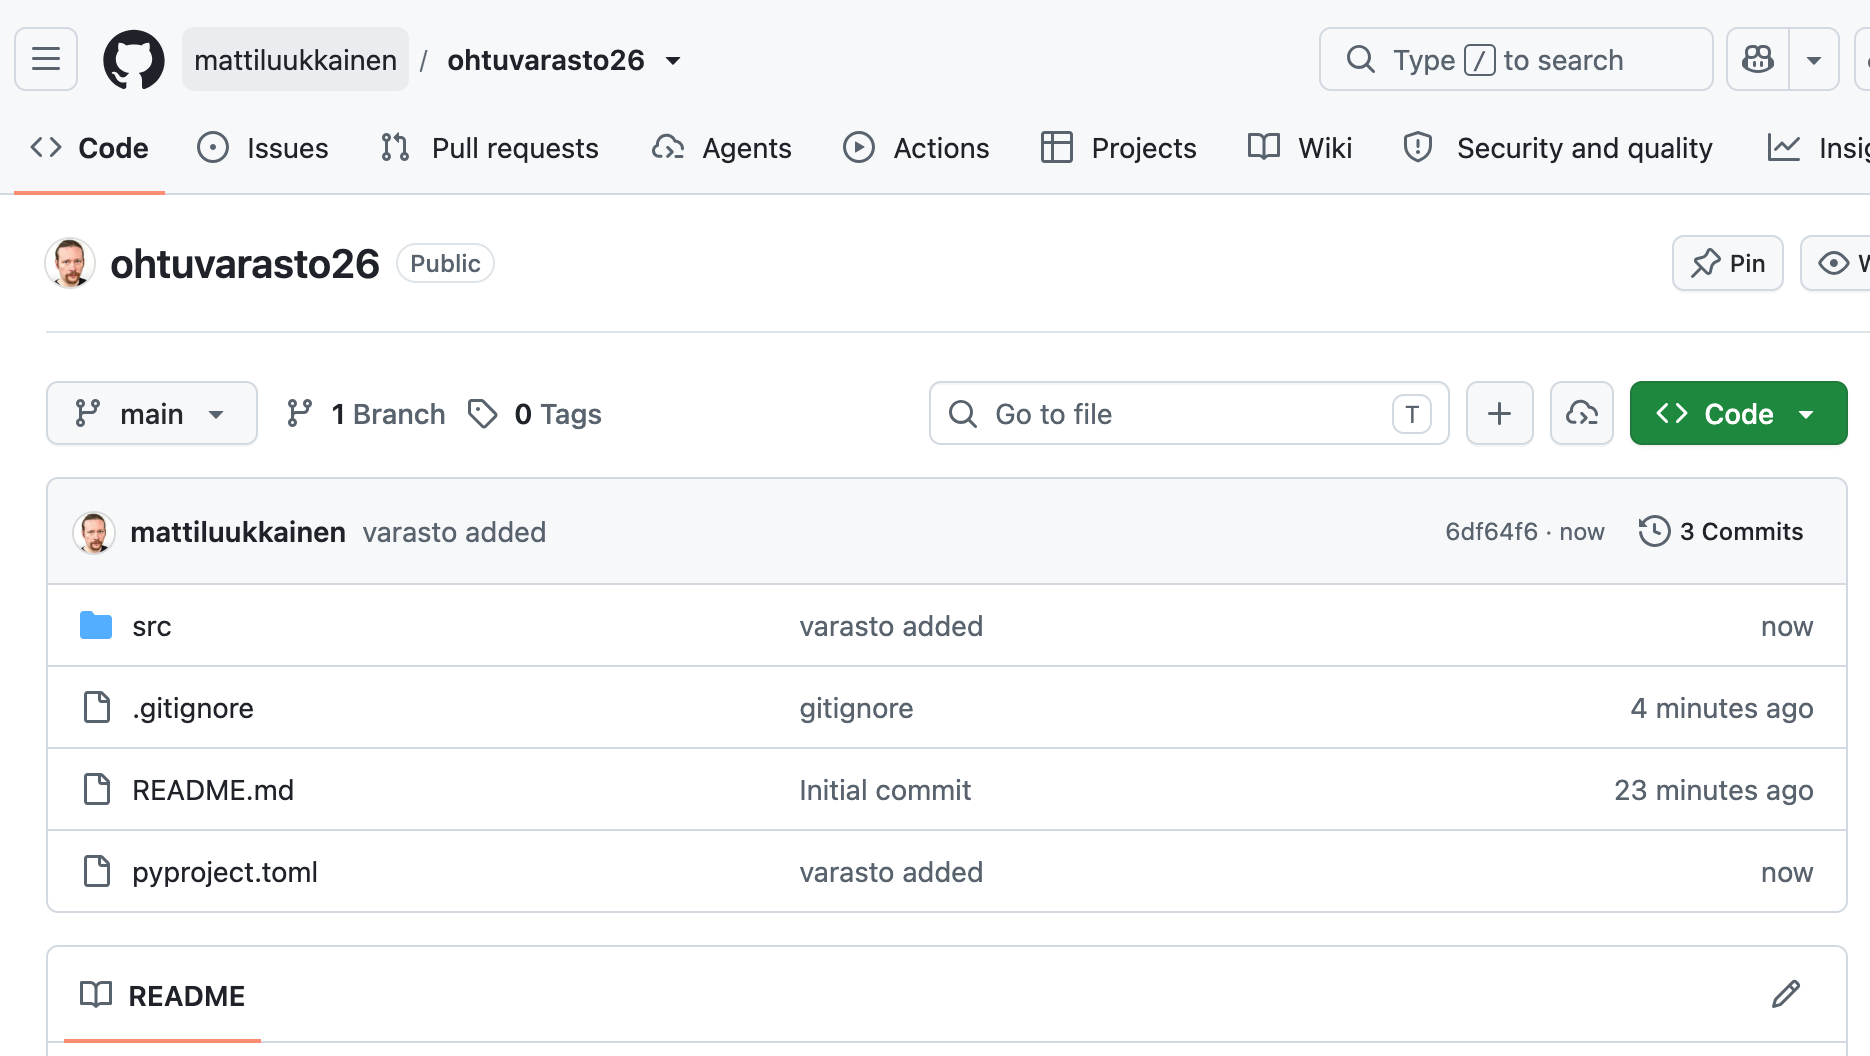
If the directory src and the files pyproject.toml etc. are not in the root of the repository, move them there before you continue.
7. uv
The programming exercises of this course use Python. The course uses the uv command line tool for managing the dependencies and the Python version of Python projects, so let’s start by installing it.
Install uv by following the installation section of the uv guide
- The course uses uv version 0.12 (or newer). If your machine has an older version, you should update it with the command
uv self update - If you run into problems, see here for solutions to some typical problems
Once uv is installed, you can also use it to install the Python version needed on the course, so no separate Python installation is needed:
uv python install 3.14
Check the installed versions with the command uv python list. When you later create a new uv project with the command uv init --python 3.14, uv automatically uses the version you just installed. If needed, see more in the section Python version management of the uv guide.
For editing code we recommend the Visual Studio Code editor.
On the introductory programming courses you may have run code by pressing the arrow button of VS Code, and tests by pressing the eye button. In professional software development, running and testing code must happen in a repeatable way, and so that the operations can be performed on any machine, scripted from the command line, i.e. independently of development environments such as VS Code.
Running code from the command line with the python3 command is not very hard in itself. Problems start to arise only when the project needs external dependencies in the form of various installable libraries. Installing and managing libraries requires separate tools. For Python, the pip command line tool has traditionally been used for this purpose.
To avoid conflicts between the dependencies of projects on the same computer, so-called project-specific virtual environments are often used. Virtual environments are created and used through the venv module.
The uv you just installed combines both tools: it installs and manages the project’s dependencies like pip, and automatically creates a virtual environment for the project. This way everything related to dependency management is handled with a single tool, and there is no need to use pip or the venv module separately.
In the previous exercise, a varasto project in uv format was added to the repository. The project contains code suitable for managing an extremely simple warehouse. Warehouse management is handled by the class Varasto defined in the file src/varasto.py. The class is used by the function main defined in the file src/index.py.
Examine the directory structure of a uv project, e.g. by giving the command tree in the root of the project directory (tree is not a uv command but a normal shell command)
Hint: using the tree command on different operating systems
- On Windows the most useful form of the command is
tree /F. If you use git bash on Windows, the command iscmd //c tree - NOTE: macOS does not have the
treecommand by default - If you have Homebrew installed, you can install the
treecommand withbrew install tree - The
treecommand is not installed by default on all Linuxes either. On Debian-based Linuxes (e.g. Ubuntu) you can install thetreecommand withsudo apt-get install tree
Look at the contents of the file pyproject.toml that defines the project
- Among other things, the file defines the dependencies used by the project
It is best to edit program code with a sensible editor, e.g. Visual Studio Code, but uv commands are easiest to run from the command line.
Warning: pip
You may have installed Python dependencies with the pip command. Do not use pip on this course: if you do, you are 99.9% likely to do something wrong.
On this course, dependencies are installed with uv.
Now do the following.
Install the dependencies of the varasto project by running the command uv sync in its root directory
Start the application with the command uv run python3 src/index.py
- The run command runs the given command (in this case
python3 src/index.py) in the virtual environment
Enter the virtual environment with the command source .venv/bin/activate
- On Windows the command is
.venv\Scripts\activate.batin the command prompt (cmd) and.venv\Scripts\Activate.ps1in PowerShell, see the Python documentation - From now on the material uses the Linux/macOS form
source .venv/bin/activate
Run the command python3 src/index.py
- In the virtual environment, commands can be run “normally”, i.e. without the
uv runcommand - When new code is developed and run in a tight cycle, it is most convenient to run the commands inside the virtual environment
Exit the virtual environment with the command deactivate
Run the tests with the command uv run pytest
- Tests are run with the pytest framework
8. Unit tests
Quality assurance is perhaps the most important phase of software development, and its most important means is testing. Software has to be tested a lot, so testing should be automated as far as possible. This is emphasised in iterative, i.e. agile, software development, where the same tests have to be run again every time the program is changed.
AI-assisted software development makes testing even more important. AI quickly produces a lot of code that often looks plausible but may still be wrong. Comprehensive automated tests are the best way to make sure that code, whether written by a human or an AI, works as it should, and that previously working functionality does not break as a result of changes.
In the Python world, the leading tool for automated testing is unittest, which you may already have met on the course Ohjelmistotekniikka.
If unittest is unfamiliar or you have forgotten it, revise its basics from this unittest guide.
The ohtuvarasto of the previous exercise already has some unittest tests, let’s now extend the tests.
Remember that you can run the tests in the root directory of the project with the command uv run pytest, or by entering the virtual environment with the command source .venv/bin/activate and then running the command pytest.
Extend the tests of the varasto project so that the branch coverage of the tests of the class Varasto becomes 100%
- You will have to take into account at least the cases where too much stuff is put into the warehouse and where more is taken from the warehouse than there is
- Even that is not yet enough
You can find out the line coverage of the tests with the coverage tool. Get to know the tool by reading the Coverage guide
Take the tool into use in your project by installing it as a development dependency of the project with the command:
uv add coverage --dev
Add the configuration file .coveragerc to the root directory of the project; it tells which files of the project test coverage is collected from. The content of the file must be the following:
[run]
source = src
Enter the virtual environment with the command source .venv/bin/activate
Run the command coverage run --branch -m pytest. The command runs the tests and collects the branch coverage of the tests
After this, run the command coverage html. The command creates a report based on the collected data
The directory htmlcov should appear in the root directory of the project. You can view the test coverage report in HTML format by opening the file index.html of the directory htmlcov in your browser
- By clicking the name of an individual file in the report you can see which execution branches of the code are still untested
Add the file .coverage and the directory htmlcov to the project’s .gitignore file
When the branch coverage of the tests of the class Varasto (the file src/varasto.py) is 100%, push your changes to GitHub
- The report probably also includes other files, but only the branch coverage of the file src/varasto.py needs to be 100%. We will later learn how to leave the extra files out of the report
- When you edit the tests, remember to run the commands
coverage run --branch -m pytestandcoverage htmlagain so that the report gets updated - You can run both commands “at the push of a button” by putting them on the same line separated by a semicolon:
coverage run --branch -m pytest; coverage html
Hint: using AI in the exercise
Naturally, it is easy to generate not only code but also tests with AI. Instead of the chat interface, it is better to generate the tests with the Agent mode of Copilot in VS Code, where the AI can create files and run code (more about agents in week 3).
Let’s try how the agent copes with exercise 8 of week 1. The agent is opened from the Chat view of VS Code:
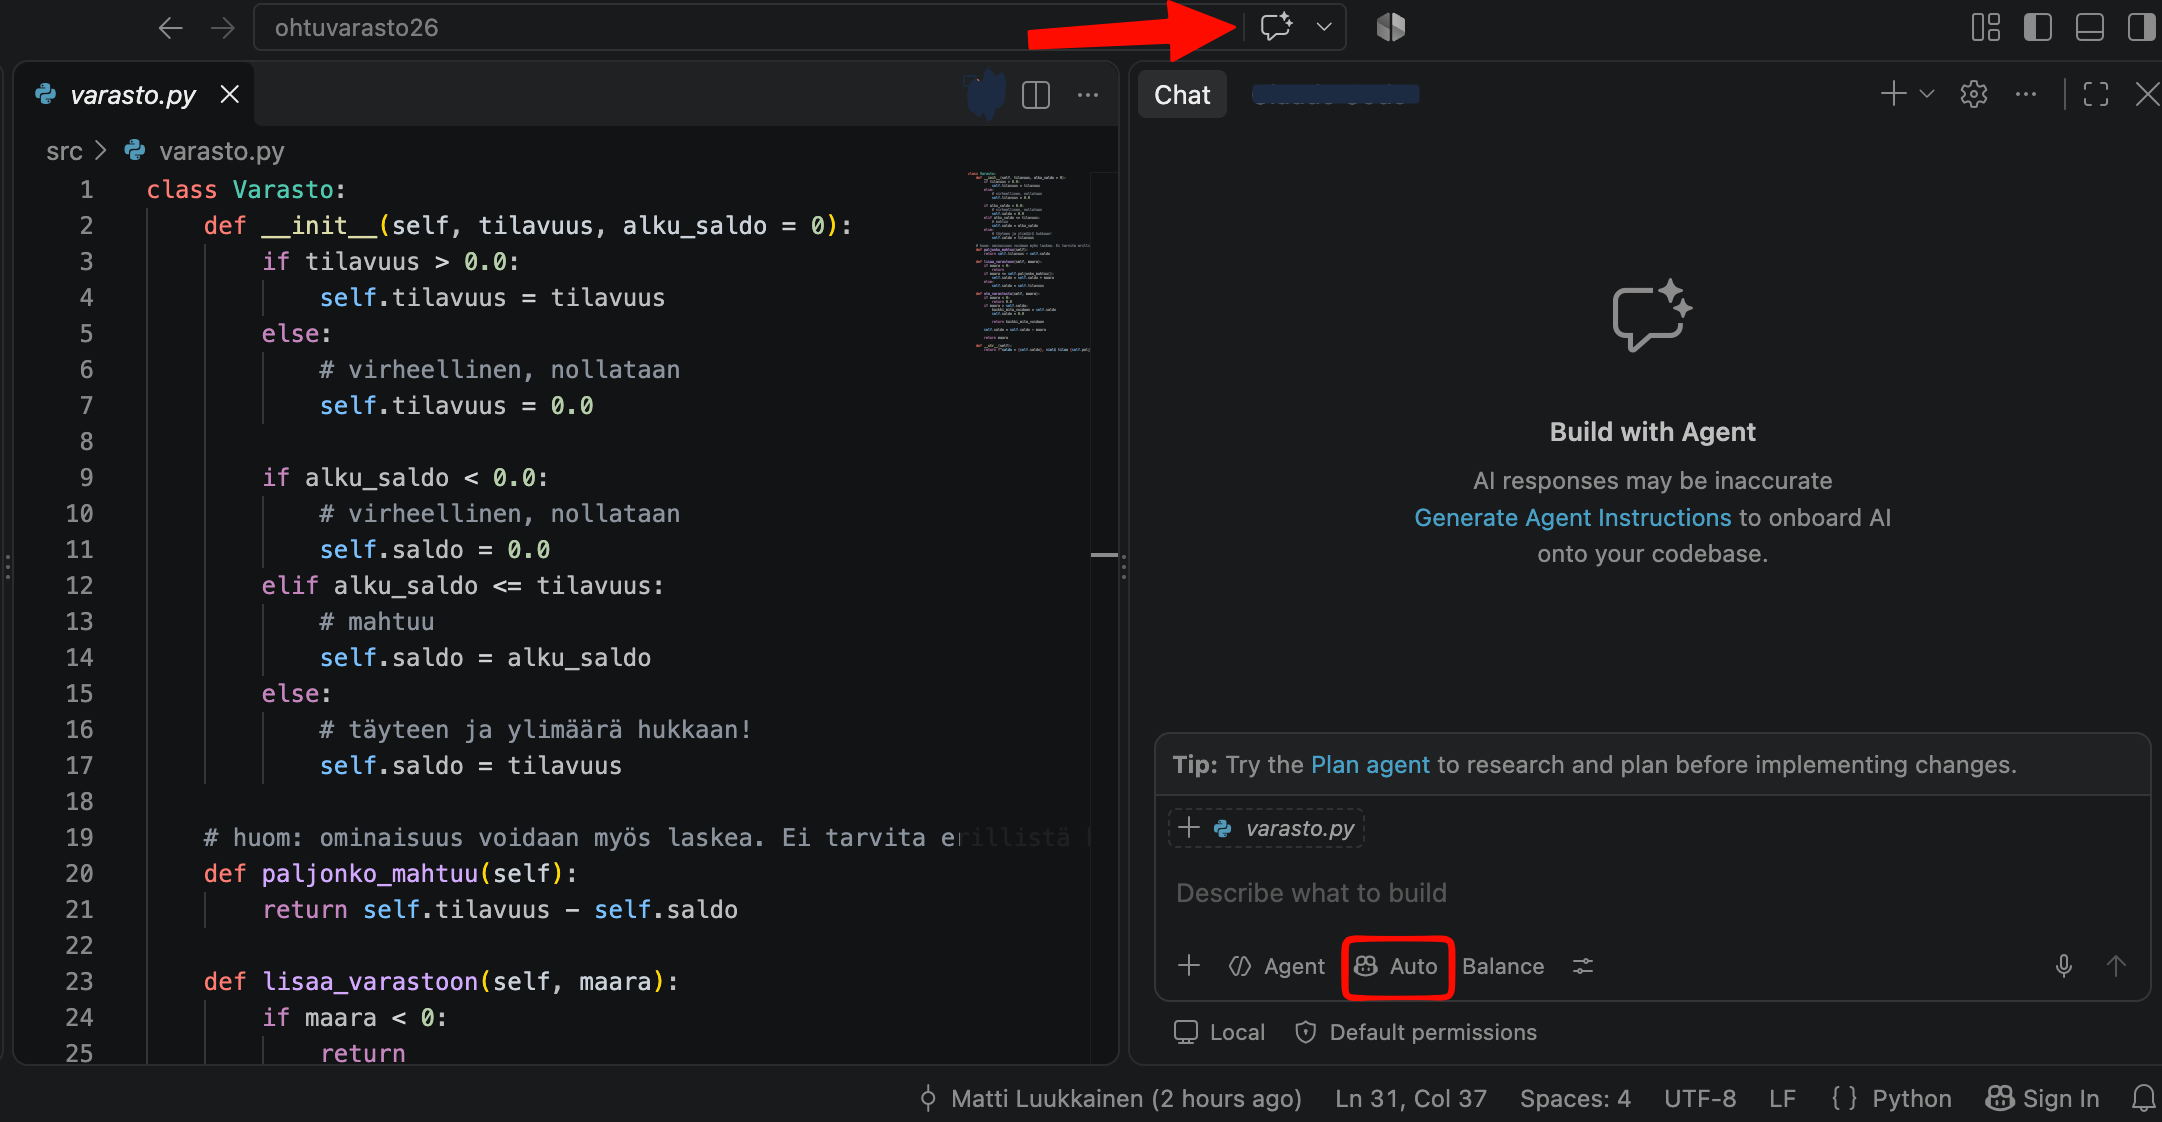
We give the agent the instruction:
generate tests for #file:varasto.py so that brach coverage is 100%
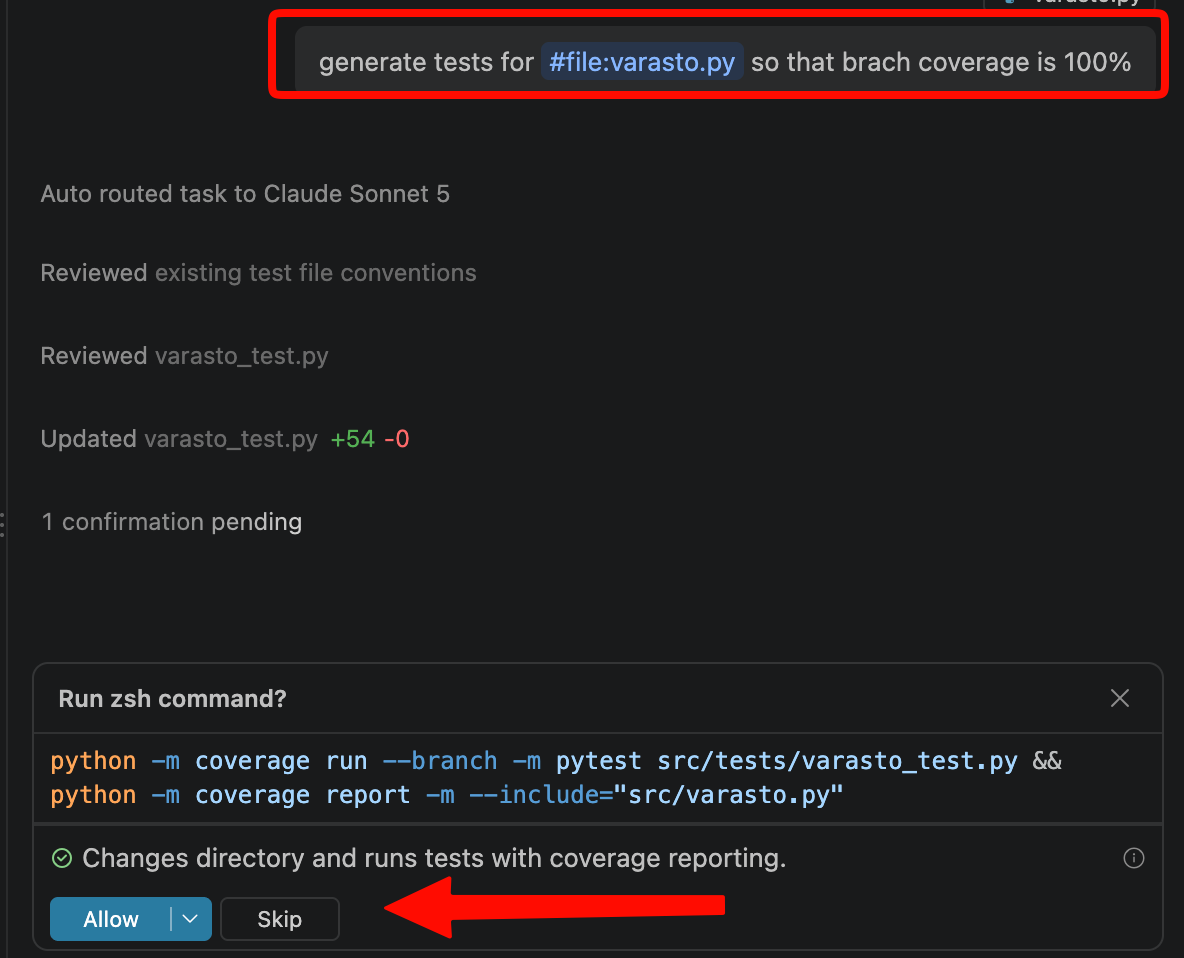
The agent tells what it is doing: first it wants to run a command that finds out the test coverage. The command looks a bit odd, and after we give permission to run it, it turns out that it doesn’t work. The agent suggests a couple of commands until it figures out that this is a uv project:
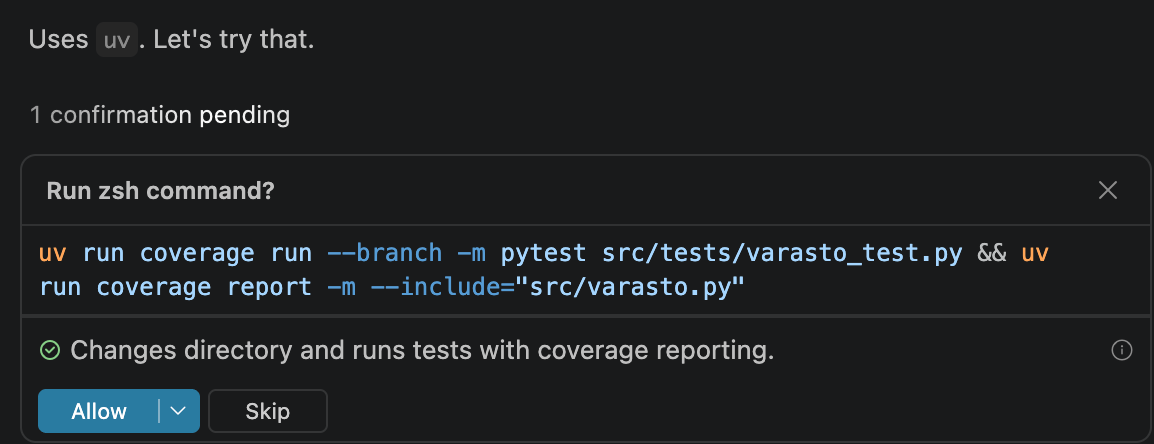
The new command works. After a while, the agent has proposed new tests that raise the coverage to one hundred percent:
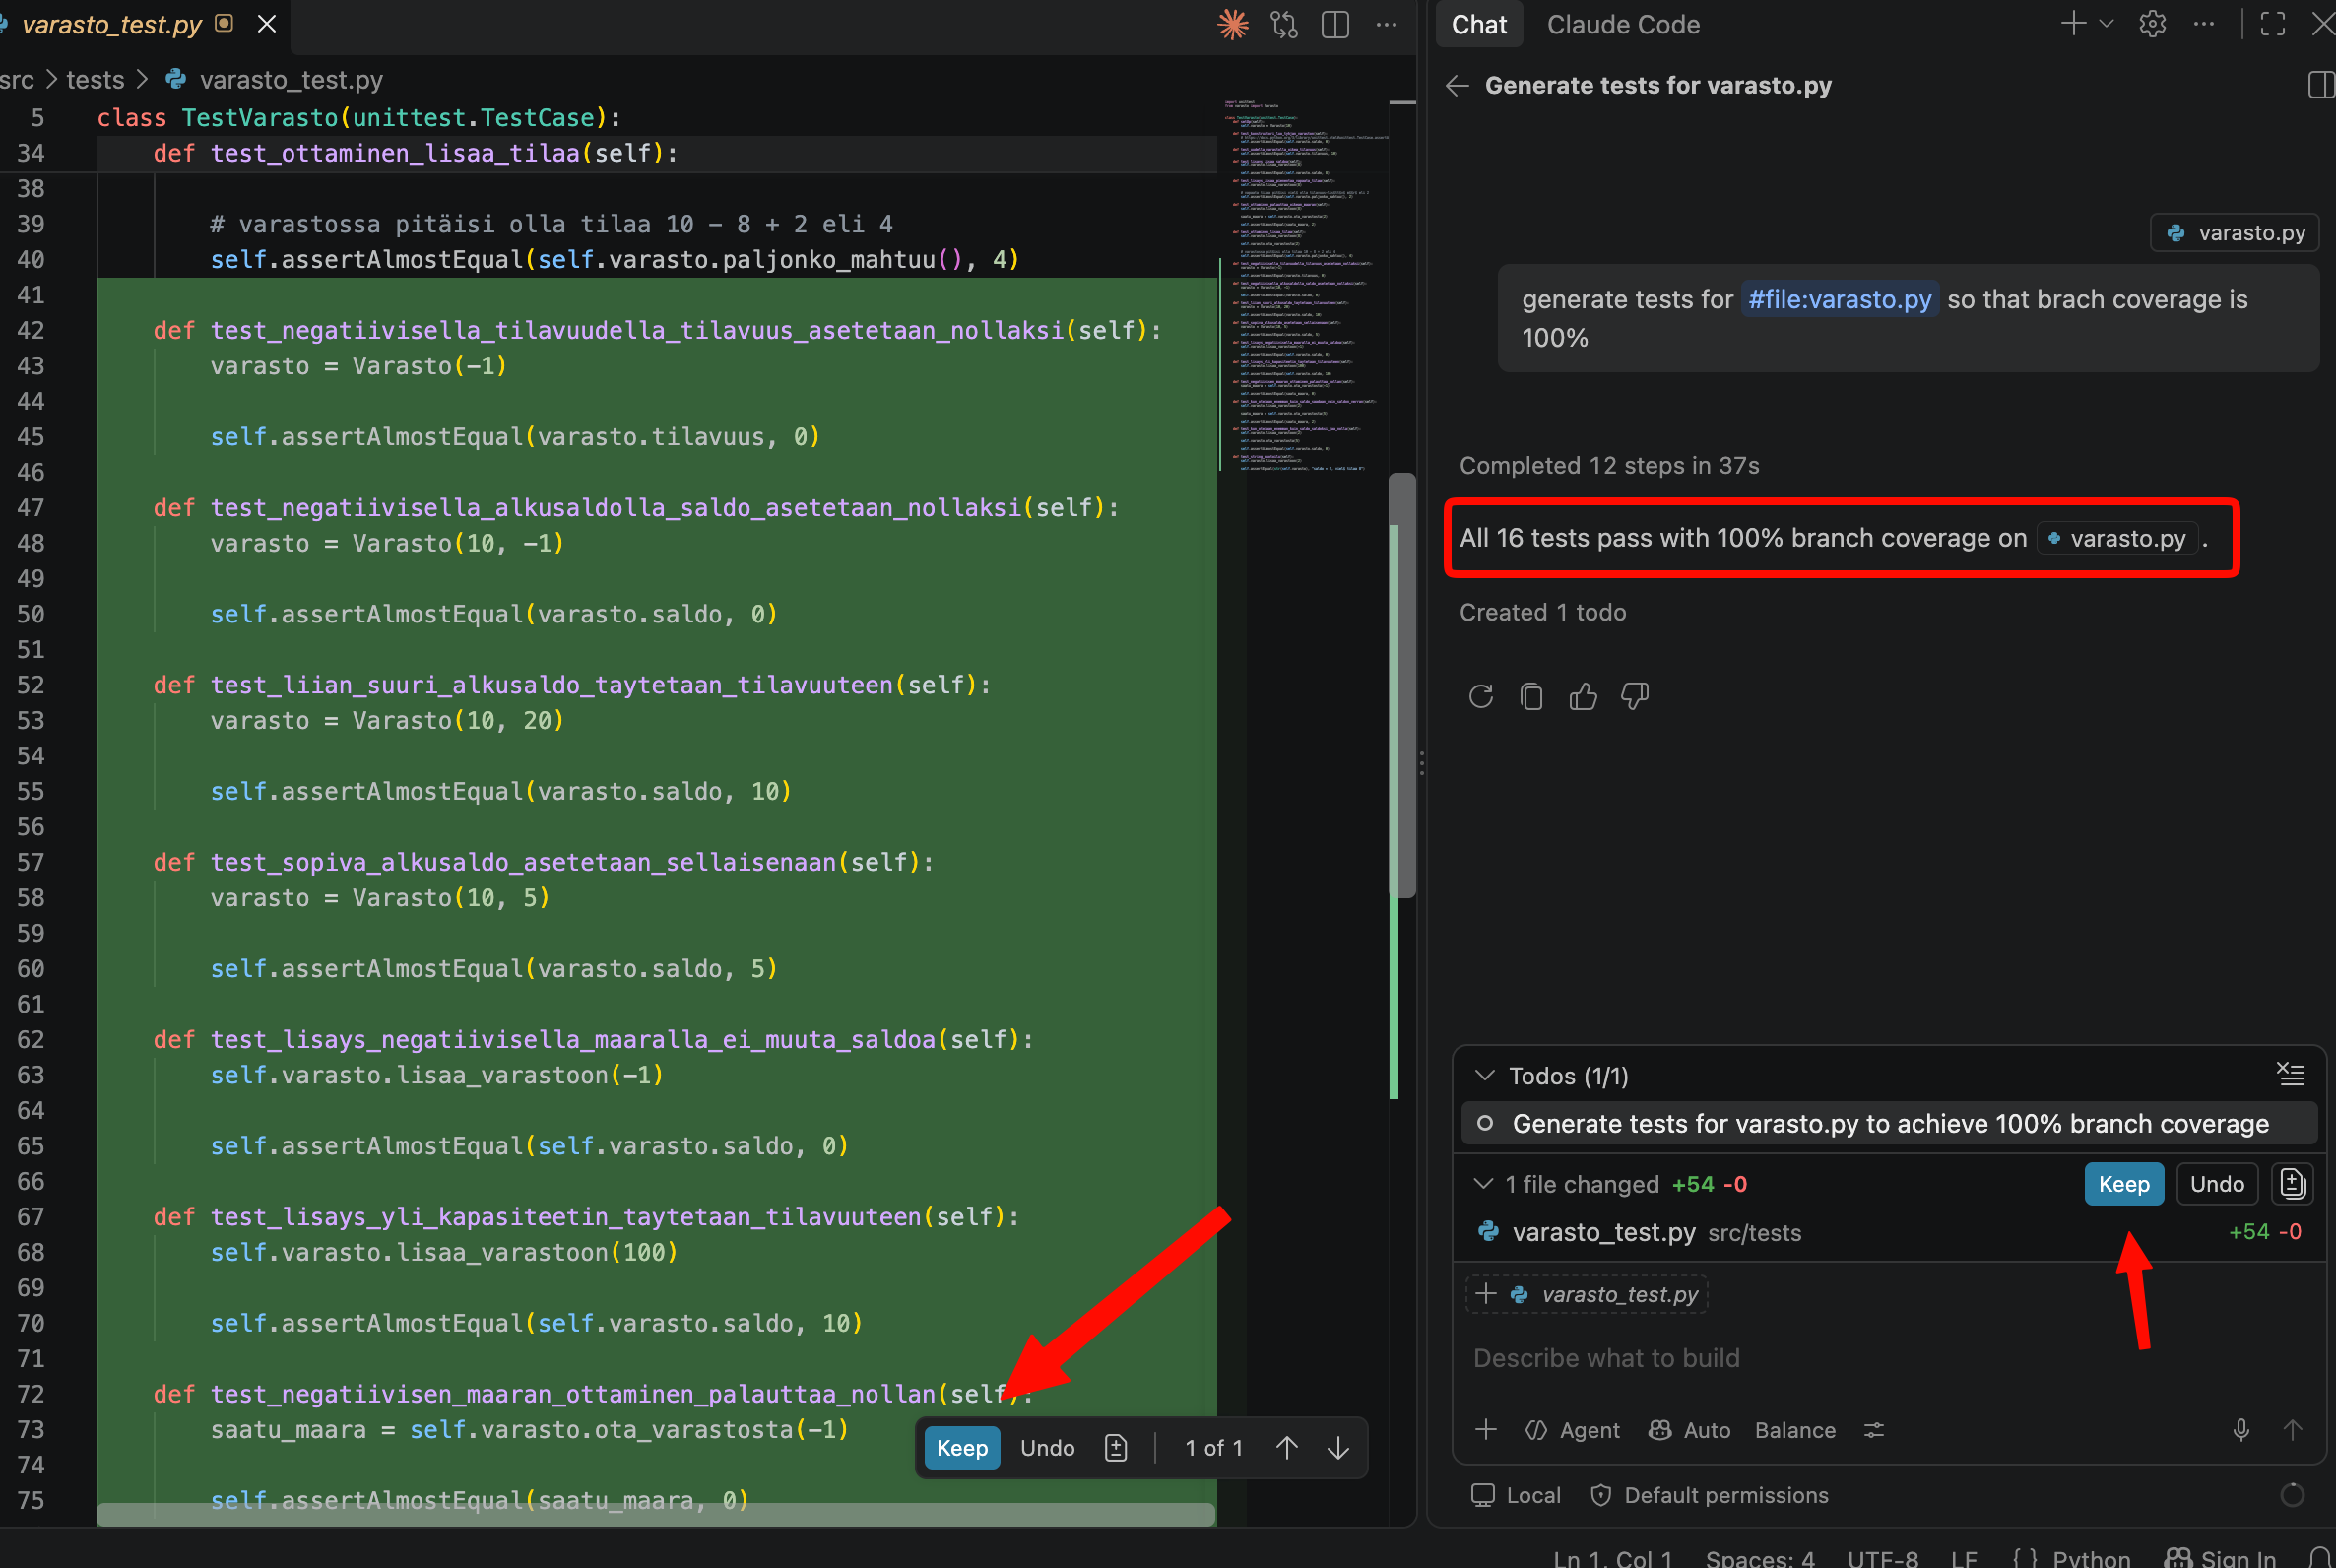
As responsible coders, we go through the tests before we accept them. The tests use the method assertAlmostEqual, which is unfamiliar to us. We don’t accept code that we don’t understand, so we first find out what it is about. We can ask the agent or look at the unittest documentation:
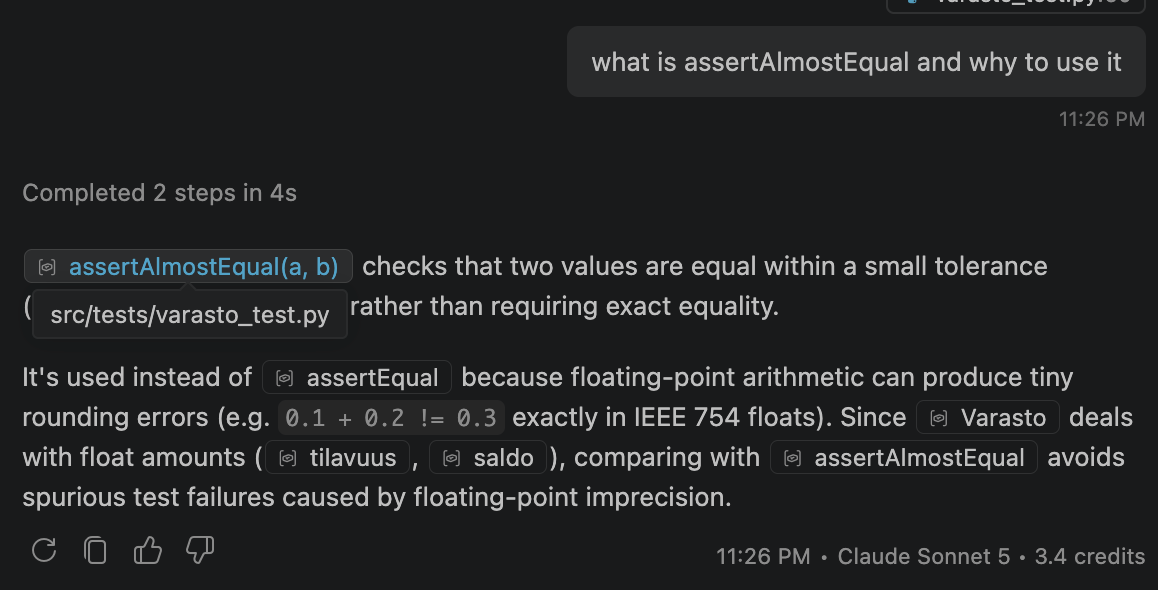
We now understand the tests, and we have also learned something new, thanks to AI! We are now satisfied and commit the changes to GitHub.
Bonus exercise: alias
When using uv, you can run commands either in the long form, i.e.
uv run pytest
or enter the virtual environment with the command source .venv/bin/activate, in which case the beginning of the command is not needed:
pytest
So the virtual environment is quite handy, but the command that activates it is rather unpleasant and hard to remember.
You can make things easier by creating an alias that is easier to remember for the command. If you like, create an alias for activating the virtual environment. Find instructions on the internet or ask CurreChat e.g. with the prompt
how do I create an alias in Ubuntu that runs the command source .venv/bin/activate
9. GitHub Actions, part 1
With uv, running the tests can be made scriptable, i.e. easy to run from the command line with a single command. The next step is to run the build process, i.e. the steps required to run the program and the related tests, on a separate build server.
The idea is that the software developer follows this cycle:
- The latest version of the code is fetched from the central version control repository to the developer’s machine
- Additions and the tests that test them are made in the local copy
- The tests are run on the developer’s machine
- If everything is fine, the local changes are sent to the central repository
- The build server follows the central repository, and when it notices changes there, the build server fetches and compiles the changed code and runs the tests on it
- The build server reports any errors it finds
A separate build server ensures that the software works elsewhere too, not just on the machine of the developer who made the changes. This practice is called continuous integration. We will return to it in more detail in the third part of the course.
Nowadays it is becoming common to use some online build service instead of a separate build server, so that software developers don’t have to take care of installing the build server and its software at all.
The course uses the Actions feature built into GitHub to handle automated builds.
Next, let’s configure GitHub Actions to take care of our project.
Select the Actions tab of your GitHub repository and click the set up a workflow yourself link:

This opens the configuration file of the actions.
Change the file to the following form:
name: CI

on:
  push:
    branches: [main]

jobs:
  build:
    runs-on: ubuntu-latest

    steps:
      - uses: actions/checkout@v5
      - name: Install uv
        uses: astral-sh/setup-uv@v10.1.0
        with:
          python-version: "3.14"
      - name: Install dependencies
        run: uv sync
      - name: Run tests
        run: uv run coverage run --branch -m pytest
Press the green Commit changes button and give a suitable commit message.
The configuration file (named main.yml by default) is saved in your repository under the directory .github/workflows:

So GitHub commits the new file to your repository automatically.
Pull the repository’s code to your own machine. The configuration file is now visible there too; e.g. in the Visual Studio Code editor it looks like this:
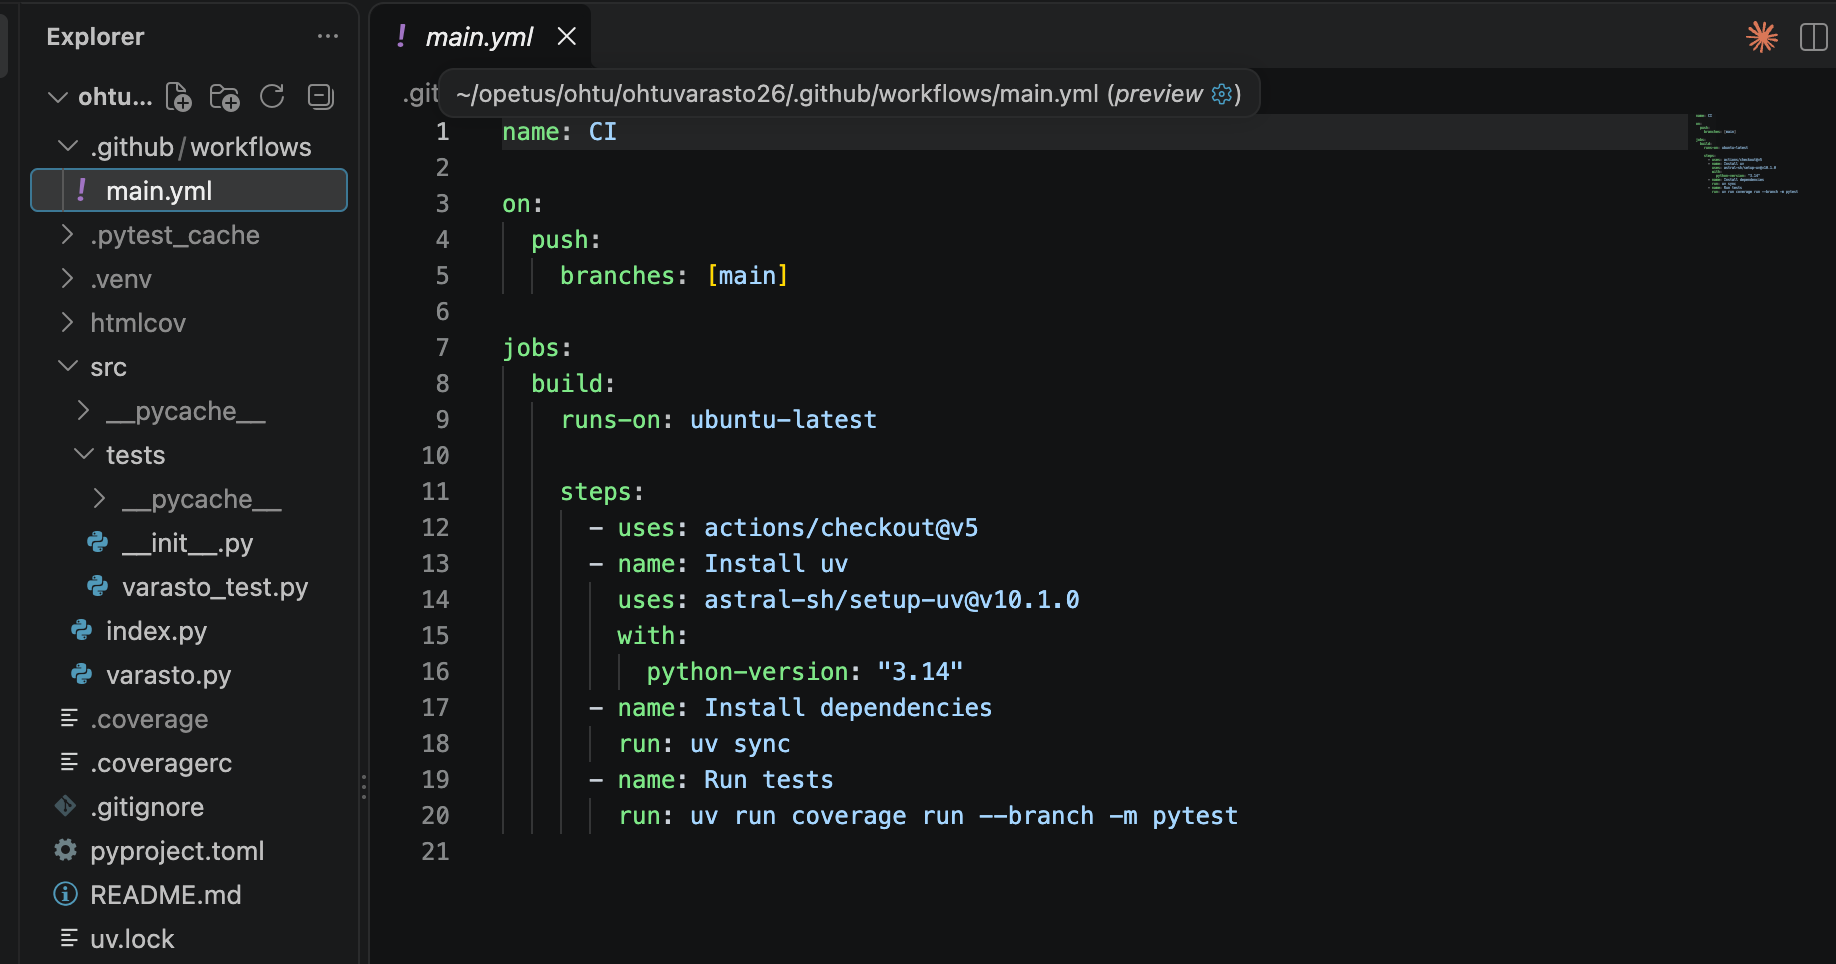
Open the Actions tab of the repository; you’ll notice that some stuff has appeared there:

10. GitHub Actions, part 2
Let’s take a closer look at what happens under the hood of GitHub Actions.
GitHub Actions are series of various “operations” that GitHub can run on the code in a repository. The behaviour of an action is defined in files ending in .yml placed in the directory .github/workflows.
Let’s look at the file we just defined:
name: CI

on:
  push:
    branches: [main]

jobs:
  build:
    runs-on: ubuntu-latest

    steps:
      - uses: actions/checkout@v5
      - name: Install uv
        uses: astral-sh/setup-uv@v10.1.0
        with:
          python-version: "3.14"
      - name: Install dependencies
        run: uv sync
      - name: Run tests
        run: uv run coverage run --branch -m pytest
The section on defines in which situations the actions are run. Our configuration says that the actions are run whenever code is pushed to the main branch of the repository.
In the section jobs you can define one or more “jobs”, i.e. series of tasks consisting of several steps. This time we defined only one job, which we named build. If there were several jobs, GitHub Actions would run them in parallel.
A single job consists of several steps, which are defined under the job in the section steps.
GitHub reserves a virtual machine for running the steps of the job. The section runs-on defines on what kind of operating system the steps of the job are run. In our example, the execution environment is Ubuntu Linux.
In our example, the job consists of four steps. The first step
- uses: actions/checkout@v5
runs the predefined action checkout, which according to its documentation does the following
This action checks-out your repository under $GITHUB_WORKSPACE, so your workflow can access it.
So the checkout action fetches the repository’s code to the virtual machine that runs the steps.
The second step is the action setup-uv, which installs uv on the virtual machine running the job, and with the python-version parameter also the Python version we want. The version number should be given in quotes, i.e. in the form "3.14", because otherwise YAML interprets it as a floating-point number, in which case e.g. the version 3.10 would turn into 3.1.
- name: Install uv
  uses: astral-sh/setup-uv@v10.1.0
  with:
    python-version: "3.14"
Both of these actions were ready-made actions found in GitHub’s marketplace. For example, installing Python on the virtual machine running the job is a fairly complicated operation in itself, but a predefined action makes it easy.
The third step installs the project’s dependencies with the uv sync command.
The fourth step is the most important one: it uses uv to run the project’s tests and collect the test coverage:
- name: Run tests
  run: uv run coverage run --branch -m pytest
Now make a change to the code that breaks the tests, and commit and push the change to GitHub.
After a while, the actions tab should show that there are two commits, and that the status of the latest one is “red”:
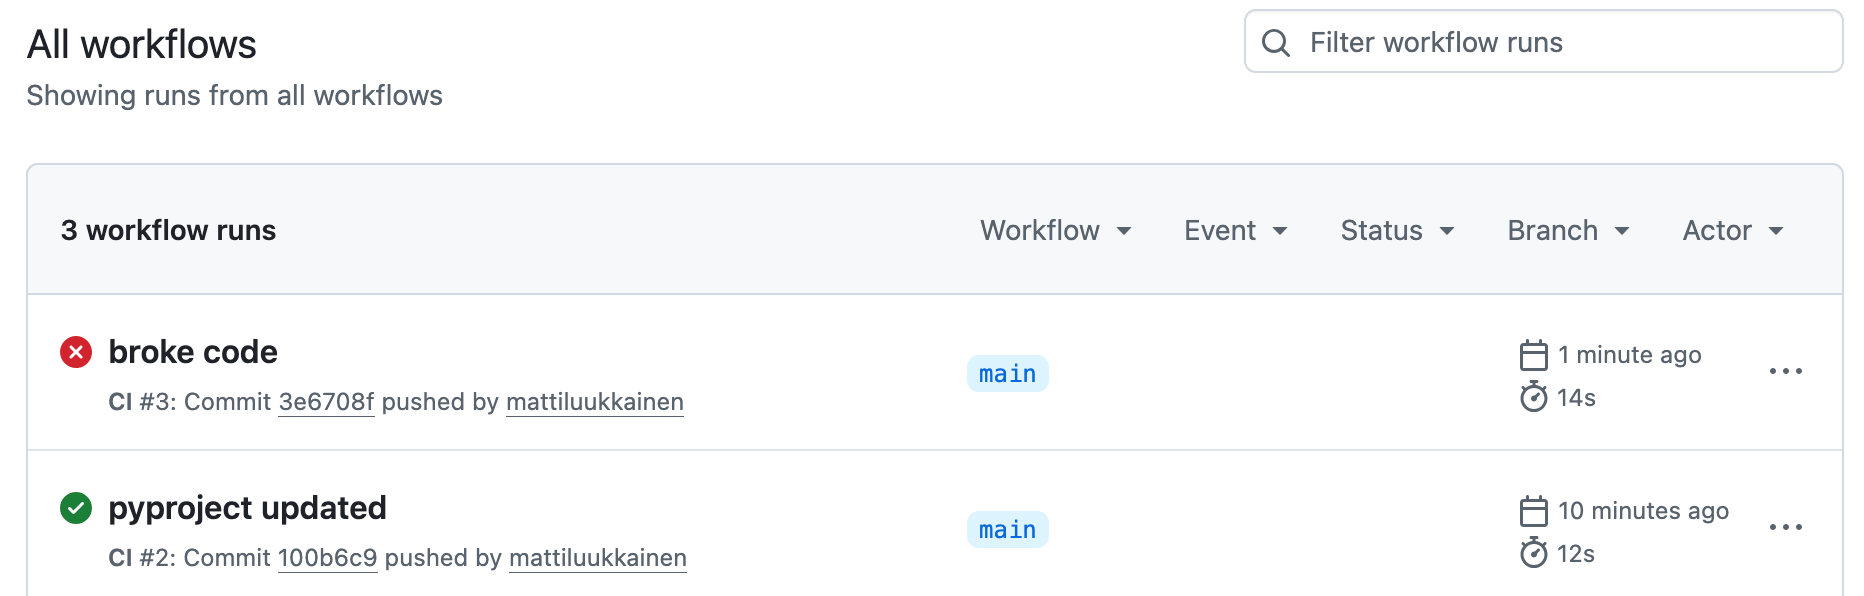
By clicking the broken commit, you can look at the progress of the action’s run in a bit more detail:
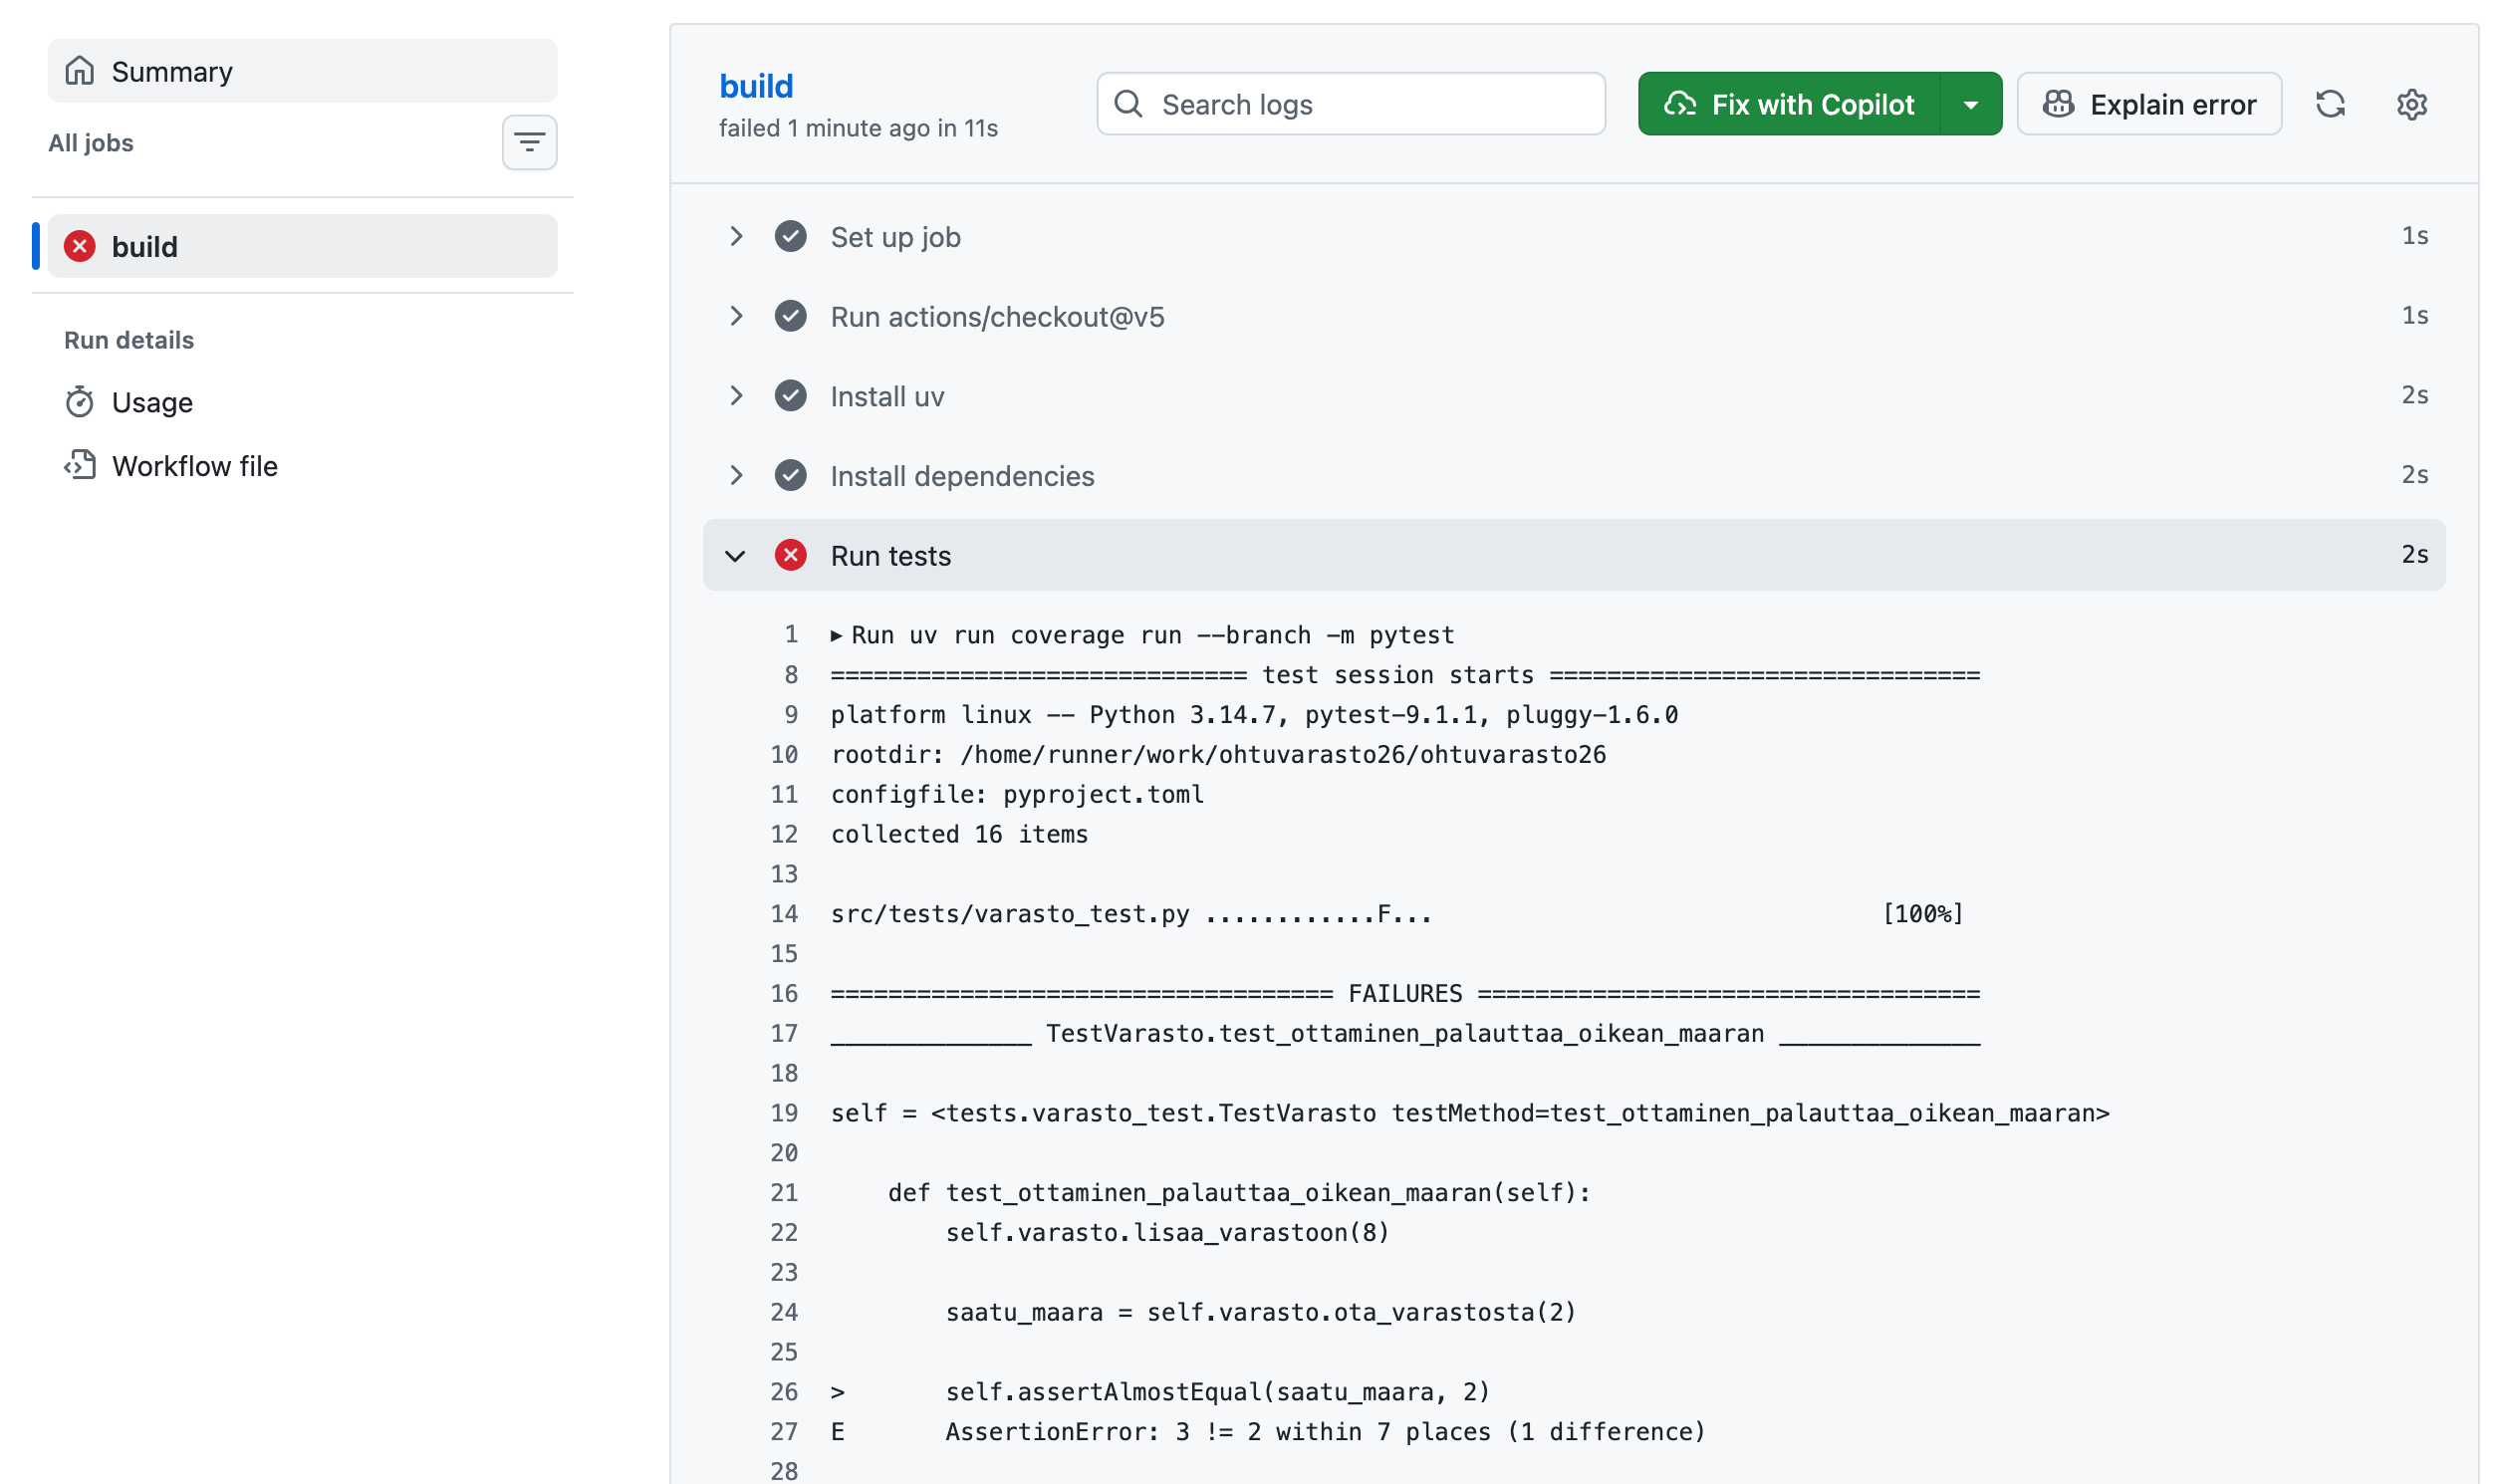
As expected, the test did not pass. Depending on your GitHub settings, you may also have received an email reminder about the broken build.
Fix the test and push the changes to GitHub again. Watch the Actions view again and make sure that everything works correctly.
11. GitHub Actions, part 3
Put a Status Badge showing the state of the code in the file README.md of the repository.
According to these instructions, the address of the badge has the form
https://github.com/OWNER/REPOSITORY/actions/workflows/WORKFLOW-FILE/badge.svg
For example, in my case the badge link is
https://github.com/mattiluukkainen/ohtuvarasto26/actions/workflows/main.yml/badge.svg
Add the badge by editing the file README.md directly on GitHub:
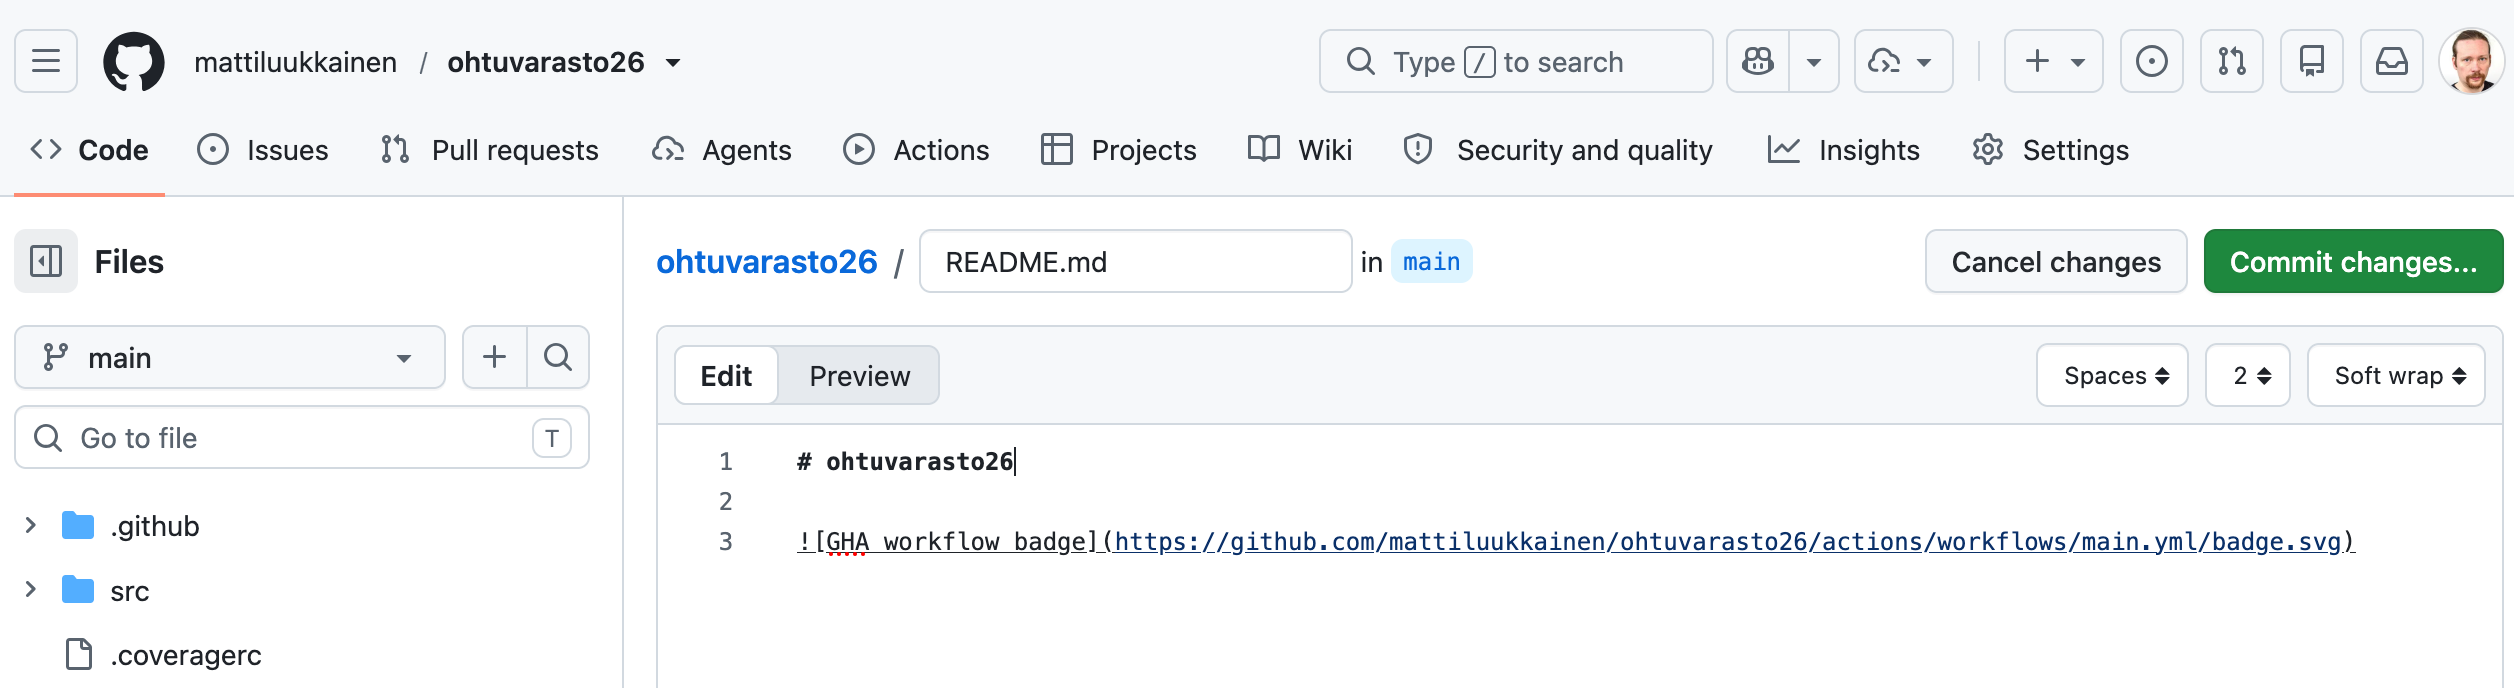
A correctly working badge looks like this:
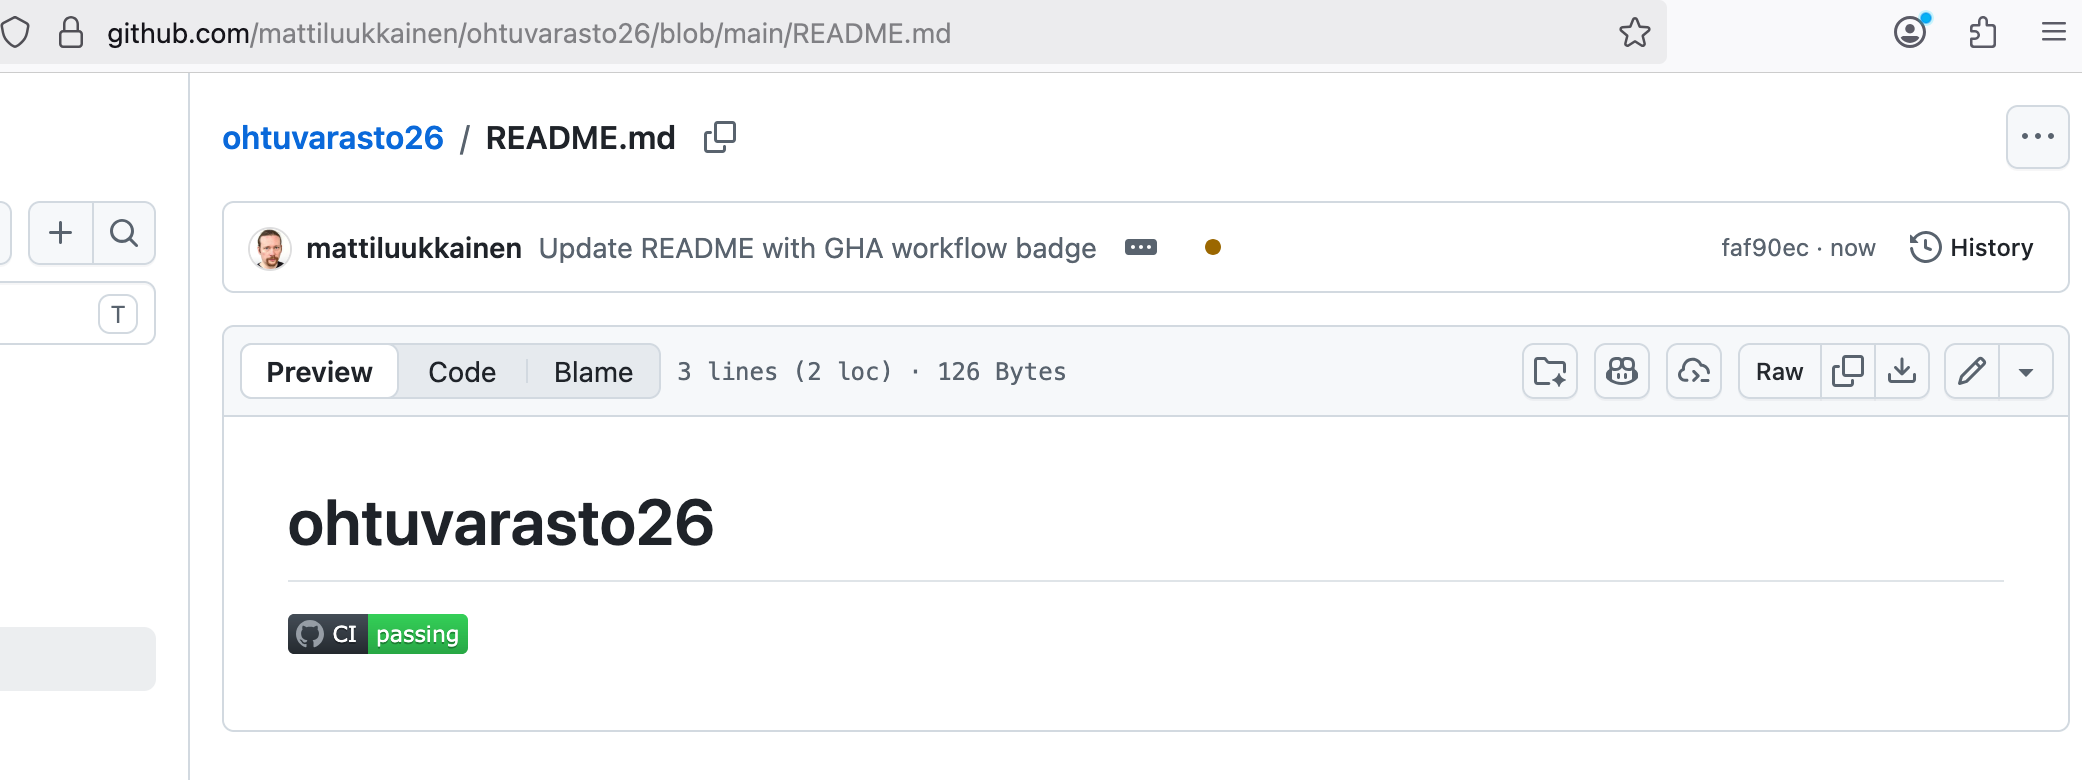
So the badge acts as an indicator of whether the code in your repository is in order as far as the tests are concerned!
Now make some change on your machine to some file in the repository other than README.md and try to push the code to GitHub. This results in an error:
To github.com:mattiluukkainen/ohtuvarasto26.git
 ! [rejected]        main -> main (fetch first)
error: failed to push some refs to 'git@github.com:mattiluukkainen/ohtuvarasto26.git'
hint: Updates were rejected because the remote contains work that you do
hint: not have locally. This is usually caused by another repository pushing
hint: to the same ref. You may want to first integrate the remote changes
hint: (e.g., 'git pull ...') before pushing again.
hint: See the 'Note about fast-forwards' in 'git push --help' for details.
You will probably run into a similar error often. The reason for the error is that you are trying to push changes to GitHub even though GitHub is “ahead” of your local repository (i.e. the file README.md was added there).
The problem is solved as follows.
First give the command git pull. Git gives you a long complaint:
remote: Enumerating objects: 5, done.
remote: Counting objects: 100% (5/5), done.
remote: Total 3 (delta 0), reused 0 (delta 0), pack-reused 0
Unpacking objects: 100% (3/3), 645 bytes | 215.00 KiB/s, done.
From github.com:mattiluukkainen/ohtuvarasto26
   6f1cd65..aa6c099  main       -> origin/main
hint: You have divergent branches and need to specify how to reconcile them.
hint: You can do so by running one of the following commands sometime before
hint: your next pull:
hint:
hint:   git config pull.rebase false  # merge
hint:   git config pull.rebase true   # rebase
hint:   git config pull.ff only       # fast-forward only
hint:
hint: You can replace "git config" with "git config --global" to set a default
hint: preference for all repositories. You can also pass --rebase, --no-rebase,
hint: or --ff-only on the command line to override the configured default per
hint: invocation.
fatal: Need to specify how to reconcile divergent branches.
In practice, Git wants to know with what strategy the code of your local and remote repository should be combined. Of the alternatives, it’s probably best to choose the middle one.
Give the command on the command line
git config pull.rebase true
In practice, the chosen alternative means that Git applies the new local commits after the commits in the remote repository.
Pull the code again with the command git pull, after which the command git push succeeds. From now on, you can handle similar situations with the commands git pull and git push.
If you changed the file README.md locally, you may have caused a so-called merge conflict, which already takes a bit of effort to resolve. We will return to this in the coming weeks…
Finally, also make your badge a link to the Actions tab. That is, when the badge is clicked, the browser should be directed to the repository’s Actions tab, e.g. in my case to the address https://github.com/mattiluukkainen/ohtuvarasto26/actions
12. Codecov
In exercise 8 we determined the project’s test coverage with coverage. The https://codecov.io service makes it possible to publish the code coverage of projects online.
Log in to Codecov (GitHub login)
Add the repository to Codecov:
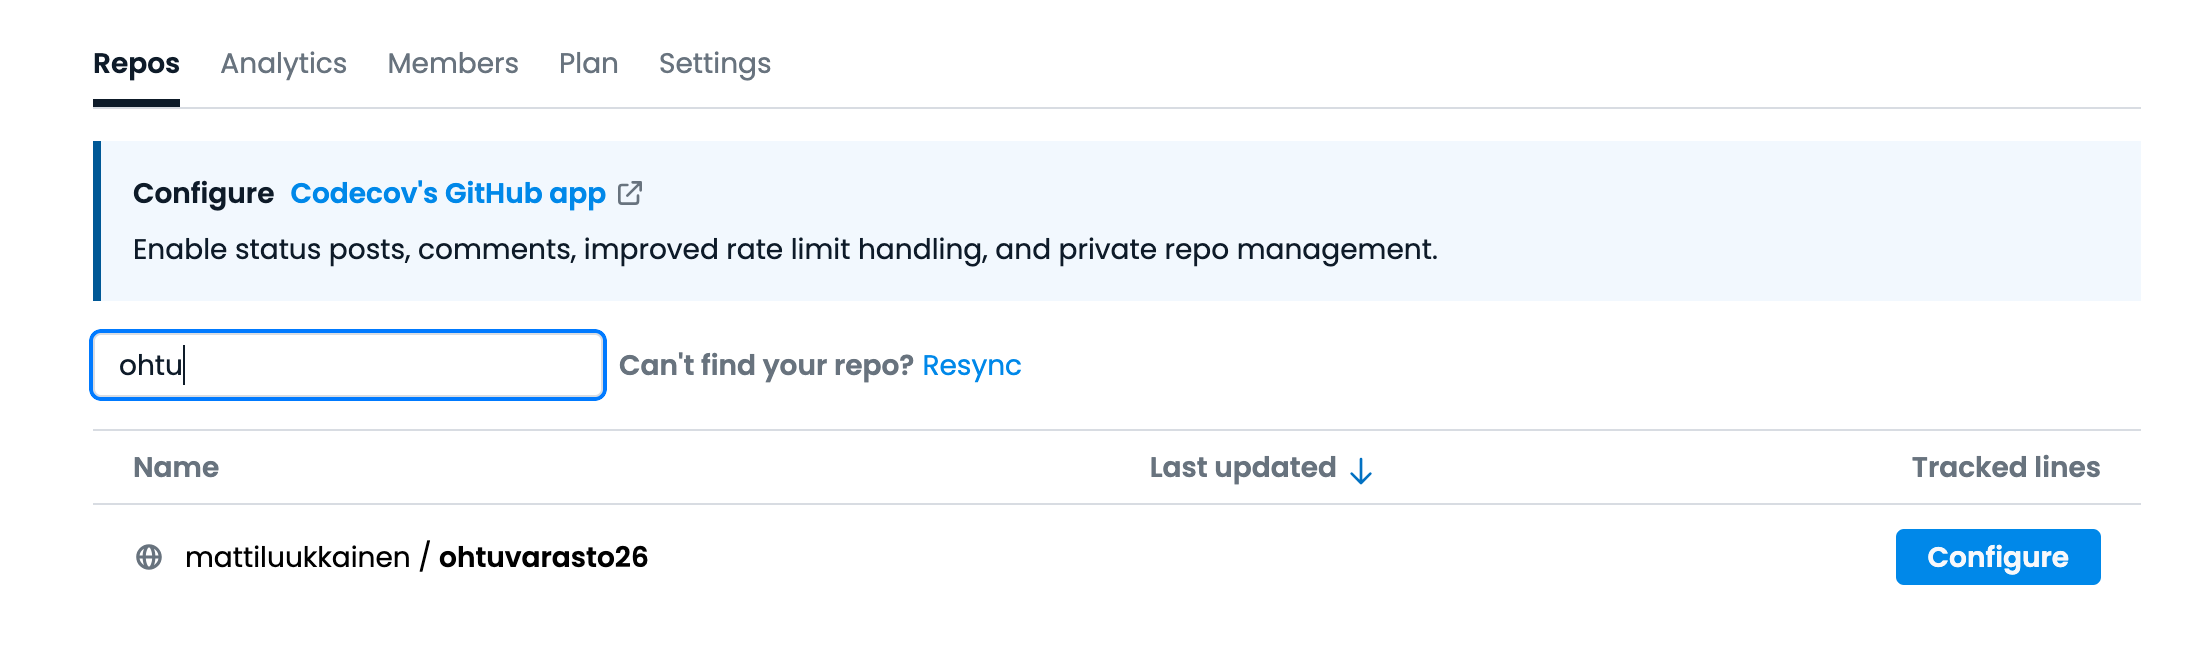
You may have to wait a moment before Codecov finds your repository. It is also possible that you still have to allow the repository to be visible through GitHub’s settings.
After adding the project, Step 3 in the view that opens contains an essential thing, Codecov’s token:
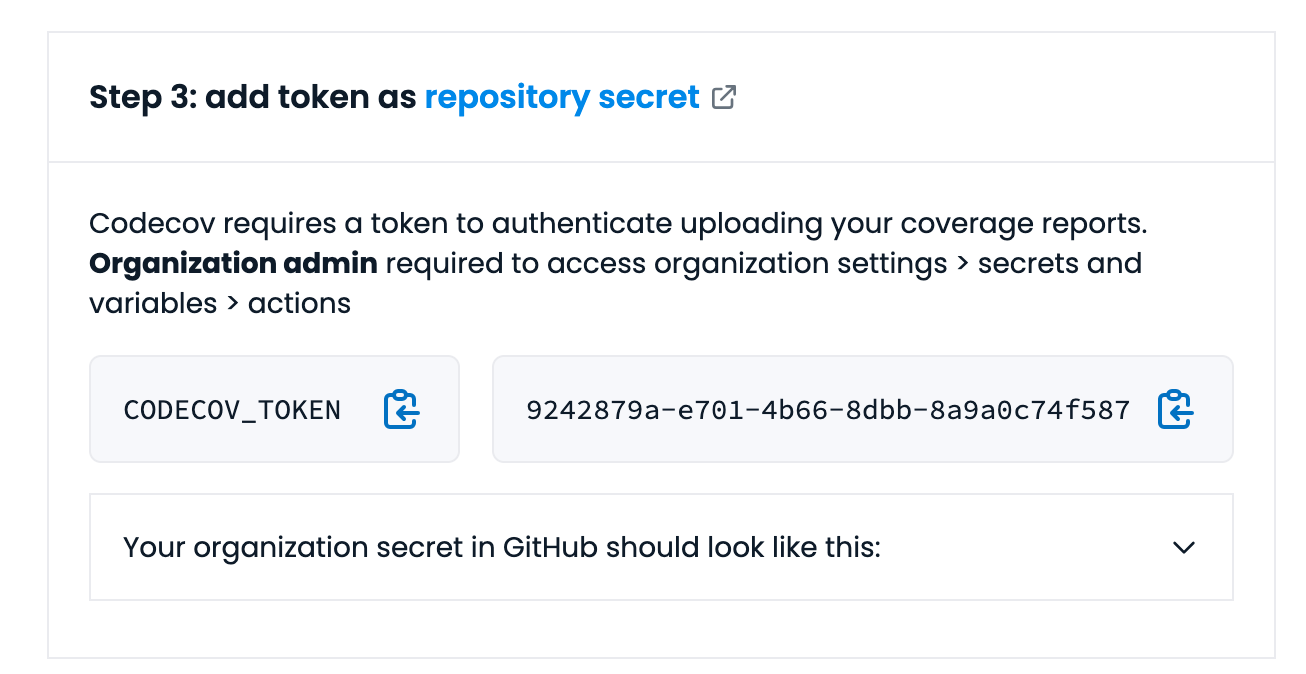
In practice, the Codecov (repository) token is a key that the service uses to identify the project. It is typical of such keys that you don’t want them available to everyone in a public repository.
Forget steps 1 and 2!
Now make the key available to GitHub Actions by following these instructions.
We can create a test coverage report that Codecov understands by using the command coverage xml instead of the coverage html command. That command creates a test coverage report in XML format.
Add two new steps to the end of the GitHub Action configuration:
- name: Coverage report
  run: uv run coverage xml
- name: Coverage report to Codecov
  uses: codecov/codecov-action@v5
  env:
    CODECOV_TOKEN: ${{ secrets.CODECOV_TOKEN }}
NOTE the lines must be indented to the same level as the other steps.
To recap:
- Create the key according to Codecov’s instructions
- Move the key into a GitHub secret (in the GitHub repo settings -> secrets and variables / actions -> New repository secret -> CODECOV_TOKEN as the name and the key as the value)
- Add the steps above to your GitHub Action configuration
The next time code is pushed to GitHub, a test coverage report of the code appears in Codecov:

In practice, we now ask GitHub Actions to first run the tests and collect the test coverage (with the command uv run coverage run --branch -m pytest), after which a test coverage report in XML format is created (with the command uv run coverage xml). This test coverage report is sent to Codecov.
The GitHub Actions log shows how the steps are progressing:
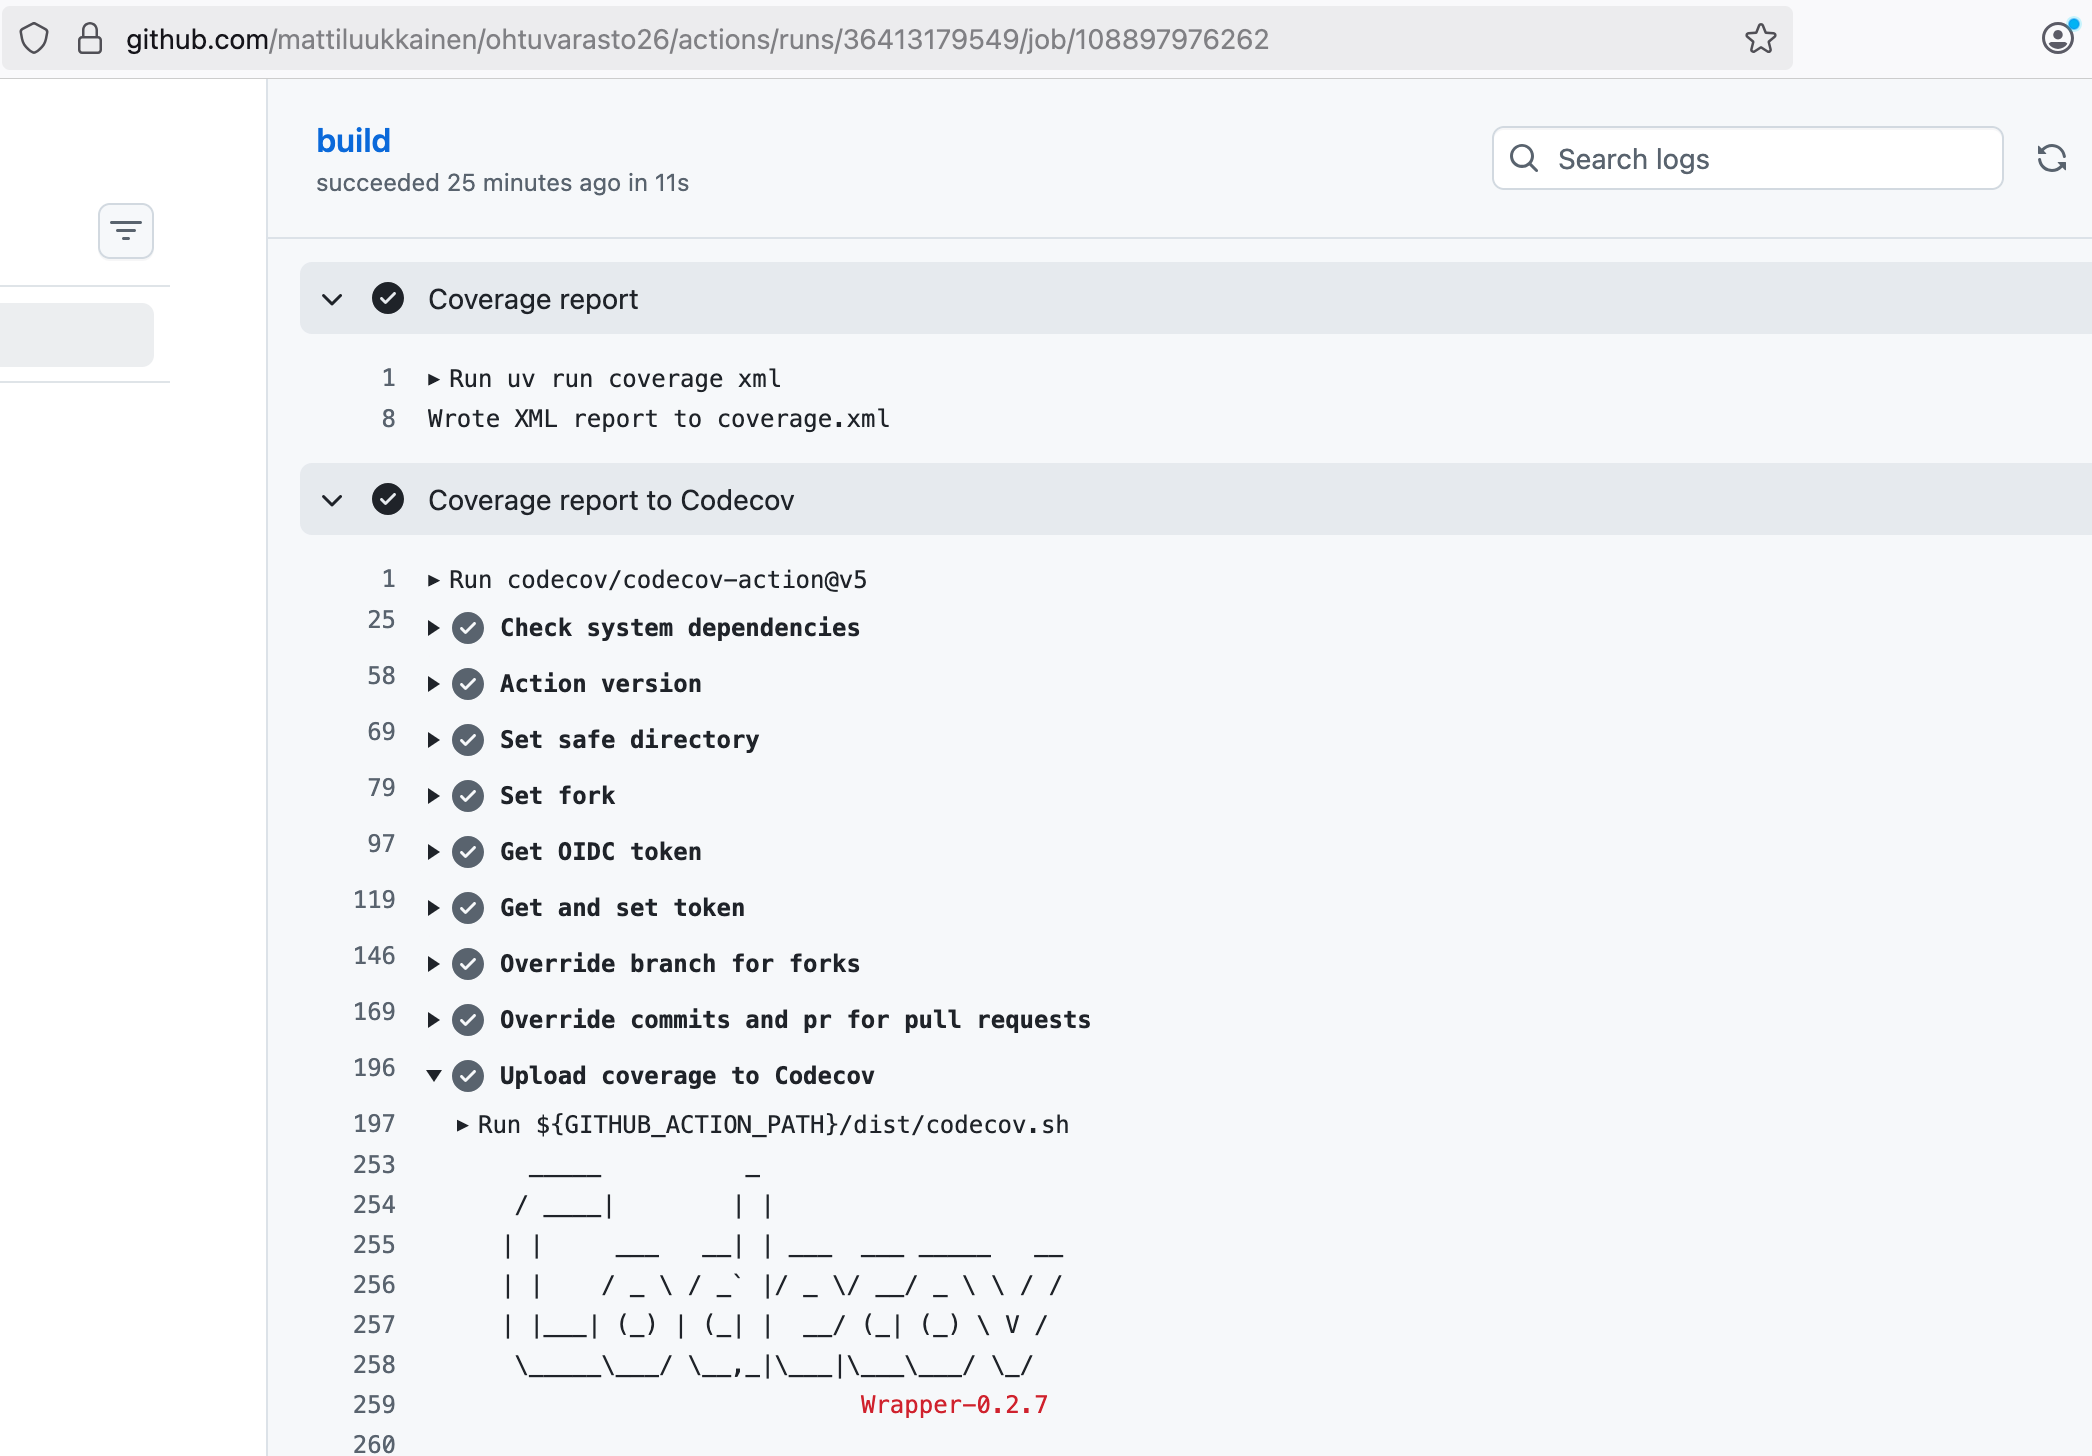
Also add a Codecov badge to the README.md file of your repository. You can find the badge in the Configuration menu of the repository’s Codecov page.
Your project’s GitHub page should finally look roughly like this:
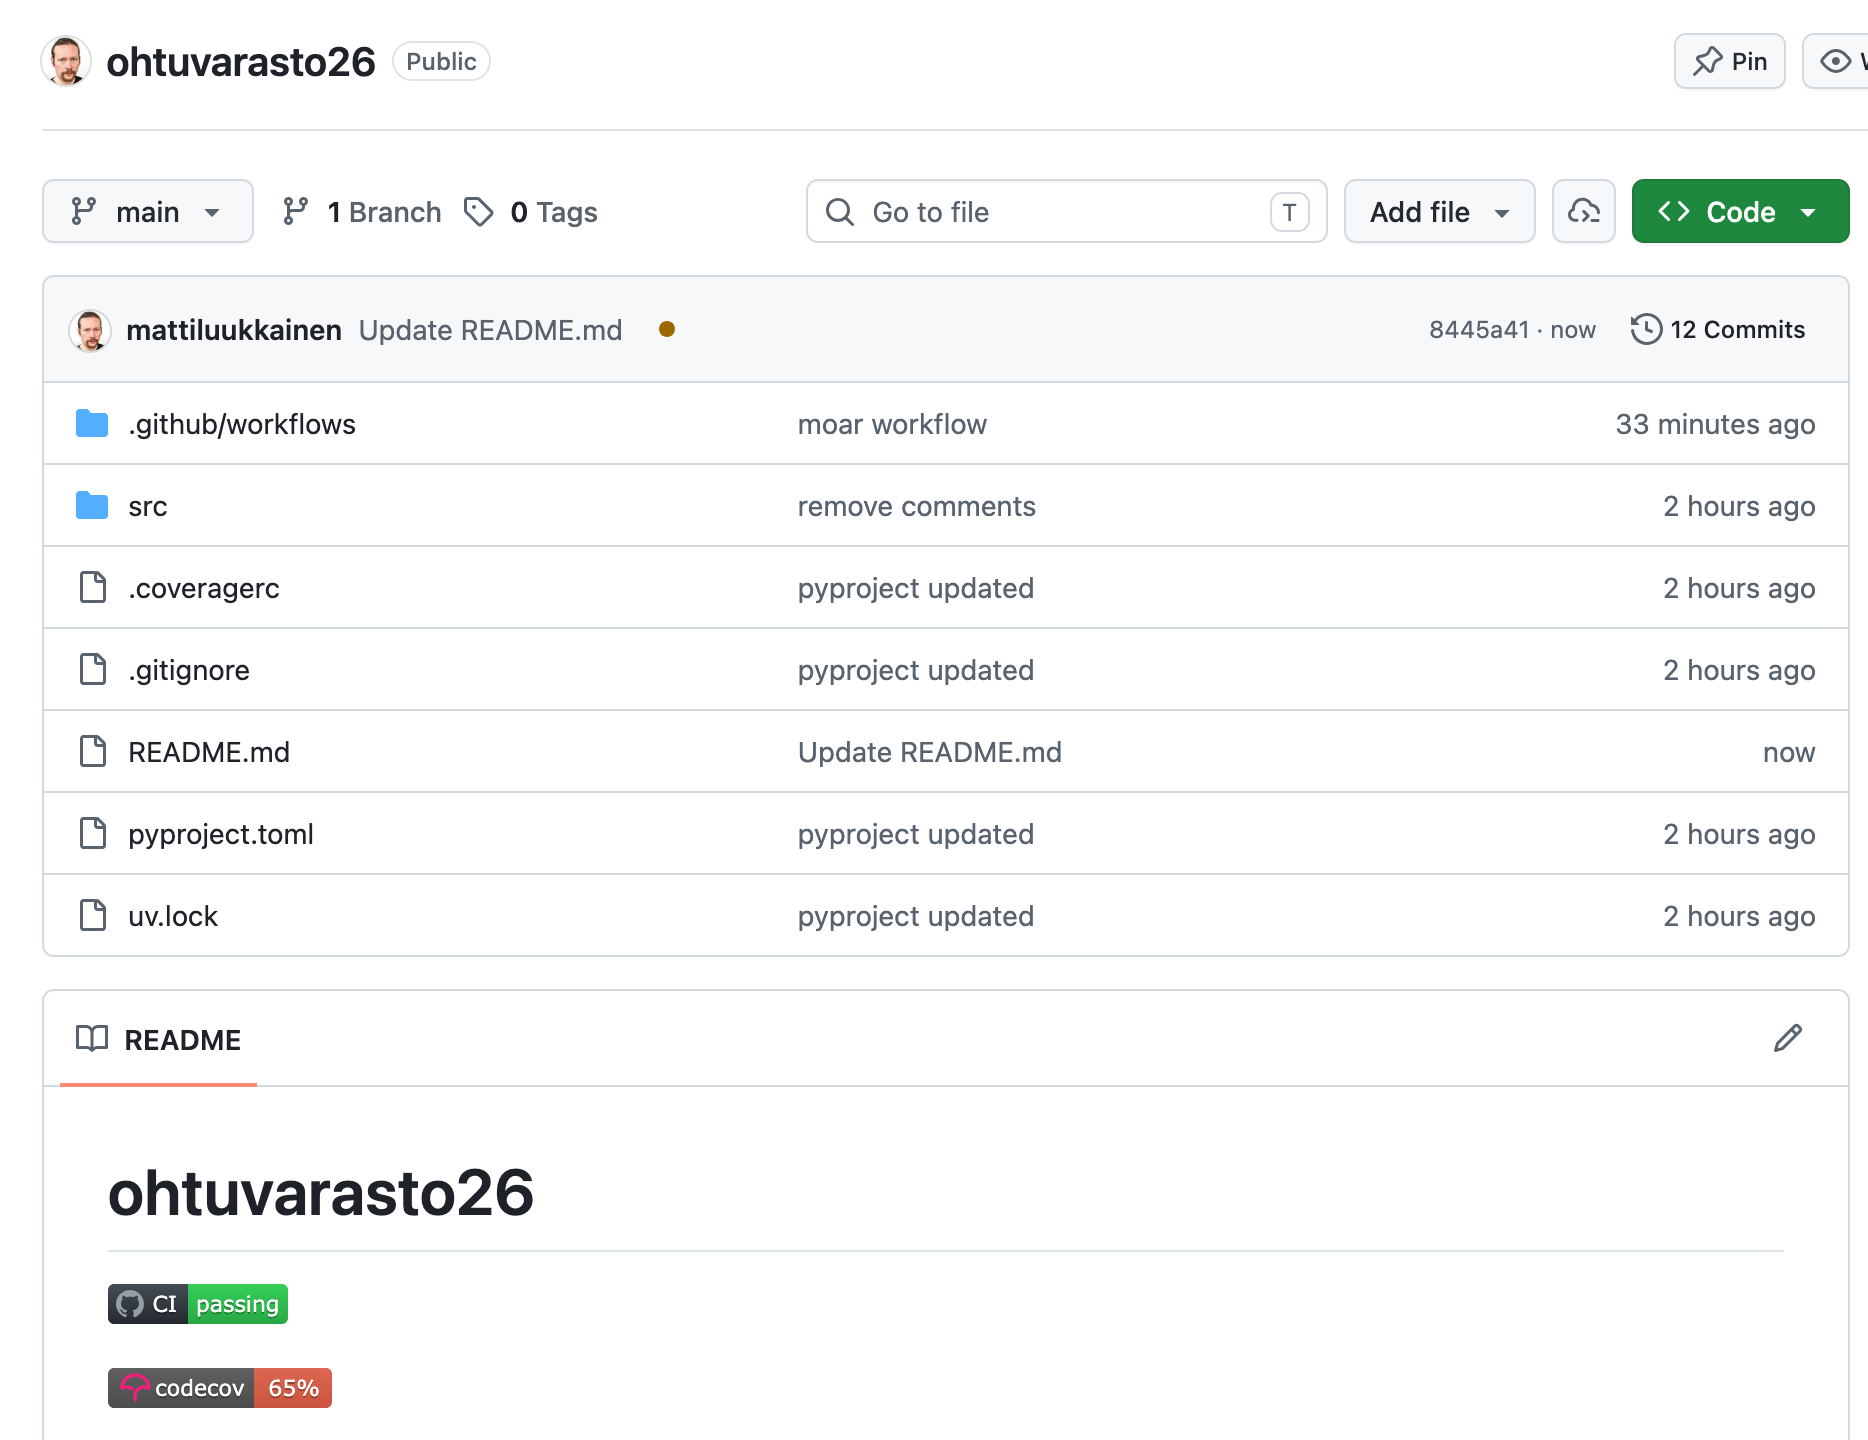
Note that the badges of GitHub Actions and Codecov are not updated fully in real time. So even if the project’s test coverage goes up, it takes a while before the badge shows the latest situation.
13. Better test coverage
The project’s test coverage is now disturbed by the fact that the file src/index.py is also counted in the test coverage. We can define that some files or entire directories are ignored when generating the coverage report.
Add an omit configuration to the .coveragerc file in the root directory and define the files to be ignored in it:
[run]
source = src
omit = src/index.py, src/tests/**
The configuration defines so-called glob paths separated by commas. We can ignore, for example, the path of a single file (src/index.py), or all paths under a certain directory (src/tests/**).
Push the code to GitHub and make sure that Codecov generates the report so that the file src/index.py is ignored.
Submission repositories for the exercises
As already stated earlier, this week you will create two separate GitHub repositories for the submissions:
- the first one (called ohtuvarasto) for exercises 2-13 and
- the second one for exercises 14-17 (we call this the submission repository)
The latter of the repositories (the one where exercises 14-17 are submitted) is also used as the submission repository for the exercises of the other weeks.
So now create a new repository.
The structure of the submission repository you create now can be, for example, the following:
viikko1
  riippuvuuksien-injektointi
  nhl-statistics-1
viikko2
  uv-web
  project-reader
  nhl-reader
viikko3
  webcounter
  login
...
To keep junk that doesn’t belong there out of the submission repository, it’s a good idea to create a .gitignore file in its root that contains at least the following lines
__pycache__/
.venv/
.pytest_cache/
.coverage
htmlcov/
output.xml
log.html
report.html
browser/
playwright-log.txt
14. Dependency injection part 1
This exercise is done in the submission repository you just created, i.e. we DO NOT USE the ohtuvarasto repository where you did exercises 2-13
During the course we will get to know a few design patterns, i.e. well-known solutions that suit many different situations and whose application often improves the maintainability of code.
The first design pattern of the course, dependency injection, is a simple principle; by following it, automated testing of code can in many situations be made decisively easier.
Get to know dependency injection by reading this document
Fetch the example project from the directory viikko1/riippuvuuksien-injektointi of the course’s exercise repository
- It is probably most sensible to clone the repository to your local machine
- After this, it’s a good idea to copy the project inside the submission repository you use for submitting exercises 14-17
- NOTE read 15 cm above how the code should be organised inside the submission repository
Make sure that the code and its tests work
- If you already forgot how uv projects work, revise exercise 7
Write a new test for the application that makes sure that the calculator can correctly compute two consecutive calculations
15. Dependency injection part 2: NHL statistics
This exercise is done in the submission repository you just created, i.e. we DO NOT USE the ohtuvarasto repository where you did exercises 2-13
The directory viikko1/nhl-statistics of the course’s exercise repository has a program that lets you explore the statistics on the https://nhl.com site (by changing the URL used by the application you can look at the statistics of different seasons).
Copy the project into its own directory under the submission repository
- NOTE: now we DO NOT USE the ohtuvarasto repository of exercises 2-13!
Install the project’s dependencies by running the command uv sync in its root directory
- The program consists of three classes.
StatisticsServiceis the class that provides the service; it offers methods for showing the information of one player, showing the points leaderboard, and showing the information of the players of one teamPlayeris the class whose objects theStatisticsServiceclass uses to handle the information of an individual playerPlayerReaderis the class the program uses to fetch the players’ information from the internet
- The program is now unpleasantly structured, and e.g. unit testing is very difficult
The exercise itself:
Change the structure of the program so that the StatisticsService class gets an object of the PlayerReader class as a constructor parameter, and that PlayerReader gets as a constructor parameter the address from which it fetches the players’ information
Change the main program so that it injects an object of the PlayerReader class (given the desired address as a constructor parameter) into the StatisticsService object, and check that the program still works:
stats = StatisticsService(
  PlayerReader("https://studies.cs.helsinki.fi/nhlstats/2024-25/players.txt")
)
NOTE: if you run into the error URLError: <urlopen error [SSL: CERTIFICATE_VERIFY_FAILED] certificate verify failed, a possible solution to the problem can be found here.
16. Unit testing the NHL statistics program
This exercise is done in the submission repository you just created, i.e. we DO NOT USE the ohtuvarasto repository where you did exercises 2-13
If you are lazy, you can outsource this exercise (too) to AI. From a learning point of view, however, it is better that you do most of the exercise yourself; you can of course ask for help with problems and details. For example, AI is a good help in generating suitable assert statements.
Write unit tests for the class StatisticsService
- Remember to name the test file, the test class and the test methods according to the unittest guide. Otherwise Pytest will not find the tests to run
- The branch coverage of the tests must be 100% for the
StatisticsServiceclass (measure the coverage with coverage, see exercise 8)- Note that the coverage report is not generated before tests have been added to the application
- You don’t need to care about the test coverage of the other classes
- The tests must not use a network connection
- You can eliminate the need for a network connection by creating for the test a “stub” resembling the
PlayerReaderclass, inside which you hard-code the list of players to return
import unittest
from statistics_service import StatisticsService
from player import Player

class PlayerReaderStub:
    def get_players(self):
        return [
            Player("Semenko", "EDM", 4, 12),  #  4+12 = 16
            Player("Lemieux", "PIT", 45, 54), # 45+54 = 99
            Player("Kurri",   "EDM", 37, 53), # 37+53 = 90
            Player("Yzerman", "DET", 42, 56), # 42+56 = 98
            Player("Gretzky", "EDM", 35, 89)  # 35+89 = 124
        ]

class TestStatisticsService(unittest.TestCase):
    def setUp(self):
        # give the StatisticsService object an object of the "stub" class
        self.stats = StatisticsService(
            PlayerReaderStub()
        )

    # ...
When you inject the PlayerReaderStub object into the StatisticsService object in the test, it always returns the same list of players.
17. Extending the NHL statistics program
This exercise is done in the submission repository you just created, i.e. we DO NOT USE the ohtuvarasto repository where you did exercises 2-13
Change the method top of the class StatisticsService so that it can be given a second parameter that defines by which “goodness criterion” the method returns the players.
The functionality of the method is shown by the following:
from statistics_service import StatisticsService, SortBy
from player_reader import PlayerReader

def main():
    stats = StatisticsService(
      PlayerReader("https://studies.cs.helsinki.fi/nhlstats/2024-25/players.txt")
    )

    # sort by total points, i.e. goals+assists
    print("Top point getters:")
    for player in stats.top(5, SortBy.POINTS):
        print(player)

    print()
    # without the second parameter the method works the same way as the call above
    for player in stats.top(5):
        print(player)

    print()
    # sort by goals
    print("Top point goal scorers:")
    for player in stats.top(5, SortBy.GOALS):
        print(player)

    print()
    # sort by assists
    print("Top by assists:")
    for player in stats.top(5, SortBy.ASSISTS):
        print(player)
The sorting criterion is defined as an Enum value:
from enum import Enum

class SortBy(Enum):
    POINTS = 1
    GOALS = 2
    ASSISTS = 3
Define the Enum in the file statistics_service.py, e.g. before the definition of the class StatisticsService.
Also write tests that verify the functionality of the new version of the method. If the sorting technique used by the StatisticsService class looks unfamiliar, the material of the programming course explains it in a bit more detail (in Finnish).
Why Enum?
Why does exercise 17 want the sorting principle to be expressed with enums? Couldn’t the desired order just as well be expressed with, say, a number, i.e. by writing the code as follows:
def main():
    stats = StatisticsService(
      PlayerReader("https://studies.cs.helsinki.fi/nhlstats/2023-24/players.txt")
    )

    # sort by points, the parameter 1 determines the order
    for player in stats.top(10, 1):
        print(player)

    # sort by assists, the parameter 3 determines the order
    print("Top by assists:")
    for player in stats.top(10, 3):
        print(player)
In principle this would work. This approach is called using magic numbers. It is considered highly reprehensible among programmers. Whoever originally wrote the code may remember for a while what the magic numbers mean. But as time passes and coders change, it starts to get blurry and is bound to cause nasty bugs. That is why magic numbers should be avoided, and enums or, say, constants (i.e. variables whose value is not changed) should be used instead.
Submitting the exercises
Add a file README.md to your repository containing exercises 14-17 (i.e. your so-called submission repository), in which you put a link to your ohtuvarasto repository containing exercises 2-13.
The submission repository should now look roughly like this

Push all the exercises you have done (except those where it says that the exercise is not submitted anywhere) to your submission repository on GitHub, and mark the exercises you have done in the submission app https://study.cs.helsinki.fi/stats/courses/ohtu-2026, on the my submissions tab.
- Give the repository containing exercises 14-17 in the submission app.
- If you didn’t do exercises 14-17, you can put a link to the ohtuvarasto repository containing exercises 2-13.
Reminder: if you haven’t yet answered the course’s pre-course survey, do it now.