This English version of the course material has been machine translated from the Finnish original and may contain errors. If something is unclear, check the Finnish version of this page.
Week 2
The deadline for the exercises below is Monday 9.11. at 23:59
You can get help with the exercises on the course Discord channel and on campus in the help sessions (paja) in BK107:
- Mon 16–19
- Tue 13–16
- Thu 16–19
- Fri 13–16
You can join the course Discord channel with the command /join course TKT20006 - Ohjelmistotuotanto - ohtu
Also remember this week’s multiple choice quizzes, whose deadline is Sunday 8.11. at 23:59:00.
In exercises 1-4 of the week you will get to know dependency management with uv and do some programming using a couple of libraries. Exercises 6-8 introduce static analysis of code with the Pylint tool. Exercise 9 starts the course’s series of [AI] exercises with GitHub Copilot or OpenCode. Getting to know Git continues in exercises 10-14.
Typos or unclear instructions in the exercises?
Suggest a fix by editing this file on GitHub.
Course feedback
In addition to the usual feedback collected at the end, the course uses so-called continuous feedback: you can give anonymous feedback to the course staff at any time at https://norppa.helsinki.fi/targets/112400522/feedback
Problems with uv?
Some instructions can be found here
Submitting the exercises
The exercises are submitted to GitHub, and by marking the completed exercises in the submission app https://study.cs.helsinki.fi/stats/courses/ohtu-2026 on the “my submission” tab.
Exercises 6 and 7 extend the first series of exercises of last week, so they are submitted to the ohtuvarasto repository, i.e. the same one that was used in exercises 2-13 of week 1. The other exercises are submitted to the submission repository, i.e. the same one where you submitted exercises 14-17 of the first week.
See more detailed instructions on the submission repositories here.
GitHub Education
Weeks 2–7 have [AI] exercises that you can do either with GitHub Copilot or with OpenCode. Choosing the tool and the reasons for the choice are covered in exercise 9 of week 2.
You can do most of the exercises with the free Copilot Free version, but its monthly quota is limited. When done with Copilot, the week 5 exercises require Copilot Student, a version that is free for students and that you get by activating a GitHub Education membership. If you plan to use Copilot, apply for the membership now. According to the internet, it can take up to a week for the application to be approved.
OpenCode uses the language models of the university’s CurreChat, so it does not require a GitHub Education membership.
Checkboxes for tracking your progress in the exercises
The exercise descriptions of the course are sometimes long, and it can be hard to spot the steps that require you to do something. To make the exercises clearer and easier to follow, the steps that require action are marked with checkboxes instead of bullet points.
You can use the checkboxes to keep track of your progress. When you have done a step, tick its box. This way you will not lose track of where you are. The ticks are saved in your browser’s local storage (localStorage), so they are kept even if you reload the page. The ticks do not move to another computer or browser, and they are not sent anywhere.
1. Practising uv
This exercise is done in the submission repository, i.e. the same one where exercises 14-17 of week 1 were done
Create a directory viikko2 in the submission repository, and inside it a directory uv-web for this exercise
Read more about the submission repositories here
Warning: pip
You may have installed Python dependencies with the pip command. Do not use pip on this course: if you do, you are 99.9% likely to do something wrong.
On this course, dependencies are installed with uv.
In practice, this means that you install dependencies with the command uv add kirjasto instead of pip install kirjasto.
In this exercise we practise using uv some more and get to know semantic versioning. You can get help for the exercise from e.g. the uv guide and the uv documentation.
Imagine a situation where you work as a software developer in a development team that is starting to develop a web application. You have decided to develop the application in Python and to use uv for dependency management.
Do the following:
Initialise a project with uv in a directory named uv-web inside the directory viikko2 of the repository you use for submitting the exercises
You google for suitable libraries for a web application and come across the Flask framework.
Install Flask as a dependency of the project with uv
The first bug appears in the application. The reason is probably that not a single test has been written for the application yet. You decide to use the pytest library for testing.
Install pytest as a development dependency of the project
- Think for yourself why it is useful to define a dependency separately as a development dependency
The application uses a relational database, so you start looking for suitable libraries for the purpose. You come across a suitable library called SQLAlchemy.
Install SQLAlchemy as a dependency of the project
You notice a bug in the SQLAlchemy library, so you start looking through the issues of its GitHub repository. One issue says that the bug you found does not appear in version 1.4.54 of the library.
Install version 1.4.54 of the SQLAlchemy library
Get to know semantic versioning here
- Think about the benefits of semantic versioning. If a library follows semantic versioning, why may updating version
1.4.54of the library to version2.0.44involve risks? Why are the same risks probably not there from version2.0.5to version2.0.44? - Version requirements often include e.g. the
>=,==or~=operator. Find out what they express. This is covered e.g. in the uv documentation
You hear from a friend that instead of Flask you should use the FastAPI library.
Remove Flask from the project’s dependencies and install FastAPI.
The submitted uv-web directory doesn’t need to contain any files other than pyproject.toml and uv.lock.
2. Using dependencies: Player list
Fetch the almost empty skeleton of a uv project from the directory viikko2/nhl-reader of the course repository. It includes the class Player that you will soon need.
Copy the project to your submission repository, inside the directory viikko2.
Let’s make a program that can fetch the statistics of different seasons of the ice hockey league NHL.
You can see the raw data of the statistics in JSON format with a web browser at https://studies.cs.helsinki.fi/nhlstats/2024-25/players
Next, let’s make a program that lists the statistics of the players of a given country.
The program needs one library, i.e. dependency. That library is the requests library, which can be used to make HTTP requests. Note that Python also has built-in modules for this purpose, but the requests library is considerably easier to use than these modules.
So install the requests library as a dependency of the project. Use the latest version of the library (which uv installs automatically).
You can use the following file as the basis of your project:
import requests
from player import Player

def main():
    url = "https://studies.cs.helsinki.fi/nhlstats/2024-25/players"
    response = requests.get(url).json()

    print("JSON-muotoinen vastaus:")
    print(response)

    players = []

    for player_dict in response:
        player = Player(player_dict)
        players.append(player)

    print("Oliot:")

    for player in players:
        print(player)
The exercise template already contains a skeleton of the code of the class Player. In the code above, requests.get(url) makes an HTTP request, after which calling the json method turns the JSON response into Python data structures. In this situation response contains a list of dictionaries. This list is turned into a list of Player objects with a for loop.
The purpose of this exercise is to implement functionality that makes it possible to print the players of a given nationality, e.g. the Finns.
Add attributes to the Player class for all the fields in the JSON data that your program needs.
Finish the program so that it lists the statistics of Finnish players.
Your program can work, for example, so that it prints the players in the following way:
Players from FIN:

Juuso Välimäki team UTA  goals 2 assists 3
Anton Lundell team FLA  goals 17 assists 28
Ville Ottavainen team SEA  goals 0 assists 1
Roope Hintz team DAL  goals 28 assists 39
Rasmus Ristolainen team PHI  goals 4 assists 15
Ville Koivunen team PIT  goals 0 assists 7
Mikael Pyyhtia team CBJ  goals 4 assists 3
Mikko Rantanen team COL, CAR, DAL  goals 32 assists 56
...
The output format is not essential in this exercise, and neither is what information about the players is printed.
3. A tidier player list
Print the Finnish players sorted by points (goals + assists).
Again, the exact output format is not essential, but it can for example look like this:
Players from FIN

Mikko Rantanen        COL, CAR, DAL   32 + 56 = 88
Sebastian Aho         CAR             29 + 45 = 74
Aleksander Barkov     FLA             20 + 51 = 71
Roope Hintz           DAL             28 + 39 = 67
Mikael Granlund       SJS, DAL        22 + 44 = 66
Teuvo Teravainen      CHI             15 + 43 = 58
Anton Lundell         FLA             17 + 28 = 45
Artturi Lehkonen      COL             27 + 18 = 45
Kaapo Kakko           NYR, SEA        14 + 30 = 44
Eeli Tolvanen         SEA             23 + 12 = 35
...
- Hint 1: Here is an explanation of how sorting is done in Python
- Hint 2: if you like, you can use the filter function.
- Hint 3: try what
f"{self.name:20}"does to the string representation in the__str__method of thePlayerclass. - Hint 2 in particular is weak, see below how to get help from AI
- Parts 11 and 12 of the Ohjelmoinnin MOOC (in Finnish) also cover things that are useful for the exercise
Hint: using AI in the exercise
Hint 2 suggested getting to know Python’s filter function. The documentation is poor, as is quite often the case with Python.
AI gives quite good instructions with the prompt how does the python function filter work

The examples contain a lambda, whose working principle has slipped from memory. Let’s ask the AI with the following prompt: explain how a python lambda works.
Hopefully the idea becomes clear and the exercise gets solved.
AI also gives good answers about how the f-strings mentioned in hint 3 work; the prompt could be e.g. recap the principles of python f-strings
After the basics you can try a prompt more specific to the exercise: how do I get columnar output with f-strings
4. Refactoring the player list
At the moment, most of the code related to player information is probably in the main function. The degree of cohesion of the function is rather low, because it focuses on implementing several pieces of functionality. So the code could use a little refactoring.
Split the responsibilities of the functionality between two classes: PlayerReader and PlayerStats.
- The
PlayerReaderclass is responsible for fetching the players in JSON format from the address given as a constructor parameter, and for creatingPlayerobjects from them. This can happen e.g. in the class’sget_playersmethod. - The
PlayerStatsclass is responsible for producing various statistics based on the players provided by thePlayerReaderclass. In this exercise it is enough that the class has a methodtop_scorers_by_nationality, which returns the players of the nationality given as a parameter in descending order of points (highest points first).
After the refactoring, the main function should look roughly like this:
def main():
    url = "https://studies.cs.helsinki.fi/nhlstats/2024-25/players"
    reader = PlayerReader(url)
    stats = PlayerStats(reader)
    players = stats.top_scorers_by_nationality("FIN")

    for player in players:
        print(player)
The function should print the same players in the same order as in the previous exercise.
5. Graphical player list
Extend your application by adding functionality to it and by formatting the output with the Rich library.
You can find instructions for using the library in its documentation, by googling, or from AI.
The application must be able to show the statistics of the players of the country the user wants, from the season the user specifies.
The application can work, for example, like this:

This exercise is done in the submission repository, i.e. the same one where you did the previous exercise
6. Pylint and static analysis of code
This and the next exercise are done in the ohtuvarasto repository used in exercises 2-13 of last week
The theme of the third part of the course is assuring the quality of software. One factor that usually improves the quality of a program is following a sensible coding style. The style of code can be monitored automatically with so-called static analysis tools.
Let’s now get to know a static analysis tool called Pylint. You may already be familiar with Pylint from the course Ohjelmistotekniikka.
Start by reading the Pylint guide borrowed from the course Ohjelmistotekniikka.
Now go to your submission repository for the exercises related to the varasto project of week 1.
Take Pylint into use in the varasto project by following the instructions you read.
For now, the contents of the .pylintrc file used as the configuration follow the contents of this file.
The rules checked by Pylint are configured in the .pylintrc file under the right sections. The [main] section contains general configuration, such as which directories or files should be left out of the checks. In the [MESSAGE CONTROL] section, on the other hand, you can define e.g. checks that don’t need to be reported. The rest of the sections are for configuring the various rules, which are documented in Pylint’s documentation.
If, for example, we want to set the maximum number of arguments to four for functions and methods, we can add it to the [DESIGN] section as follows:
[DESIGN]

max-args=4
The rule max-args is defined in the documentation as follows:

So the two dashes at the beginning of the rule’s name should not be written in the file .pylintrc
The easiest way to find rules is to search the documentation with a suitable search term, to google, or to ask AI. You can find the right section in the documentation (for example, the max-args rule is in the documentation under the Design checker section).
Now do as follows:
Enter the virtual environment with the command source .venv/bin/activate and run the command pylint src inside it. If the checks find errors, fix them
Now define the following rules in the file .pylintrc (see the list of rules in Pylint’s documentation):
- The maximum line length is 80 characters
- Tip: the rule is in the Format checker section and must be defined under the
[FORMAT]section
- Tip: the rule is in the Format checker section and must be defined under the
- The width of one indentation level is 4 characters
- No more than two nested blocks (e.g. if or for blocks) inside a function or method
- Tip: the rule is in the Refactoring checker section and must be defined under the
[REFACTORING]section)
- Tip: the rule is in the Refactoring checker section and must be defined under the
- A function or method has at most 10 statements. Find the rule in the documentation
- you can shorten the function main in index.py so that it meets the condition
- Also define some rule of your own choice that sounds interesting/useful
Change your code so that you get each of the defined Pylint rules to break
Fix your code and make sure that it follows all the rules
Often it is not sensible to write the .pylintrc configuration by hand from scratch; instead, the configuration recommended by Pylint is used as the starting point. You can print the recommended configuration on the command line with the command pylint --generate-rcfile.
7. Static analysis of code and GitHub Actions
This exercise is done in the ohtuvarasto repository used in exercises 2-13 of last week
Extend the GitHub Actions definition of your ohtuvarasto so that the Pylint checks are also run whenever code is pushed to GitHub
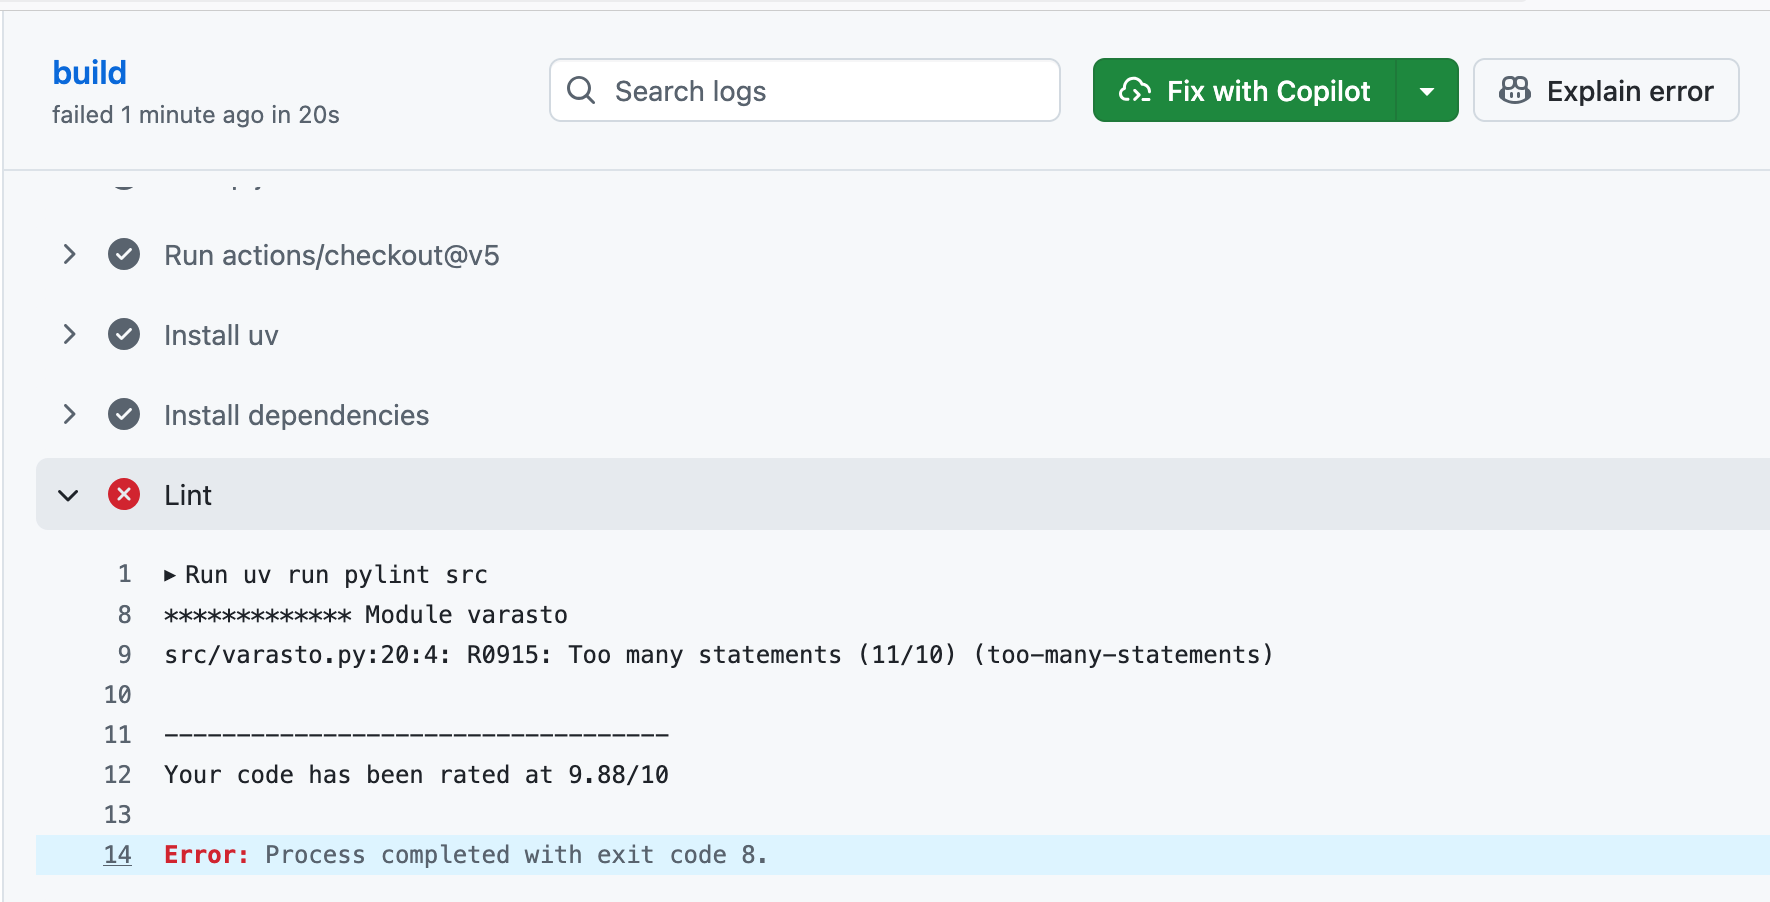
Make sure that GitHub notices a situation where the code breaks the project’s Pylint rules:
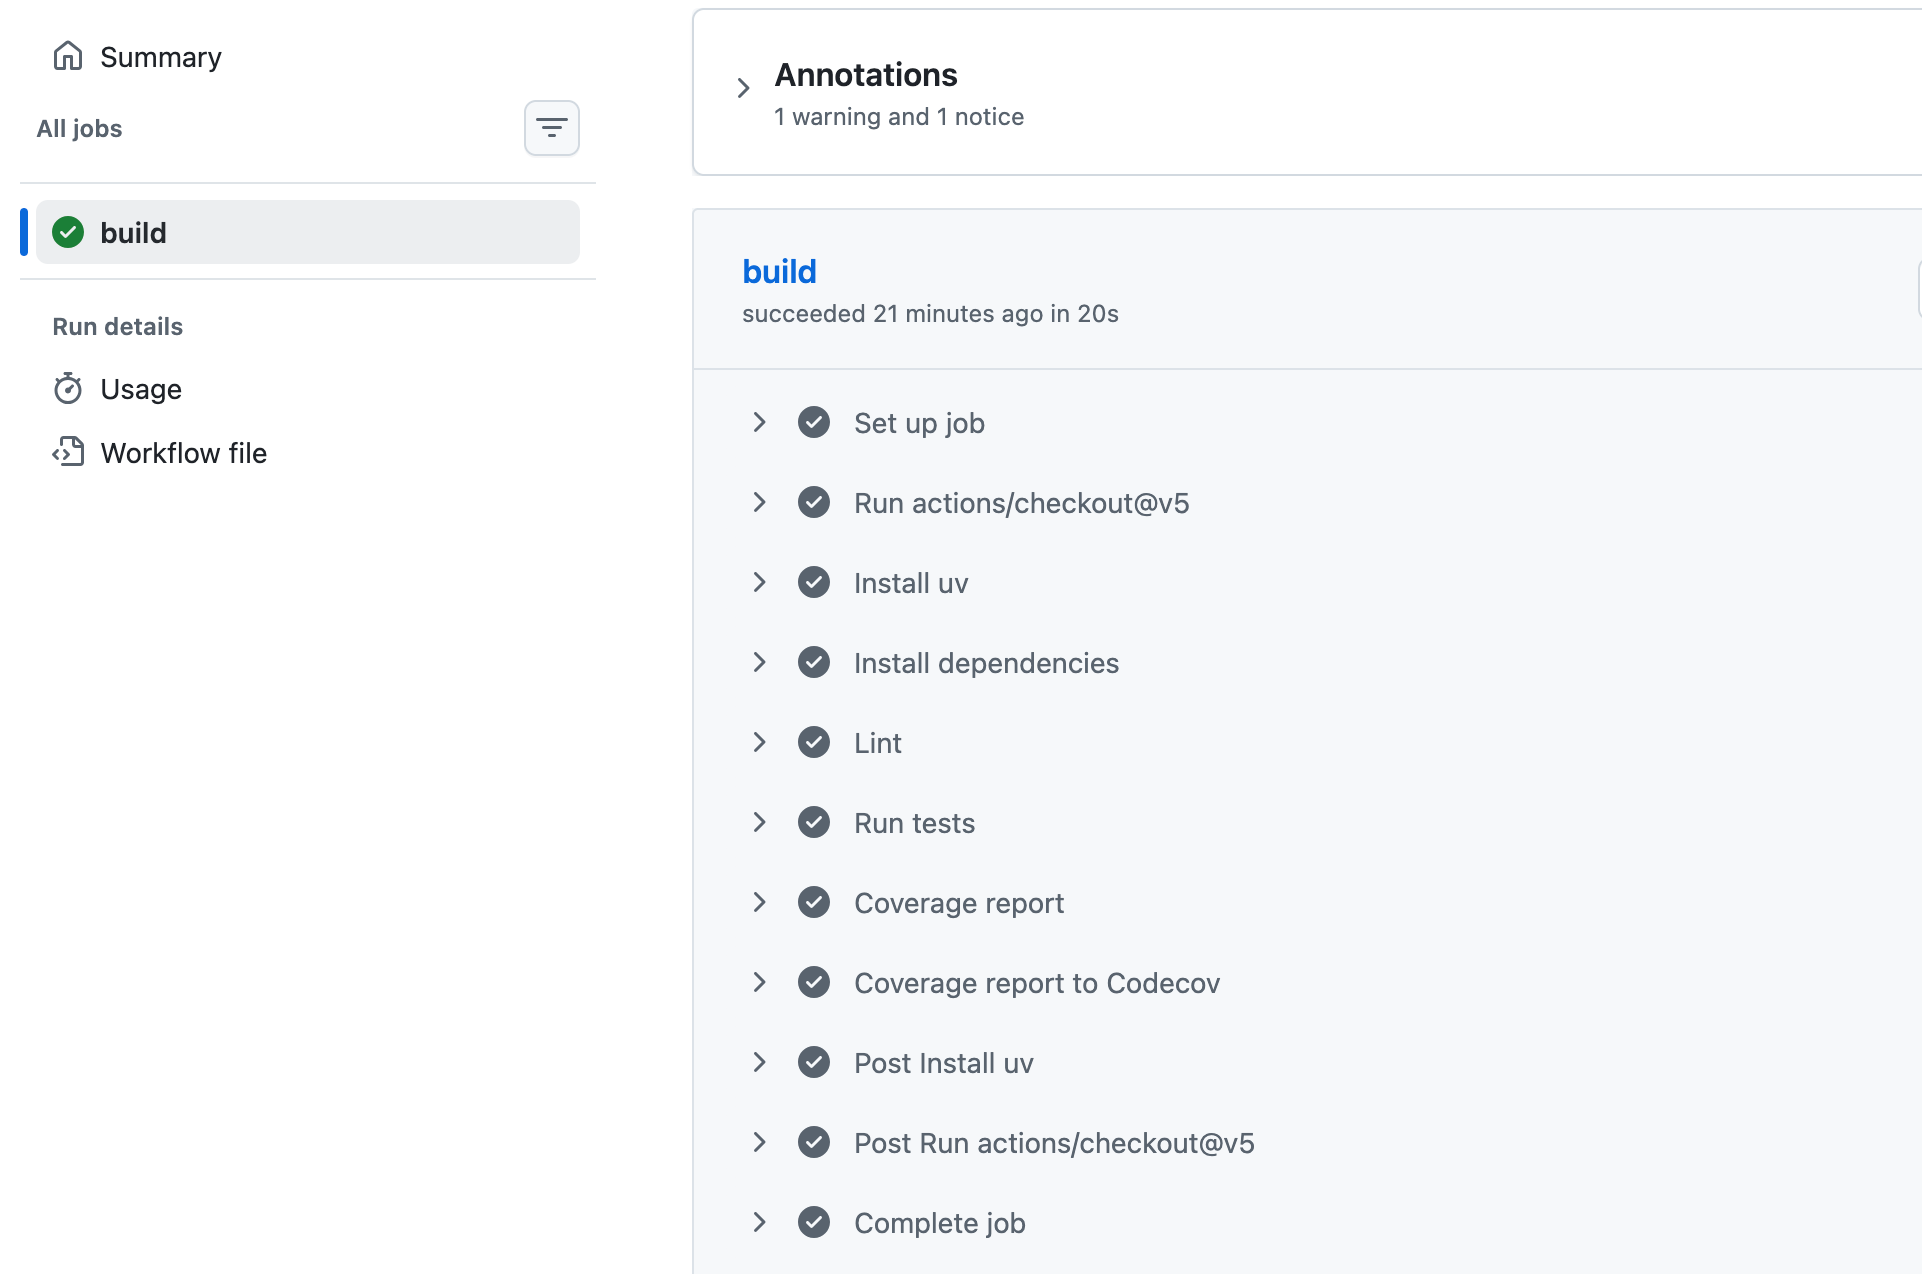
Also make sure that when you fix the code, everything works flawlessly again:
8. Precommit hook and Pylint
So the GitHub Action makes sure that Pylint errors that end up in the repository are noticed. It would of course be better if the developer always ran Pylint on their own machine and fixed the errors before they slip through to GitHub. Developers, however, are often lazy and forgetful, so Pylint easily goes unrun locally. Git offers a handy feature, hooks, which lets us automate various operations to be run e.g. before a commit.
In Python projects, configuring hooks is easy with the precommit tool.
Install pre-commit in ohtuvarasto with the following command
uv add pre-commit --dev
Add the file .pre-commit-config.yaml to the root of the project with the following content
repos:
- repo: local
  hooks:
    - id: pylint
      name: pylint
      entry: pylint
      language: system
      types: [python]
      require_serial: true
After the definition, the precommit hook still has to be installed by running the following command in the project’s virtual environment
pre-commit install
Note that the command must be run every time the file .pre-commit-config.yaml is changed!
Now when you run the command git commit -m"viesti", Pylint is run before the commit, and if there are errors in the code, the commit fails.
Make a Pylint error in the code and make sure that the precommit hook detects the error.
Also add Pylint to the project nhl-reader of exercises 2-5 and fix any errors. Use a configuration similar to the one you made in exercise 6. You can increase the maximum line length; 80 is rather little in modern times.
Bonus: submission repository and precommit hook
Configure your submission repository so that it runs Pylint in a precommit hook for the project nhl-reader of exercises 2-5. This exercise is a bit more challenging, because the uv environment is not defined in the root of the repository.
Instead of the precommit tool, it may be easier in this exercise to make the precommit hook “by hand” in the file .git/hooks/pre-commit in the root of the project.
It’s worth using every possible aid, from Google to AI.
9. First contact with a coding agent [AI]
This is the first [AI] exercise of the course.
Before the exercise, read the chapters What is a language model, Forms of AI-assisted programming and Understanding unfamiliar code of the material AI in software engineering.
Copilot or OpenCode?
You can do the [AI] exercises either with GitHub Copilot in VS Code or with the open source OpenCode agent in the terminal. The exercises work with both, and the instructions cover both tools. You pick the tool with the switch at the beginning of the exercise. The choice applies to all exercises, and you can change it at any time.
Choose Copilot if
- you want to use AI directly inside VS Code, including code completion in the editor
- you have a GitHub Education membership or will apply for one: the week 5 exercises use GitHub’s Copilot code review and cloud agent, which require Copilot Student, a version that is free for students
Choose OpenCode if
- you do not want to apply for a GitHub Education membership: OpenCode uses the language models of the university’s CurreChat, so it is free for students without any separate membership
- you want to try an editor-independent agent that runs in the terminal and is used much like Claude Code
- you want to use an open source tool in which you can freely switch the language model
The exercises were originally written for Copilot, and the OpenCode versions of weeks 5–7 have not yet been tested as thoroughly. Their OpenCode instructions may therefore contain more errors and unclear parts.
If you cannot decide, choose Copilot. The week 5 exercises that rely on GitHub integration are more straightforward with it, and with OpenCode they are done on your own machine.
Both tools come with a quota: Copilot has a monthly quota, and CurreChat tokens are limited. So think about what you use AI for, and do not waste your quota on pointless experiments.
Note: if you run out of CurreChat tokens, you can get more by sending a message to matti.luukkainen@helsinki.fi or to the user mluukkai on Discord.
This exercise uses GitHub Copilot in VS Code. You can do the exercise with the free Copilot Free version, so your GitHub Education application doesn’t need to be approved yet. The monthly quota of the Free version is limited, so don’t waste it on pointless experiments.
This exercise uses OpenCode. Install it and connect it to CurreChat’s language models according to the instructions on the page. It is enough to read the instructions up to the section Instruction file.
Let’s continue with the nhl-reader project of exercises 2-5 and 8. Before you start, make sure that all changes have been committed and that Pylint is in use in the project.
Take Copilot into use in VS Code: log in with your GitHub account through the Copilot view. If needed, see the instructions here
Open the directory viikko2/nhl-reader in VS Code as its own workspace, e.g. with the command code . in the project directory
Unlike Copilot, OpenCode by default edits files and runs commands without asking for permission. So before you start, turn on approval of commands and edits: add the file opencode.json to the root of your submission repository; its content is in the section Approving commands of the OpenCode page. A file in the root applies in all subdirectories of the repository, so you don’t need to create it separately for the projects of later weeks
Start OpenCode in the directory viikko2/nhl-reader with the command opencode
Code completion
Write in the class PlayerStats the definition of a new method and a docstring describing it, e.g.
def top_goal_scorers(self, how_many):
  """Returns the how_many players with the most goals in descending order of goals"""
and wait for Copilot to suggest the body of the method.
Read the suggestion before you accept it (Tab). Does the code do what the docstring promises? Is the code in the same style as the other methods of the class?
Inline suggestions are Copilot’s old, original feature, which nowadays acually does more harm than good, and which agent mode has in practice replaced. So it’s a good idea to turn them off after trying them out.
Suggestions are also pedagogically a bad thing when you write code partly yourself: the suggestion appears before you have had time to think about the solution yourself, and pressing the Tab key easily replaces your own thinking. That way you don’t learn from the exercises exactly what they are meant to teach.
You can turn the suggestions off by clicking the Copilot icon in the bottom bar of VS Code and unchecking Ghost text suggestions:
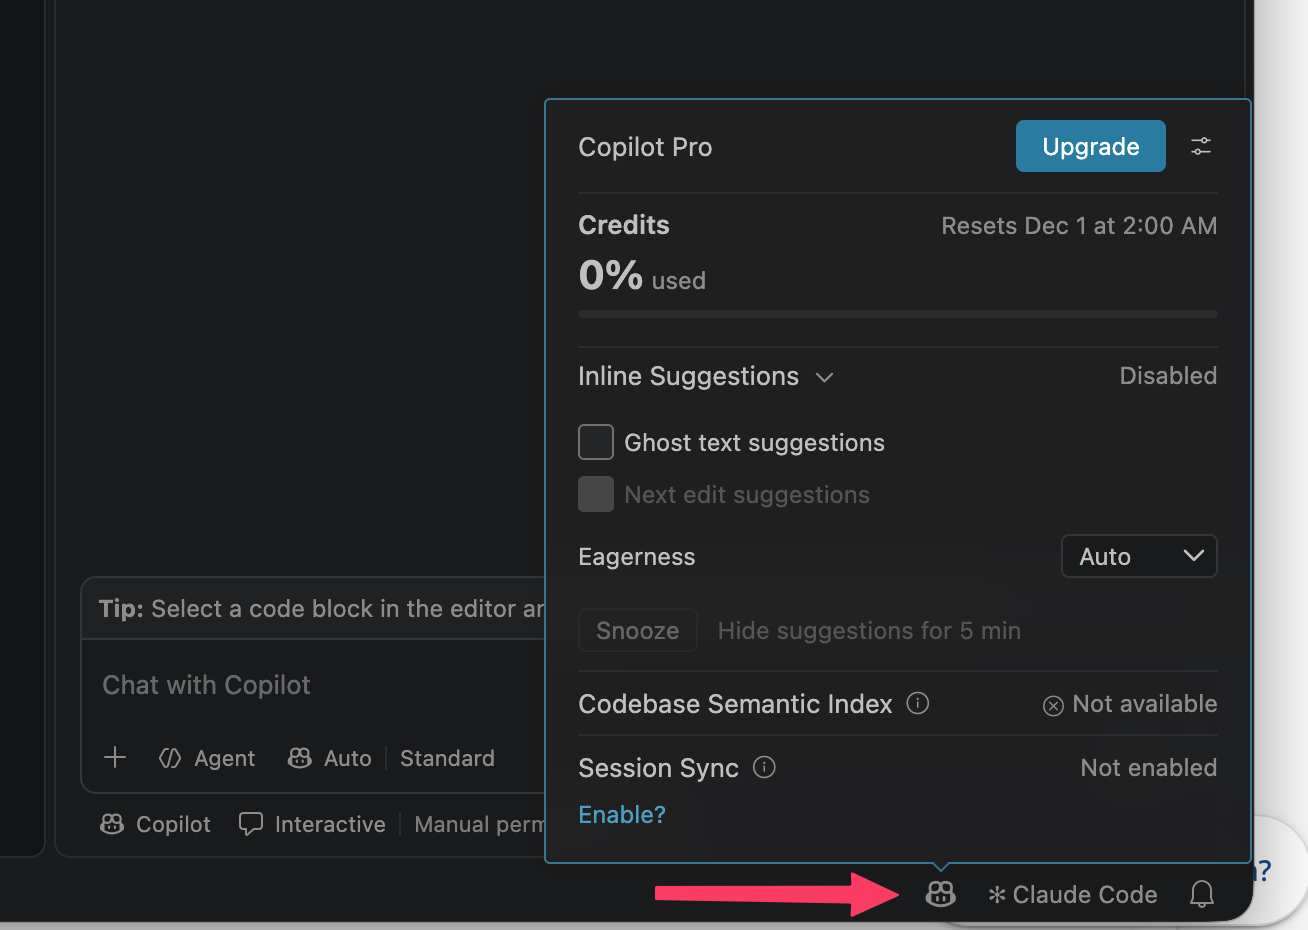
Chat and the agent work normally even when inline suggestions are turned off.
Before we start using the agent in the modern way to implement larger features, let’s try what used to be the typical way of coding with AI: the programmer writes the definition of a method and a comment describing it, and the AI completes the implementation. OpenCode has no in-editor code completion, so let’s ask the agent to implement a single method:
Write in the class PlayerStats the definition of a new method and a docstring describing it, e.g.
def top_goal_scorers(self, how_many):
  """Returns the how_many players with the most goals in descending order of goals"""
and ask the Build agent (the default agent; the selected agent is shown in the bottom right corner) to implement the method, e.g. “Implement the method top_goal_scorers in the file @src/player_stats.py”. In the reference, use the file where your class PlayerStats is.
Read the change before you accept it. Does the code do what the docstring promises? Is the code in the same style as the other methods of the class?
After the implementation, the agent may try to run the project’s tests, and the run fails. You don’t need to care about this at this point, as we return to the tests at the end of the exercise.
Chat: explaining code and errors
Open Copilot’s Chat view and select the Ask mode. If the Ask mode is not in the menu, see this. Ask Copilot to explain how the project’s code works, e.g. “Explain how #file:player_reader.py works”
Switch with the Tab key to the Plan agent, which does not change files. Ask it to explain how the project’s code works. A file is referenced with the @ sign, e.g. “Explain how @src/player_reader.py works”
Also ask for an explanation of a single method, e.g. the method top_scorers_by_nationality of the PlayerStats class. Select the lines of the method in the editor and ask in the chat e.g. “Explain the selected code”, and the selection is attached to the request automatically.Give the name of the method or the line numbers in the request, e.g. “Explain the method top_scorers_by_nationality in the file @src/player_stats.py” or “Explain lines 10–20 of the file @src/player_stats.py”.
If you use OpenCode in the VS Code terminal and its VS Code extension is installed, you can also select lines in the editor and add a reference to them in the request with the key combination Cmd+Option+K (Mac) or Alt+Ctrl+K (Windows and Linux).
Break one of the Pylint rules you defined in exercise 6 in your code, and run uv run pylint src from the command line. Copy the error message to Copilot’s chat and ask Copilotto OpenCode and ask the Plan agent to explain what the Pylint warning is about and why the rule exists
Check Copilot’sthe agent’s explanation against Pylint’s documentation. Was the explanation correct?
Fix the code back so that it follows the rules
Agent: new functionality and tests
Select the Agent mode in the Chat viewSwitch to the Build agent with the Tab key and ask the agent to add to the application the ability to show the players of a desired team sorted by points
The agent may check its code with the command
python -m compileall src. The command compiles the Python files of the directory src into bytecode (in the__pycache__directories) and thus reveals syntax errors without running the program. However, it tells nothing about whether the code works correctly, so the agent’s “check” does not replace trying out the application and tests.
Test yourself that the new functionality works and that the players of the desired team are shown in the right order
The easiest way to try out the new method is with a simple test main program, made in its own file, e.g. src/kokeilu.py:
from player_reader import PlayerReader
from player_stats import PlayerStats

url = "https://studies.cs.helsinki.fi/nhlstats/2026-27/players"
stats = PlayerStats(PlayerReader(url))

for p in stats.top_scorers_by_team("DAL"):
    print(p)
Run the program with the command uv run python src/kokeilu.py. Use the names of the method and modules that your application has.
Ask the agent to write unit tests for the class PlayerStats. Require that the tests do not use a network connection, but that a stub is used in place of the PlayerReader class, as in exercise 16 of week 1
Read every command before you give the agent permission to run it.Read every command and edit before you give the agent permission. If OpenCode does not ask for permission, check the opencode.json you created at the beginning of the exercise.
Make sure yourself that the tests pass (uv run pytest) and that they don’t make HTTP requests.
It is possible that running the tests from the command line causes an error. If the command doesn’t work, ask the agent to run it and fix the situation.
Go through the change made by the agent with the command git diff. Did the agent edit something it was not asked to touch?
Run uv run pylint src and make sure that the agent’s code follows the same rules as yours. If Pylint finds errors, fix them yourself or ask the agent to fix them. If you did the precommit hook of the bonus exercise, it does the check automatically when you commit
Commit the changes
Write a report of your experiences in the file copilot.mdopencode.md, saved in the directory viikko2 of the submission repository
In the report, tell
- How useful did you find the code completion suggestions?Did the agent implement the method
top_goal_scorersaccording to the docstring and in the style of the rest of the class’s code? - Was Copilot’sthe agent’s explanation of the Pylint warning correct?
- Did the agent produce a working solution, and tests?
- Is there something in the tests that differs from how tests were written last week?
- Did Pylint find errors in the agent’s code?
- What else did you learn?
10. Git: branches [version control]
This exercise is done in the submission repository, i.e. the same one where exercises 1 and 2 were done
Read the parts dealing with branches from https://git-scm.com/book/en/v2/Git-Branching-Basic-Branching-and-Merging
- if you want to read a somewhat more thorough explanation of the topic, read chapter three of https://git-scm.com/book/en/v2 in its entirety
Also worth noting is the fairly good visual material on branches at https://learngitbranching.js.org/
https://www.atlassian.com/git/tutorials/using-branches also seems quite clear
Language models are also quite knowledgeable about Git, so in an emergency you can turn to e.g. CurreChat.
Note: when you move between branches, it’s a good idea to keep the working tree and the staging area empty!
Create a subdirectory git-branch-harjoitus in the directory for the week 2 exercises of the submission repository for the code of this and the next few exercises.
Go to the directory you created
Make sure that you are in the branch main and that all changes have been committed:
$ git status
On branch main
nothing to commit, working tree clean
Create in the directory a file index.py with the following content
x = int(input("luku 1: "))
y = int(input("luku 2: "))
Add and commit the file to version control
Create a branch laskut, switch to the branch (this is done e.g. with the command git checkout -b laskut), and create there a file summa.py with the following content
def summa(x, y):
    return x+y
Add and commit the file to version control
Switch back to the main branch (with the command git checkout main); the file summa.py should not be visible now
- note: once more a reminder that when you switch from one branch to another, always make sure with the command
git statusthat all changes have been committed
Create a file logger.py with the following content
from datetime import datetime

def logger(viesti):
  print(f"{datetime.now()}: {viesti}")
Also change the file index.py as follows:
from logger import logger

logger("aloitetaan")

x = int(input("luku 1: "))
y = int(input("luku 2: "))

logger("lopetetaan")
Commit these changes to the main branch
Go to the branch laskut and check that the file added to main is not in the branch and that the change made to the file index.py is not visible
Create in the branch a file erotus.py with the following content
def erotus(x, y):
    return x-y
Add and commit the file to version control
Switch back to the main branch
Check that the changes added to the laskut branch are not in main
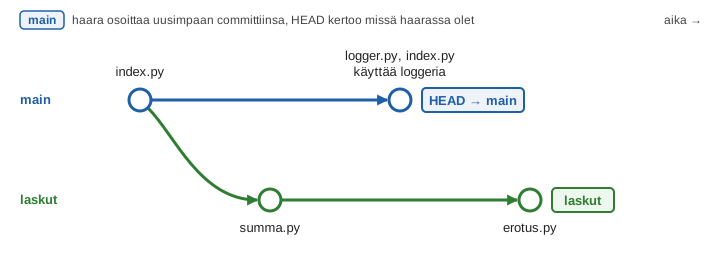
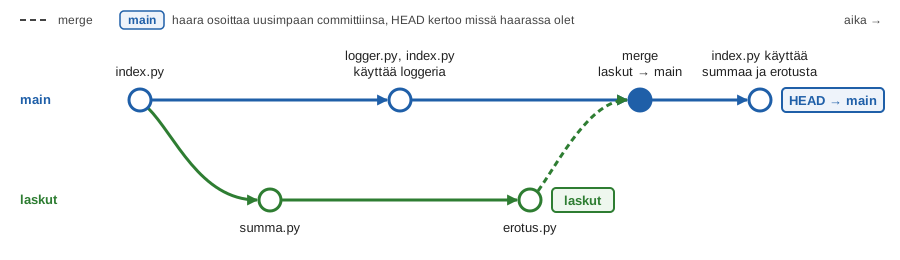
The history of the repository now looks like this. The branches have diverged after the first commit:
Look with the command gitk --all at what the repository and the branches look like (the gitk command works on Windows at least in the Git Shell of GitHub for Windows.)
- You can install
gitkon a Mac with Homebrew with the commandbrew install git-gui- if the installation doesn’t succeed, a good replacement for gitk is sourcetree
Merge the contents of the branch laskut into main (this is done with the command git merge laskut)
- Merging creates a so-called merge commit and opens a text editor in which you have to write a commit message
- If you haven’t defined an editor for git according to the instructions of exercise 2 of last week, git’s default editor vim may open
- Exiting vim may turn out to be hard for a first-timer; Google helps if needed
Look with the command gitk –all at how the situation has changed
Change the file index.py as follows:
from logger import logger
from summa import summa
from erotus import erotus

logger("aloitetaan")

x = int(input("luku 1: "))
y = int(input("luku 2: "))
print(f"{summa(x, y)}")
print(f"{erotus(x, y)}")

logger("lopetetaan")
add and commit the change to version control
Look again at what it looks like with the gitk --all command
The end result looks like this. The merge commit has two parents, so main now also contains the changes of the laskut branch. The branch laskut still points to the same commit as before the merge:
11. Git: branches and the staging area [version control]
Make sure that you are in the main branch of your repository
Create a new file README.md, but do not add and commit the file to version control
The content of the file doesn’t matter; it can be e.g. the following
## git-harjoituksia

Harjoitellaan branchien käyttöä
Give the command git status and make sure that the result is
On branch main
Untracked files:
  (use "git add <file>..." to include in what will be committed)

	README.md

nothing added to commit but untracked files present (use "git add" to track)
Now switch to the branch laskut
Run the command git status again
- You notice that the output is still the same; the file README.md is still not under version control
- So even though you were in the main branch when you created the file, neither the main branch nor git as a whole knows anything about the file yet until you add it under version control with the command
git add
Now add the file under version control and commit it
- The file goes into your current branch, i.e. the branch laskut; main still knows nothing about the file
You are still in the branch laskut. Create a new file LICENSE and add it to version control (with the command add), but do not commit
The content of the file doesn’t matter; it can be e.g. the following
This is free and unencumbered software released into the public domain.

Anyone is free to copy, modify, publish, use, compile, sell, or
distribute this software, either in source code form or as a compiled
binary, for any purpose, commercial or non-commercial, and by any
means.

For more information, please refer to <https://unlicense.org>
Check that the result of the command git status is the following:
On branch laskut
Changes to be committed:
   (use "git restore --staged <file>..." to unstage)

	new file:   LICENSE
- So you are in the branch laskut and LICENSE has been added to the staging area, but it has not yet been committed
Now switch to the branch main and run git status
- The result of the command is still the same; LICENSE is still in the staging area but uncommitted
- The staging area does not belong to any branch, so if there are uncommitted changes in the staging area and you switch branches, the same things remain in staging
- Changes move from staging into a branch only with the command
git commit
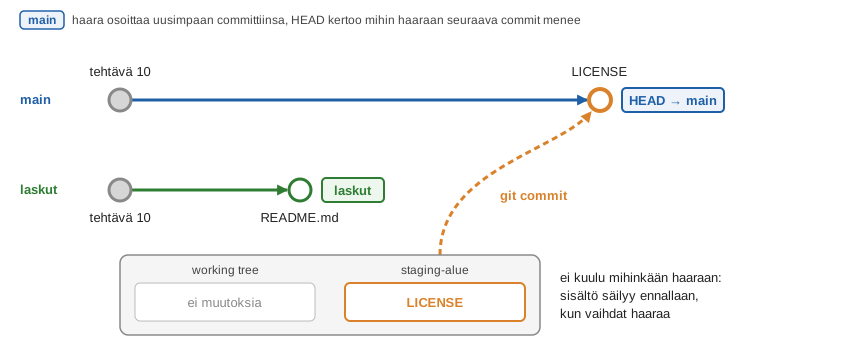
The situation now looks like this. LICENSE waits in the staging area, and when you run the command git commit, it goes into the branch HEAD points to, i.e. main:
Now commit the changes of the staging area, i.e. LICENSE, to the branch main
Make sure with the command git status that the staging area is empty:
On branch main
nothing to commit, working tree clean
Switch again to the branch laskut and you notice that LICENSE does not exist
Merge the main branch into the branch laskut
Now switch back to the branch main and delete the branch laskut
- Deleting doesn’t succeed directly with the command
git branch -dif the contents of the branch have not been fully merged into main. - If so, first merge into main, or if the intention is to delete the branch anyway even though it still has diverging changes, use
git branch -Dto delete the branch together with its diverging changes
So the idea of this exercise was to illustrate that the working tree (changes that Git is not aware of) and staging (uncommitted changes made to files added to git) are not tied to any branch; changes move from the staging area into a branch only as a result of running the command git commit.
12. Git: conflict! [version control]
Let’s continue with the repository of the previous exercise
In the main branch, change the file index.py as follows:
# imports first

from logger import logger
from summa import summa
from erotus import erotus

logger("aloitetaan")

x = int(input("luku 1: "))
y = int(input("luku 2: "))
print(f"{summa(x, y)}")
print(f"{erotus(x, y)}")

logger("lopetetaan")
So a comment and an empty line have been added at the beginning
add and commit the change to version control
Create a new branch bugikorjaus, go to the branch and edit the end of the file index.py (e.g. as follows)
# imports first

from logger import logger
from summa import summa
from erotus import erotus

logger("aloitetaan")

x = int(input("luku 1: "))
y = int(input("luku 2: "))
print(f"{summa(x, y)}")
print(f"{erotus(x, y)}")

logger("lopetetaan ohjelma")
print("goodbye!") # added in the bugikorjaus branch
Add and commit the change to version control
Go back to the main branch,
Edit the beginning of the file index.py e.g. as follows (the change is in the parameter of the function logger)
# imports first

from logger import logger
from summa import summa
from erotus import erotus

logger("aloitetaan ohjelma") # change in main

x = int(input("luku 1: "))
y = int(input("luku 2: "))
print(f"{summa(x, y)}")
print(f"{erotus(x, y)}")

logger("lopetetaan ohjelma")
Add and commit the change to version control
Merge the contents of the branch bugikorjaus into main
- Look at the contents of the file index.py; it should now contain the changes made in both branches
- So Git can merge the changes automatically, since they don’t conflict with each other
- Note: a conflict may arise already at this point if you have accidentally changed characters in the wrong part of the file! In that case, follow the instructions below.
You are still in the branch main. Change the print commands of the file as follows
# imports first

from logger import logger
from summa import summa
from erotus import erotus

logger("aloitetaan ohjelma")

x = int(input("luku 1: "))
y = int(input("luku 2: "))
print(f"{x} + {y} = {summa(x, y)}") # change in main
print(f"{x} - {y} = {erotus(x, y)}") # change in main

logger("lopetetaan ohjelma")
print("goodbye!")
Add and commit the change
Switch to the branch bugikorjaus, change the file (again the print commands) as follows, and commit
# imports first

from logger import logger
from summa import summa
from erotus import erotus

logger("aloitetaan ohjelma")

x = int(input("luku 1: "))
y = int(input("luku 2: "))
print(f"Lukujen {x} ja {y} summa on {summa(x, y)}")  # change in the bugikorjaus branch
print(f"Lukujen {x} ja {y} erotus on {erotus(x, y)}")  # change in the bugikorjaus branch

logger("lopetetaan ohjelma")
print("goodbye!")
Add and commit the change to version control
Merge the contents of the branch main into the branch bugikorjaus
- Now a conflict should arise; the command produces the output
Auto-merging index.py
CONFLICT (content): Merge conflict in index.py
Automatic merge failed; fix conflicts and then commit the result.
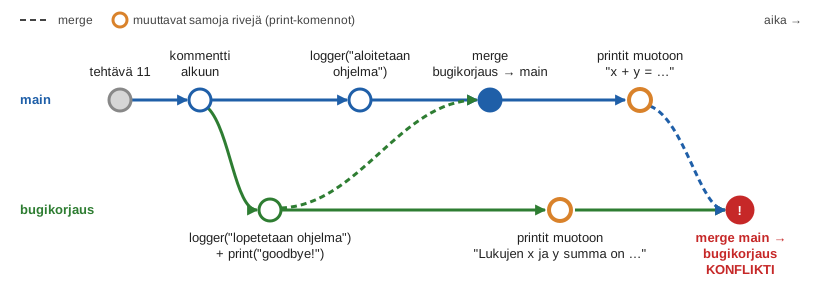
- So Git could not combine the changes made to the file, because they affect the same lines; the result is a conflict.
The picture illustrates the situation. Both branches have changed the print commands, i.e. the same lines, since the branches were last merged:
Resolve the conflict:
- Edit the contents of the file index.py the way you want
- And follow the instructions of the article mentioned above, i.e. add the conflicted file to the staging area and commit
- The command
git statusalso gives instructions for completing the merge (you will probably have to run it twice…)
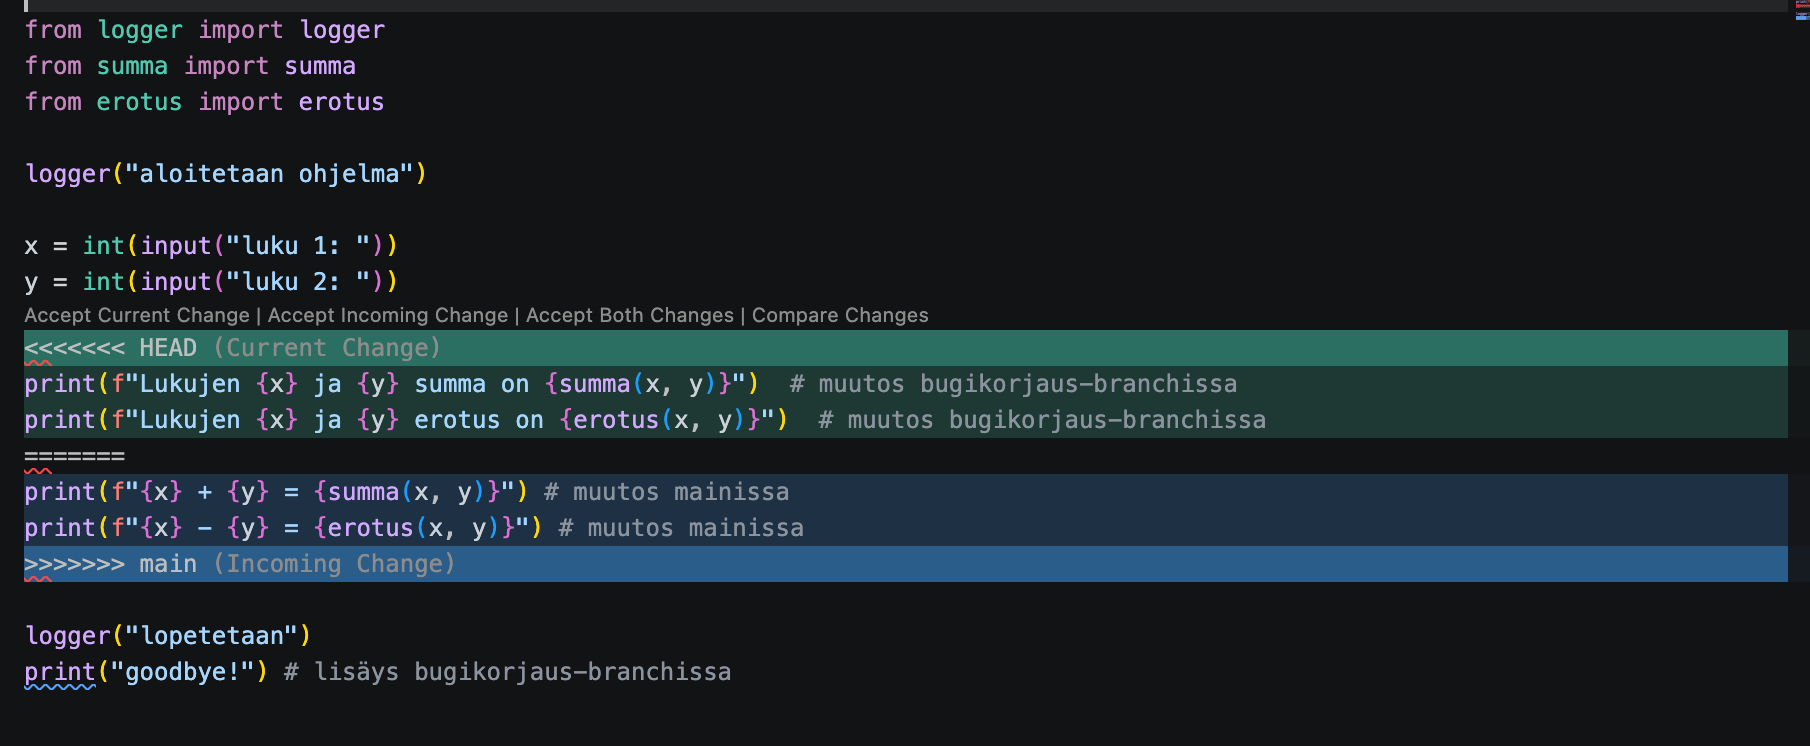
Visual Studio Code has a built-in so-called merge tool, which can make resolving conflicts somewhat easier:
13. Git: branches and GitHub [version control]
Start by reading the chapter Remote Branches of the ProGit book.
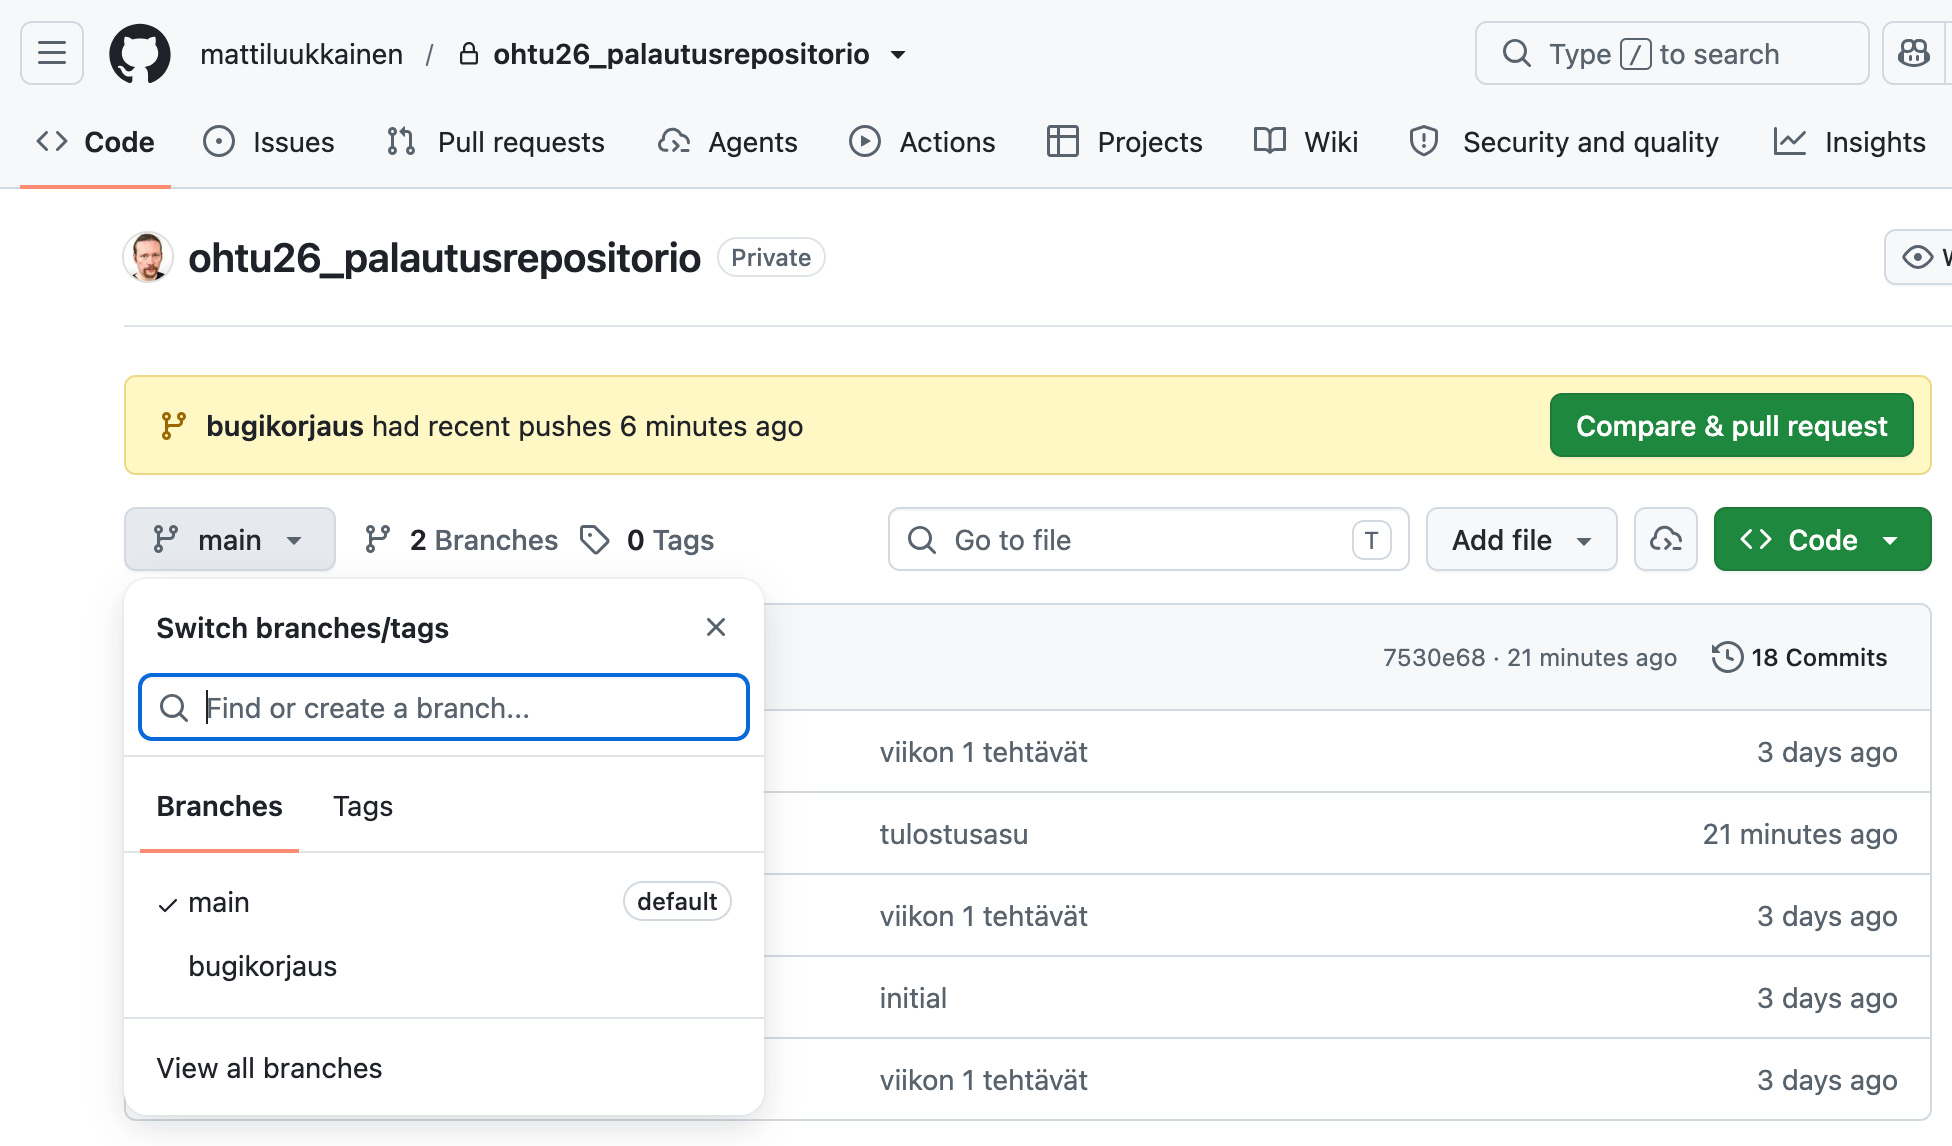
Return to the branch main and push it to GitHub. If you end up with the following error message, do as it says and push again:
fatal: The current branch main has no upstream branch.
To push the current branch and set the remote as upstream, use

    git push --set-upstream origin main

To have this happen automatically for branches without a tracking
upstream, see 'push.autoSetupRemote' in 'git help config'.
Go to the branch bugikorjaus and push it to GitHub
- The feedback given by the command again tells you how to get the command to work
Make sure that you see both branches on GitHub
Clone a second clone of the GitHub repository to your machine:
$ git clone git@github.com:omatunnus/palautusrepositorio.git kopio
$ cd kopio
with this we simulate a situation where the code on GitHub has two simultaneous users
In the following, this second clone is called kopio.
Look with the command git branch at which branches are visible locally in kopio
- By default, only main comes along when cloning
However, kopio knows all the branches of GitHub. They are there as so-called remote-tracking branches, which you can see with the command git branch -r. A tracking branch is created based on a remote-tracking branch:
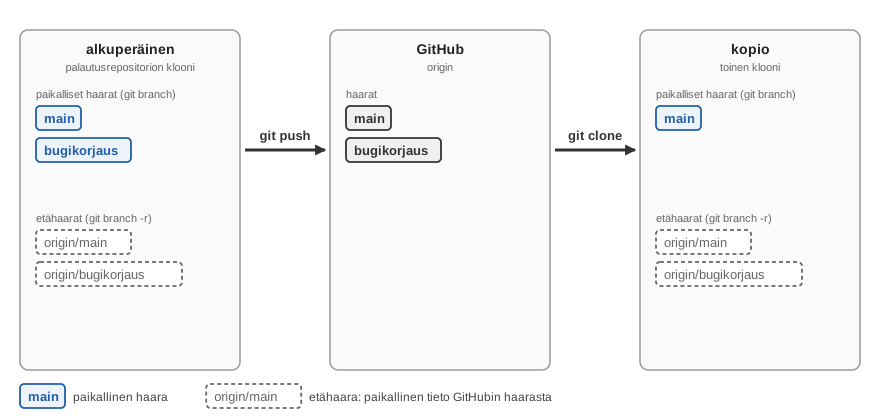
What are remote-tracking branches?
Remote-tracking branches, e.g.
origin/mainandorigin/bugikorjaus, are your local repository’s bookmarks of which commit GitHub’s branches were at when you were last in contact with GitHub. They are stored on your own machine, and they are not a connection to GitHub. They are updated only by the commandsgit clone,git fetch,git pullandgit push, so at other times they may be out of date.You cannot commit to remote-tracking branches. If you want to make changes, a local tracking branch is created from the remote-tracking branch. It is an ordinary local branch that is linked to the remote-tracking branch. Thanks to the link,
git pullandgit pushwork without extra parameters, andgit statustells you e.g. “Your branch is ahead of ‘origin/main’ by 1 commit”. The comparison is made to the remote-tracking branch, not directly to GitHub.So there are three different things in the exercise:
What Where Example GitHub’s branch (remote branch) on GitHub bugikorjauson GitHubremote-tracking branch on your own machine, read-only origin/bugikorjaustracking branch on your own machine, an ordinary branch the local bugikorjaus
Create in kopio a branch that “tracks” the branch bugikorjaus of your project on GitHub (see https://git-scm.com/book/en/v2/Git-Branching-Remote-Branches section Tracking Branches)
Add a file changelog.txt to the “tracking” branch
Add and commit the change to version control and push the branch to GitHub
Look at the GitHub repository with your browser and make sure that the branch gets updated
Create a new branch tulo in kopio, and in it a function that computes the product of two numbers in the file tulo.py
Change the program as follows
from logger import logger
from summa import summa
from erotus import erotus
from tulo import tulo

logger("aloitetaan ohjelma")

x = int(input("luku 1: "))
y = int(input("luku 2: "))
print(f"{x} + {y} = {summa(x, y)}")
print(f"{x} - {y} = {erotus(x, y)}")
print(f"{x} * {y} = {tulo(x, y)}")

logger("lopetetaan")
print("goodbye!")
Add, commit and push the changes of the branch tulo of kopio to GitHub, and make sure that they are visible there
- When pushing you may get an error message; the message tells you what to do
Go to the original local copy of the GitHub repository
- The branch just created is not yet in the original copy
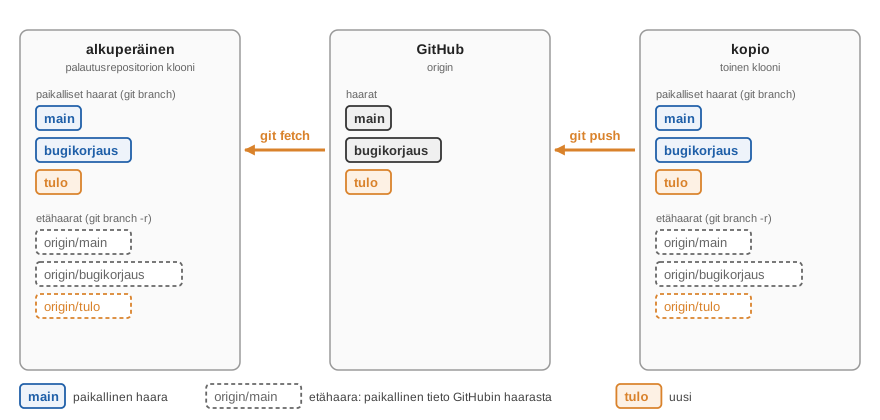
Create in the original repository a branch that tracks the branch tulo
- Note: You have to give the command
git fetchfirst, so that the local copy gets wind of the fact that stuff has been added to GitHub
The situation now looks like this. The branch tulo travelled from kopio via GitHub to the original: git push took it to GitHub, git fetch brought the remote-tracking branch origin/tulo to the original, and a local tracking branch was created based on it:
Merge the branch tulo into the branch main and delete the branch tulo both locally and from GitHub
Now create a new branch called osamaara, add a file osamaara.py to the branch and push it to GitHub
Go again to the clone of the repository created a moment ago, and to the branch main
Give the command git remote show origin. The output of the command should look like this:
* remote origin
  Fetch URL: git@github.com:mluukkai/ohtu-palautukset.git
  Push  URL: git@github.com:mluukkai/ohtu-palautukset.git
  HEAD branch: main
  Remote branches:
    bugikorjaus              tracked
    main                     tracked
    osamaara                 new (next fetch will store in remotes/origin)
    refs/remotes/origin/tulo stale (use 'git remote prune' to remove)
  Local branches configured for 'git pull':
    bugikorjaus merges with remote bugikorjaus
    main        merges with remote main
    tulo        merges with remote tulo
  Local refs configured for 'git push':
    bugikorjaus pushes to bugikorjaus (up to date)
    main        pushes to main        (up to date)
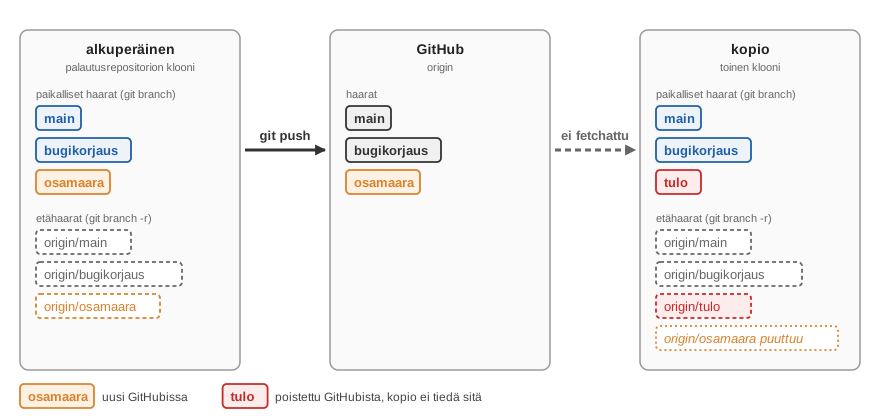
- The command tells that Remote (i.e. GitHub) and Local (i.e. the local clone) are not in the same state as far as branches are concerned.
- The already deleted branch tulo still exists locally, while the new branch osamaara does not yet exist locally.
As a picture, the situation looks like this:
Fix the situation so that git remote show origin prints
* remote origin
  Fetch URL: git@github.com:mluukkai/ohtu-palautukset.git
  Push  URL: git@github.com:mluukkai/ohtu-palautukset.git
  HEAD branch: main
  Remote branches:
    bugikorjaus tracked
    main        tracked
    osamaara    tracked
  Local branches configured for 'git pull':
    bugikorjaus merges with remote bugikorjaus
    main        merges with remote main
    osamaara    merges with remote osamaara
  Local refs configured for 'git push':
    bugikorjaus pushes to bugikorjaus (up to date)
    main        pushes to main        (up to date)
    osamaara    pushes to osamaara    (up to date)
Working with branches may feel confusing at first, especially if there are also several branches on GitHub.
What are branches used for?
A software development team can apply Git branching in many different styles. The article https://www.atlassian.com/git/tutorials/comparing-workflows presents a few alternatives for this. One common way of using branches is so-called feature branches:
The core idea behind the Feature Branch Workflow is that all feature development should take place in a dedicated branch instead of the main branch. This encapsulation makes it easy for multiple developers to work on a particular feature without disturbing the main codebase. It also means the main branch will never contain broken code, which is a huge advantage for continuous integration environments.
If you are interested, read more from the document above.
14. Git: pushing an out-of-date clone [version control]
Let’s still demonstrate a frequently occurring situation (mentioned in exercise 11 of last week) where pushing an out-of-date repository to the remote repository on GitHub fails.
Go to the main branch of the original clone of the previous exercise, make some change, commit and push it to GitHub
Go to the branch main of kopio and make some change there
Commit and push the change to GitHub
- However, not everything goes well; the result is an error message like the following:
$ git push
 ! [rejected]        main -> main (fetch first)
error: failed to push some refs to 'git@github.com:mluukkai/ohtu-palautukset.git'
hint: Updates were rejected because the remote contains work that you do
hint: not have locally. This is usually caused by another repository pushing
hint: to the same ref. You may want to first integrate the remote changes
hint: (e.g., 'git pull ...') before pushing again.
hint: See the 'Note about fast-forwards' in 'git push --help' for details.
The reason for the error is that the main branch on GitHub was ahead of the main branch of the local repository.
The problem is solved as follows. First give the command git pull. Git gives you a long complaint:
hint: You have divergent branches and need to specify how to reconcile them.
hint: You can do so by running one of the following commands sometime before
hint: your next pull:
hint:
hint:   git config pull.rebase false  # merge
hint:   git config pull.rebase true   # rebase
hint:   git config pull.ff only       # fast-forward only
hint:
hint: You can replace "git config" with "git config --global" to set a default
hint: preference for all repositories. You can also pass --rebase, --no-rebase,
hint: or --ff-only on the command line to override the configured default per
hint: invocation.
fatal: Need to specify how to reconcile divergent branches.
In practice, Git wants to know with what strategy the code of your local and remote repository should be combined. Of the alternatives, it’s probably best to choose the middle one, i.e. give the command on the command line
git config pull.rebase true
In practice, the chosen alternative means that Git applies the new local commits after the commits in the remote repository.
You can now pull the code again with the command git pull. The command git push now succeeds. From now on, you can handle similar situations with the commands git pull and git push.
Do as described above and make sure that the changes you made end up on GitHub
Feedback survey
Please also answer a short feedback survey on AI agents at https://norppa.helsinki.fi/targets/122262023/feedback.
Submitting the exercises
Push all the exercises you have done (except those that say the exercise is not submitted anywhere) to your submission repository on GitHub, and mark the exercises you have done in the submission app https://study.cs.helsinki.fi/stats/courses/ohtu-2026