This English version of the course material has been machine translated from the Finnish original and may contain errors. If something is unclear, check the Finnish version of this page.
Week 5
The deadline for the exercises below is Monday 30.11. at 23:59
You can get help with the exercises on the course Discord channel and on campus in the help sessions (paja) in BK107:
- Mon 16–19
- Tue 13–16
- Thu 16–19
- Fri 13–16
You can join the course Discord channel with the command /join course TKT20006 - Ohjelmistotuotanto - ohtu
Also remember the multiple choice quizzes that review the lectures of weeks 5 and 6. Their deadline is Sunday 6.12. at 23:59:00.
Exercises 1-3 continue practising Git. These exercises do not show up in your submissions in any way.
Exercise 4 is related to the chapters of Part 4 of the material, which covers software design, that are marked with [week 5]. Exercises 5 and 6 continue the course’s series of [AI] exercises, using AI for code review and for producing code.
Typos or unclear instructions in the exercises?
Suggest a fix by editing this file on GitHub.
Course feedback
In addition to the usual feedback collected at the end, the course uses so-called continuous feedback: you can give anonymous feedback to the course staff at any time at https://norppa.helsinki.fi/targets/112400522/feedback
Problems with uv?
Some instructions can be found here
Submitting the exercises
The exercises are submitted to GitHub and by marking the completed exercises in the submission app https://study.cs.helsinki.fi/stats/courses/ohtu-2026 on the “my submission” tab.
This week’s exercises 4-6 are submitted to the submission repository you have already used in previous weeks, inside the directory viikko5. Exercises 1-3 are not submitted.
See more detailed instructions on the submission repository here.
The ticks in the exercise checkboxes are saved in your browser’s local storage.
1. Git: restoring an accidentally deleted file [version control]
In week 4 exercise 7 we already went back in time by checking out a point marked with a tag. Let us now see how we can bring back a state from the past.
You can do this exercise and the next two in any repository; these exercises do not show up in your submissions.
Create a file called important.txt, add it and commit it to Git
Delete the file and commit
- Hint: after deleting, check the state of the deleted file with the command
git status. Just deleting the file does not yet move the deletion to the staging area; that has to be done with the commandgit add important.txt(orgit add .). Alternatively you can delete the file directly with the commandgit rm important.txt, which both deletes the file and adds the deletion to the staging area
Make some changes to some file and commit
Your history looks like this
   (1) ─────────────── (2) ─────────────── (3)  ◄── HEAD
    │                   │                   │
 important.txt       important.txt       change to some
 is added            is deleted          other file

 important.txt:      important.txt:      important.txt:
 exists              does not exist      does not exist
The present, i.e. HEAD, is (3). In commit (1) the file important.txt exists, but from commit (2) onwards it no longer does.
- Note: you can explore the history with the command
gitk
We want to restore the file important.txt.
Find out the id of the commit in which the file still exists; you can do this with gitk or with the command git log
Run the command git checkout 3290b03cea08af987ee7ea57bb98a4886b97efe0 -- important.txt where the long string is the id of that commit
Make sure with the command git status that the file important.txt has appeared in the staging area
Commit
The lost file important.txt is back, and under version control!
Note: you do not need to give the whole id in the command; it is enough to give as many characters from the beginning as are needed to identify the commit unambiguously in your repository’s history:
- “Generally, eight to ten characters are more than enough to be unique within a project. For example, as of October 2017, the Linux kernel (which is a fairly sizable project) has over 700,000 commits and almost six million objects, with no two objects whose SHA-1s are identical in the first 11 characters.” See more here
- Restoring an old version of an existing file works in exactly the same way.
2. Git: reverting the changes of a commit [version control]
Let us continue from where we left off in the previous exercise. We notice that the commit we just made was a mistake.
Let us undo it with the command git revert HEAD --no-edit
In the command, HEAD refers to the commit we are currently at.
Make sure that the change made by the previous commit (i.e. adding the file important.txt) is undone
The command git revert creates a new commit in which the changes made in the previous one are undone
- Without the option no-edit you get to edit the message of the revert commit
- Note: with
git checkout HEAD^we can get back to the reverted state, so nothing has been permanently lost
In the same way you can undo, i.e. revert, any commit: git revert kumottavancommitinid
3. Git: rebase [version control]
We have already run into the Git concept rebase in a couple of earlier exercises (week 1, exercise 11 and week 2 exercise 14). Let us now find out more precisely what it is about.
Read https://www.atlassian.com/git/tutorials/rewriting-history/git-rebase and/or http://git-scm.com/book/en/Git-Branching-Rebasing.
Create the following kind of situation between the branches main and haara:
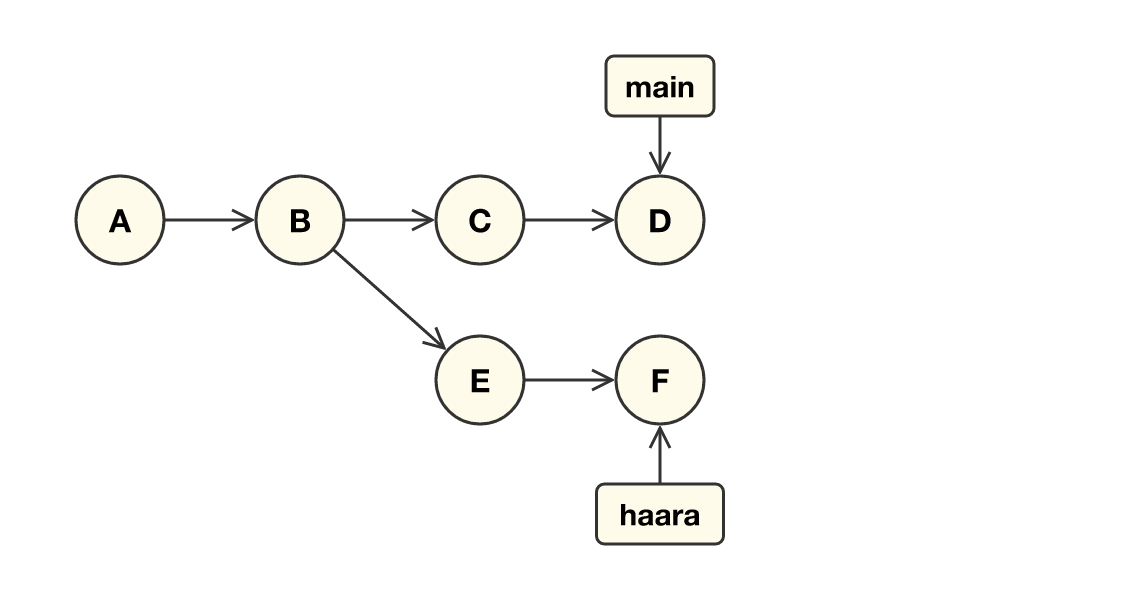
In the picture each circle (A, B, C, …) is one commit, the arrows between commits point from an older commit to a newer one, and the boxes main and haara show which commit each branch points to.
So the branch haara has diverged from main after commit B, and commits have been made to both since then. The changes should not touch the same files, so that you avoid conflicts.
Make sure with the command gitk --all that the situation is as intended.
Rebase haara onto main, i.e. create the following situation:
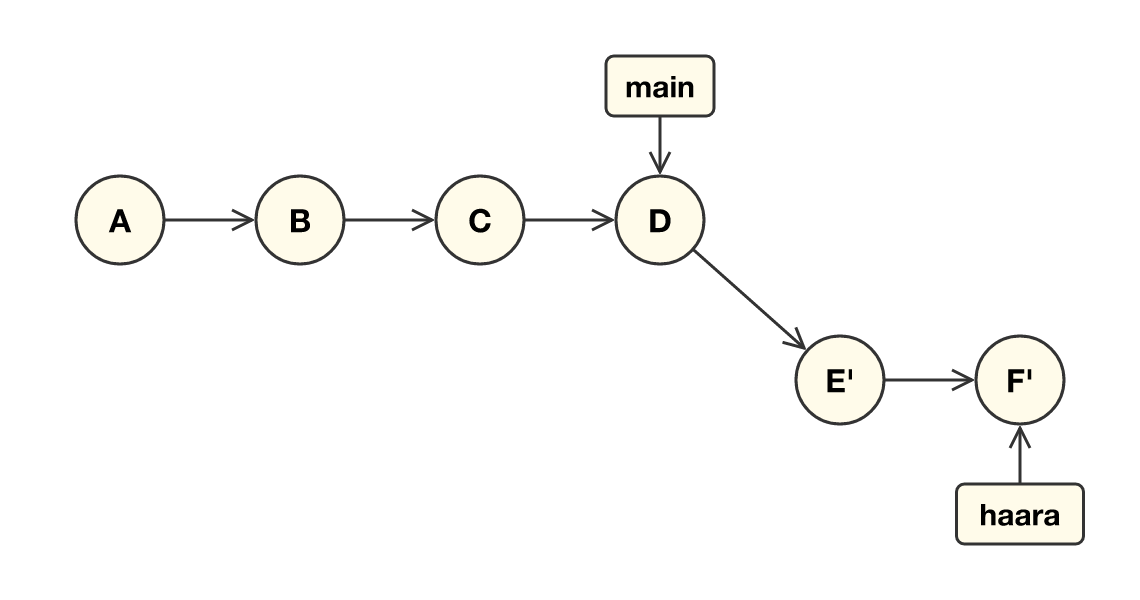
The commits of the branch have now been moved after main’s latest commit D. Commits E’ and F’ contain the same changes as the original E and F, but they are new commits with different ids. You can see this e.g. with the command git log.
Make sure with the command gitk --all that the situation is as intended.
Then merge haara into main, so that the situation is the following:
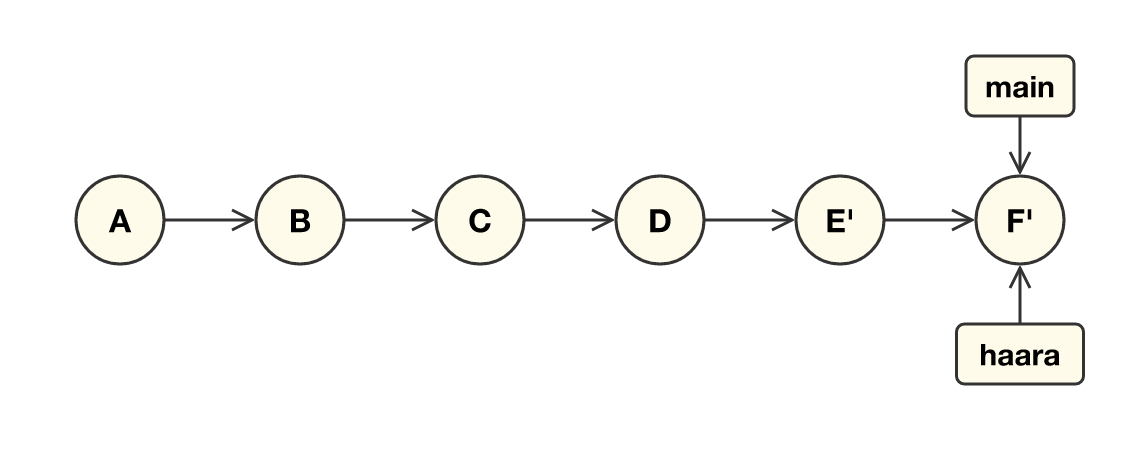
The end result should be a linear history with main and haara at the same commit. Since after the rebase haara is a direct continuation of main, the merge is a so-called fast-forward: the main reference simply moves to point to commit F’ and no separate merge commit is created.
Again make sure with the command gitk --all that everything is fine.
Delete the branch haara. If needed, ask an AI or Google how to delete a branch.
What is the purpose of the rebase command? Atlassian’s Git guide explains it like this
The primary reason for rebasing is to maintain a linear project history. For example, consider a situation where the main branch has progressed since you started working on a feature branch. You want to get the latest updates to the main branch in your feature branch, but you want to keep your branch’s history clean so it appears as if you’ve been working off the latest main branch. This gives the later benefit of a clean merge of your feature branch back into the main branch. Why do we want to maintain a “clean history”? The benefits of having a clean history become tangible when performing Git operations to investigate the introduction of a regression.
4. Refactoring tennis scoring
In the directory viikko5/tennis of the course repository there is a program for keeping score in tennis.
Copy the project to your submission repository, inside the directory viikko5
Commit and push the code to GitHub
Create a separate branch for this exercise called tennis_refactoring
Make sure you are in the following situation before you continue with the next steps
$ git status
On branch tennis_refactoring
nothing to commit, working tree clean
The interface of the scoring program is simple. The method get_score tells the current score in the way defined by tennis scoring. As the players win points, the method won_point is called with the player who won the point as its parameter.
For example, when the scoring is used like this:
game = TennisGame("player1", "player2")

print(game.get_score())

game.won_point("player1")
print(game.get_score())

game.won_point("player1")
print(game.get_score())

game.won_point("player2")
print(game.get_score())

game.won_point("player1")
print(game.get_score())

game.won_point("player1")
print(game.get_score())
it prints
Love-All
Fifteen-Love
Thirty-Love
Thirty-Fifteen
Forty-Fifteen
Win for player1
So the output shows the score after each point when player1 wins the first 2 points, player2 the third point and player1 the remaining 2 points.
You can read more about tennis scoring e.g. on Wikipedia, but it is not necessary for doing this exercise.
The code of the scoring program works and it has very thorough tests. However, the internal quality of the code is terrible.
Your task is to refactor the code so that it is as readable and easy to understand as possible
- Avoid “magic numbers” and badly named variables in the code
- It is a good idea to split the code into many small methods whose names reveal what they do
- Refactor in really small steps
- Run the tests as often as possible
- Try to keep the program working all the time, i.e. do not break the tests
- You do not need to, and are not allowed to, touch the tests of the program
Do this refactoring without the help of an agent!
If you want to use some other language than Python, versions of the code and tests in many different languages can be found at https://github.com/emilybache/Tennis-Refactoring-Kata.
When you are done, commit the code and push the branch tennis_refactoring to GitHub
More similar refactoring exercises can be found on Emily Bache’s GitHub.
5. Pull request and code review [AI]
Note: the OpenCode versions of the exercises have not been tested as thoroughly as the Copilot versions. If you find errors or unclear parts in the instructions, please report them, see Typos or unclear instructions in the exercises?
Note: if you run out of CurreChat tokens, you can get more by sending a message to matti.luukkainen@helsinki.fi or to the user mluukkai on Discord.
By default, OpenCode runs commands and edits files without asking for permission. Before you start, make sure that command approval is enabled, i.e. that the file opencode.json containing the setting is either in the project directory or in one of its parent directories, e.g. in the root of your submission repository
Before doing exercises 5 and 6, read the week 5 section AI in code review and the cloud agent of the material AI in software engineering.
To do the exercises you need a GitHub Education membership.
Note on Copilot’s AI credit quota: The Copilot Student plan has 200 AI credits per month (1 credit = 0.01 dollars). Both Copilot’s code review and the cloud agent consume these, and the consumption depends on the size of the changes and the amount of work. According to GitHub’s own estimate, one review costs about 0.05–1 dollars at the lightest Lite level and about 0.25–5 dollars at the default Balanced level. So in the worst case a single Balanced-level review can use up the whole monthly AI credit quota. In this week’s exercises, always use the Lite level for reviews, and keep your pull requests small. You can follow your AI credit consumption at https://github.com/settings/billing.
Copilot’s review is done on GitHub, and it requires a GitHub Education membership. With OpenCode the review is done on your own machine. If you have a GitHub Education membership, you can do this exercise with Copilot if you like by selecting Copilot above.
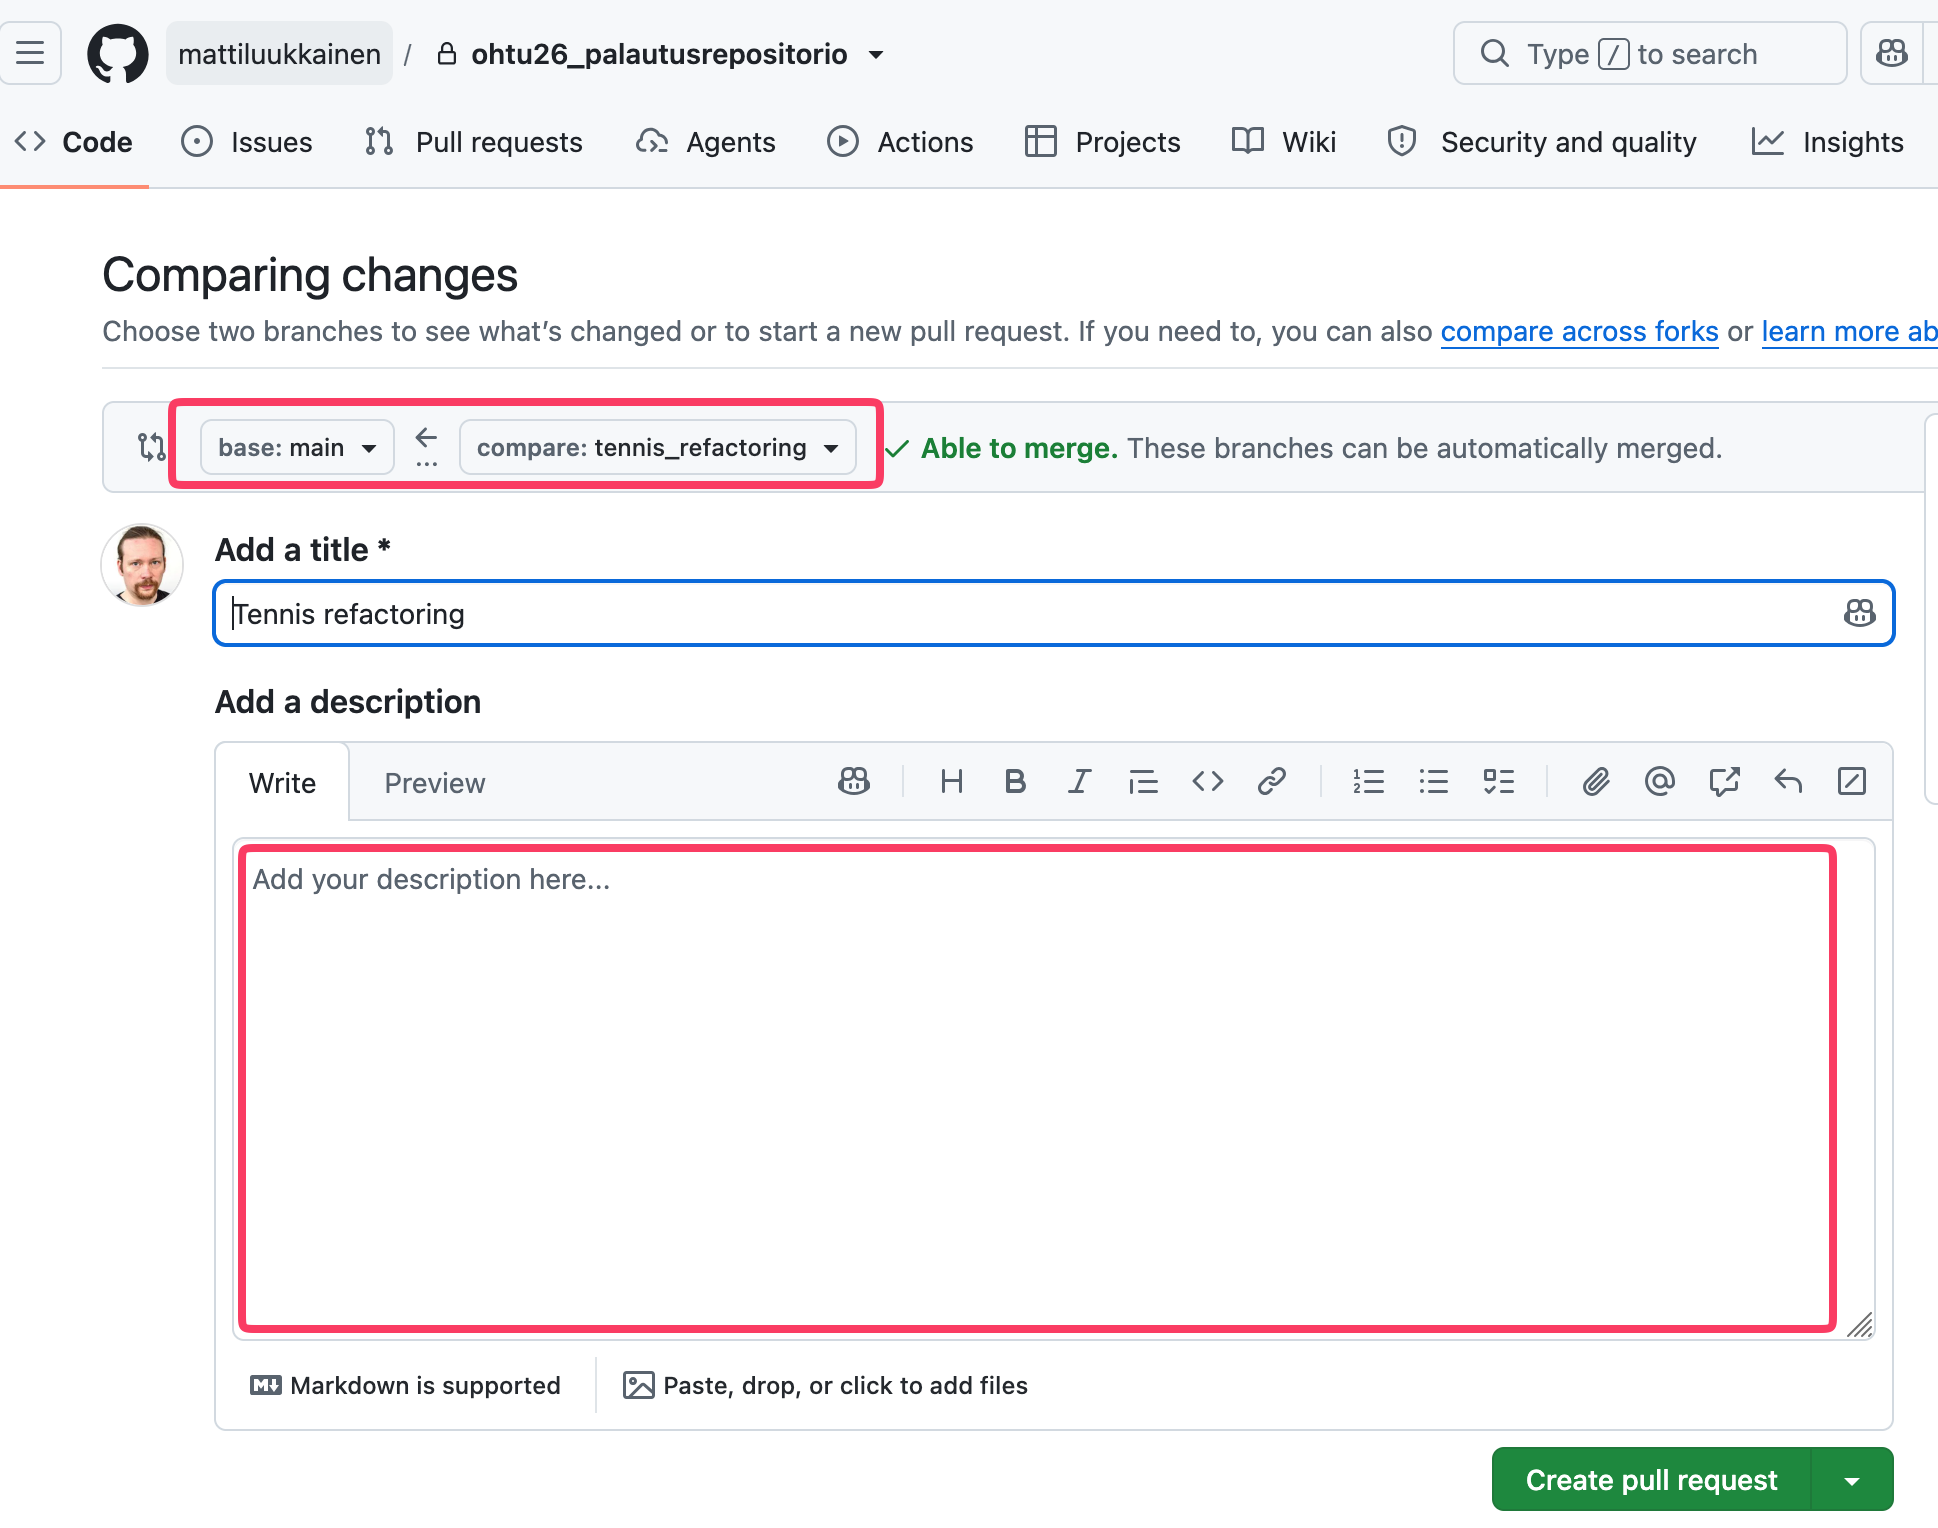
Now create a Pull request on GitHub from the branch tennis_refactoring to the branch main
GitHub may already suggest creating a Pull request

Make sure that the PR goes from the branch tennis_refactoring to the branch main.
Write a description for the PR. You can take a model for the description e.g. from here or here.
Ask GitHub Copilot to do a code review of your PR. Before requesting the review, select Lite as the review level from the menu next to Copilot’s name and then press Request:
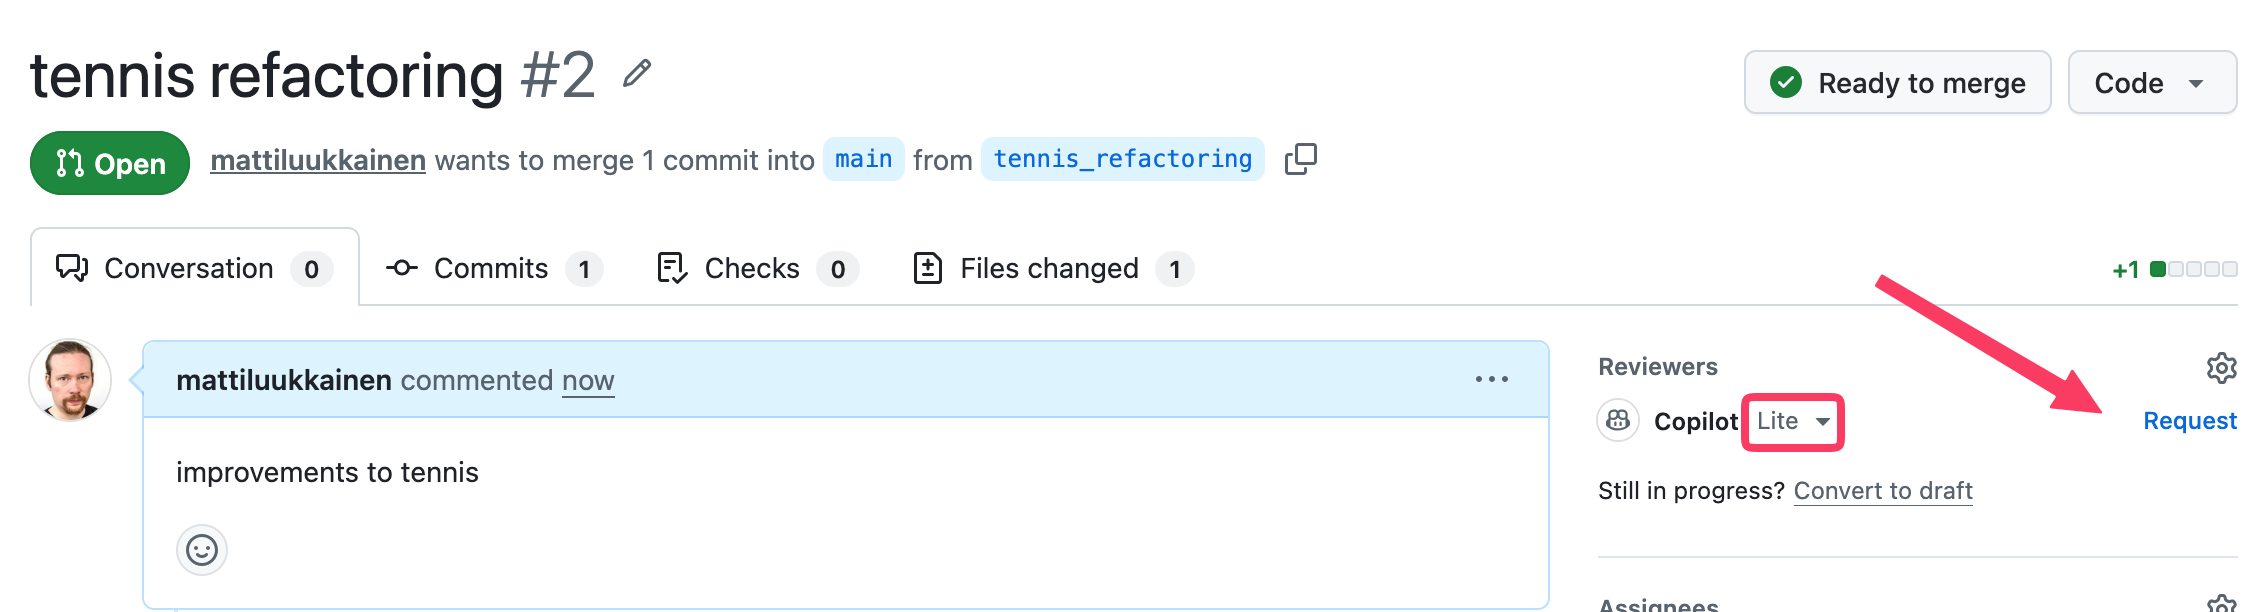
Wait for the review to finish; it usually takes a few minutes
Go through the result of the review. Accept the suggested changes if you want and mark the comments as resolved (resolve conversation)
Next to the comments there is also a button Fix with Copilot, which starts the cloud agent to make the fix. This consumes your AI credit quota, so preferably make the fixes yourself or accept Copilot’s suggested changes directly.
On your own machine, switch to the branch tennis_refactoring, start OpenCode and select the Plan agent. Ask it to review the changes in the branch, e.g. “Review the changes in this branch compared to the main branch (git diff main...tennis_refactoring). For each finding, give the file, the line and a suggested fix.”
Go through the findings and make the fixes you consider necessary yourself or with the Build agent. Push the fixes to the same branch, so that they are updated in the pull request
Merge the Pull request into the main branch
Write a report on the review into a file review.md stored in the directory viikko5 of your submission repository
In the report, tell
- What observations Copilotthe agent made about your code
- Were the suggested changes good
- How useful did you find the review made by Copilotthe agent
- Did Copilotthe agent notice something that you would have missed yourself? And did it miss something essential?
- How did Copilot’sthe agent’s comments feel compared to getting the same feedback from a teammate? What should you take into account when giving feedback when the reviewer is a human?
More on the topic in GitHub’s documentation
6. Good vibe with warehouses [AI]
Note: the OpenCode versions of the exercises have not been tested as thoroughly as the Copilot versions. If you find errors or unclear parts in the instructions, please report them, see Typos or unclear instructions in the exercises?
Note: if you run out of CurreChat tokens, you can get more by sending a message to matti.luukkainen@helsinki.fi or to the user mluukkai on Discord.
By default, OpenCode runs commands and edits files without asking for permission. Before you start, make sure that command approval is enabled, i.e. that the file opencode.json containing the setting is either in the project directory or in one of its parent directories, e.g. in the root of your submission repository
Let us return once again to Ohtuvarasto, familiar from week 1. The idea of the exercise is to get GitHub’s cloud agent (Copilot cloud agent)OpenCode to code a web user interface for Ohtuvarasto, e.g. using the Flask framework
Make sure that GitHub has an up-to-date version of Ohtuvarasto!
Create an issue in your repository in which you describe as precisely as possible what kind of application you want:

Keep the scope of the application small, since the consumption of the cloud agent’s AI credit quotaCurreChat tokens grows with the size of the task. It is enough that the application can
- create several warehouses (name and capacity)
- list the warehouses with their contents
- add items to a warehouse and take items from it
Editing or deleting warehouses or other additional features are not needed in this exercise. It is also a good idea to mention any libraries to be used, such as Flask, in the description.
CopilotThe agent uses the issue description as a prompt, so it pays to put effort into the quality of the description. You can write the description e.g. as user stories with clear acceptance criteria, like in week 3 exercise 8. Also ask for automated tests in the description.
If your AI credit quota runs out: If your AI credit quota is running low or runs out in the middle of the exercise, you can also do the exercise in VS Code’s agent mode. This is probably lighter, since the agent runs commands on your own machine instead of GitHub Actions, and you can stop it if it heads in the wrong direction. In that case, do the following:
- create the issue as instructed below
- create a new branch, e.g.
git checkout -b web-ui- give the issue description to the agent as a prompt in VS Code
- go through the changes made by the agent, commit and push the branch to GitHub
- create a pull request from the branch, and write
Fixes #<issuen numero>in its description- do your own review of the pull request as instructed below, but ask the agent in VS Code to make the changes from the review and push them to the same branch
You can then skip the steps related to following the cloud agent.
Assign the issue to Copilot:

Selecting Copilot opens the window Assign agent to issue:
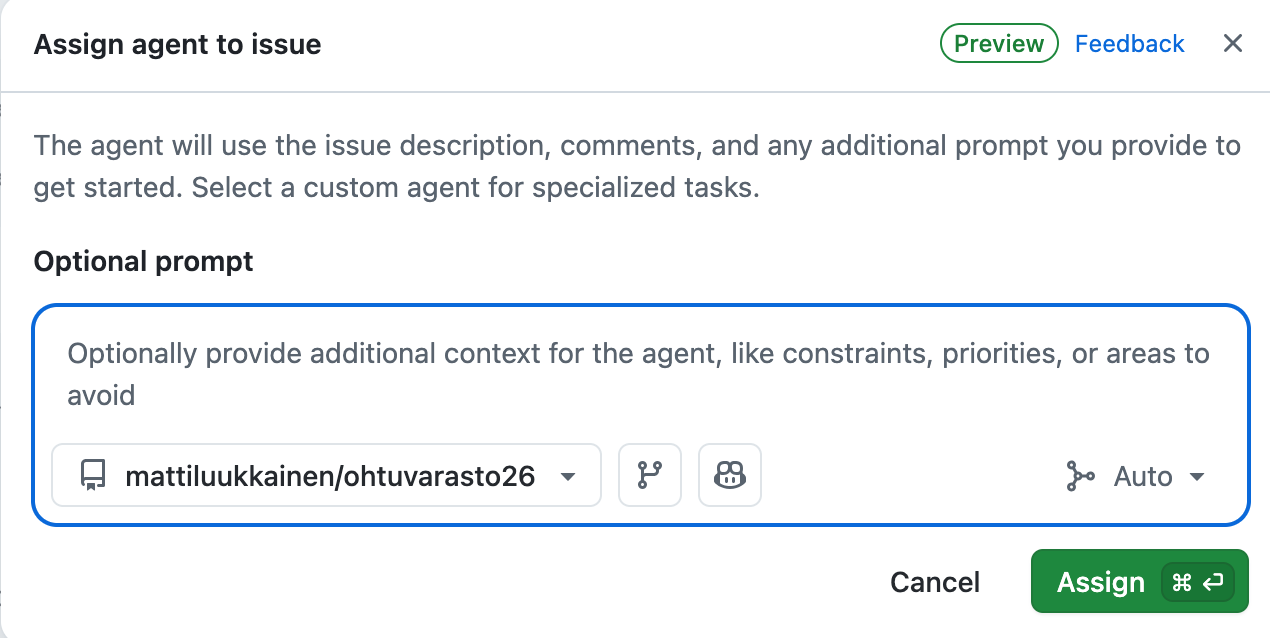
In the window you can give the agent additional instructions (Optional prompt) and select the repository, the branch the work starts from, the agent to use and the model (Auto). The default settings are fine, and you can leave the additional instructions field empty, since the issue description serves as the agent’s specification. In the Copilot Student plan the model is selected automatically in any case.
Start the agent by pressing Assign
Copilot opens a draft pull request for its work and updates its description as the work progresses.
You can follow Copilot’s work e.g. from the pull request’s page (tab Pull requests) with the button “View session”. The session can also be found on the repository’s Agents tab and on the issue’s page.
In the session view you can see what Copilot is doing. It starts by setting up an environment for itself, i.e. it clones the repository and starts a few MCP servers that give it additional tools, e.g. the ability to use the application with a browser. After this Copilot gets familiar with the project and starts implementing changes:
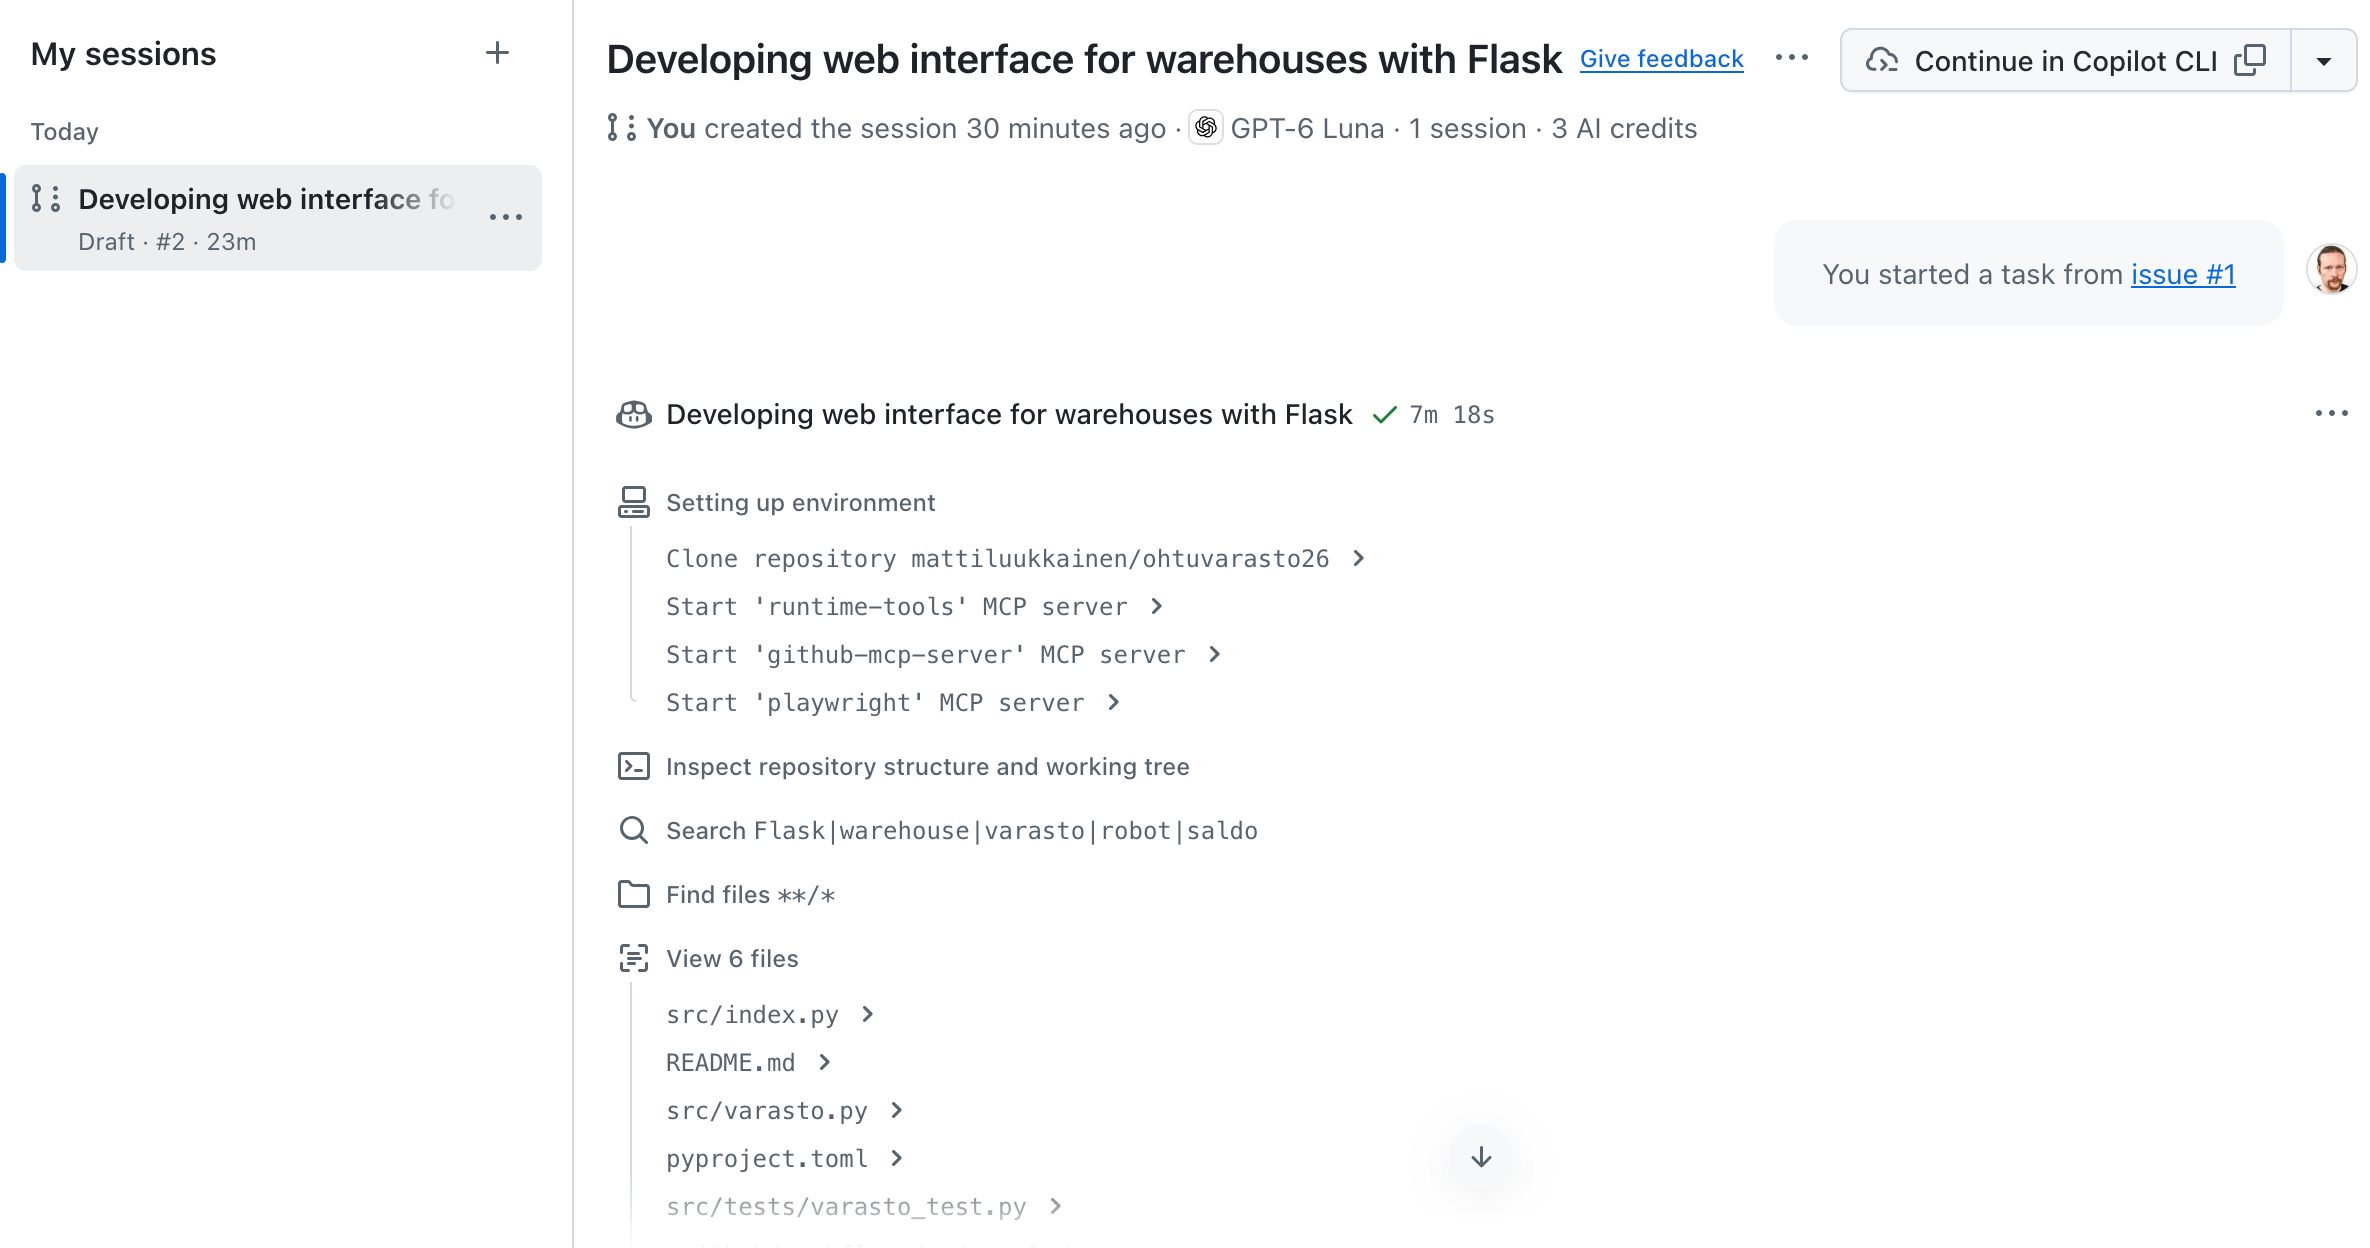
The top of the view also shows the model used by the session and the number of AI credits used so far. The roughly 7-minute session in the picture used 3 AI credits.
Wait until Copilot is done
For me, Copilot took about 7 minutes. You know that Copilot is done from the following signs:
- in the session view, a green check mark and the time spent appear after the name of Copilot’s work phase (right below the message that started the task), in the picture above ✓ 7m 18s
- Copilot requests your review: a yellow notice Copilot requested your review on this pull request appears at the top of the pull request page, and your name appears under Reviewers. You also get a GitHub notification about the request
- the pull request’s description has been updated to a summary of the changes made
- the entry Copilot finished work on behalf of … has appeared on the pull request’s timeline
A finished pull request looks e.g. like this:
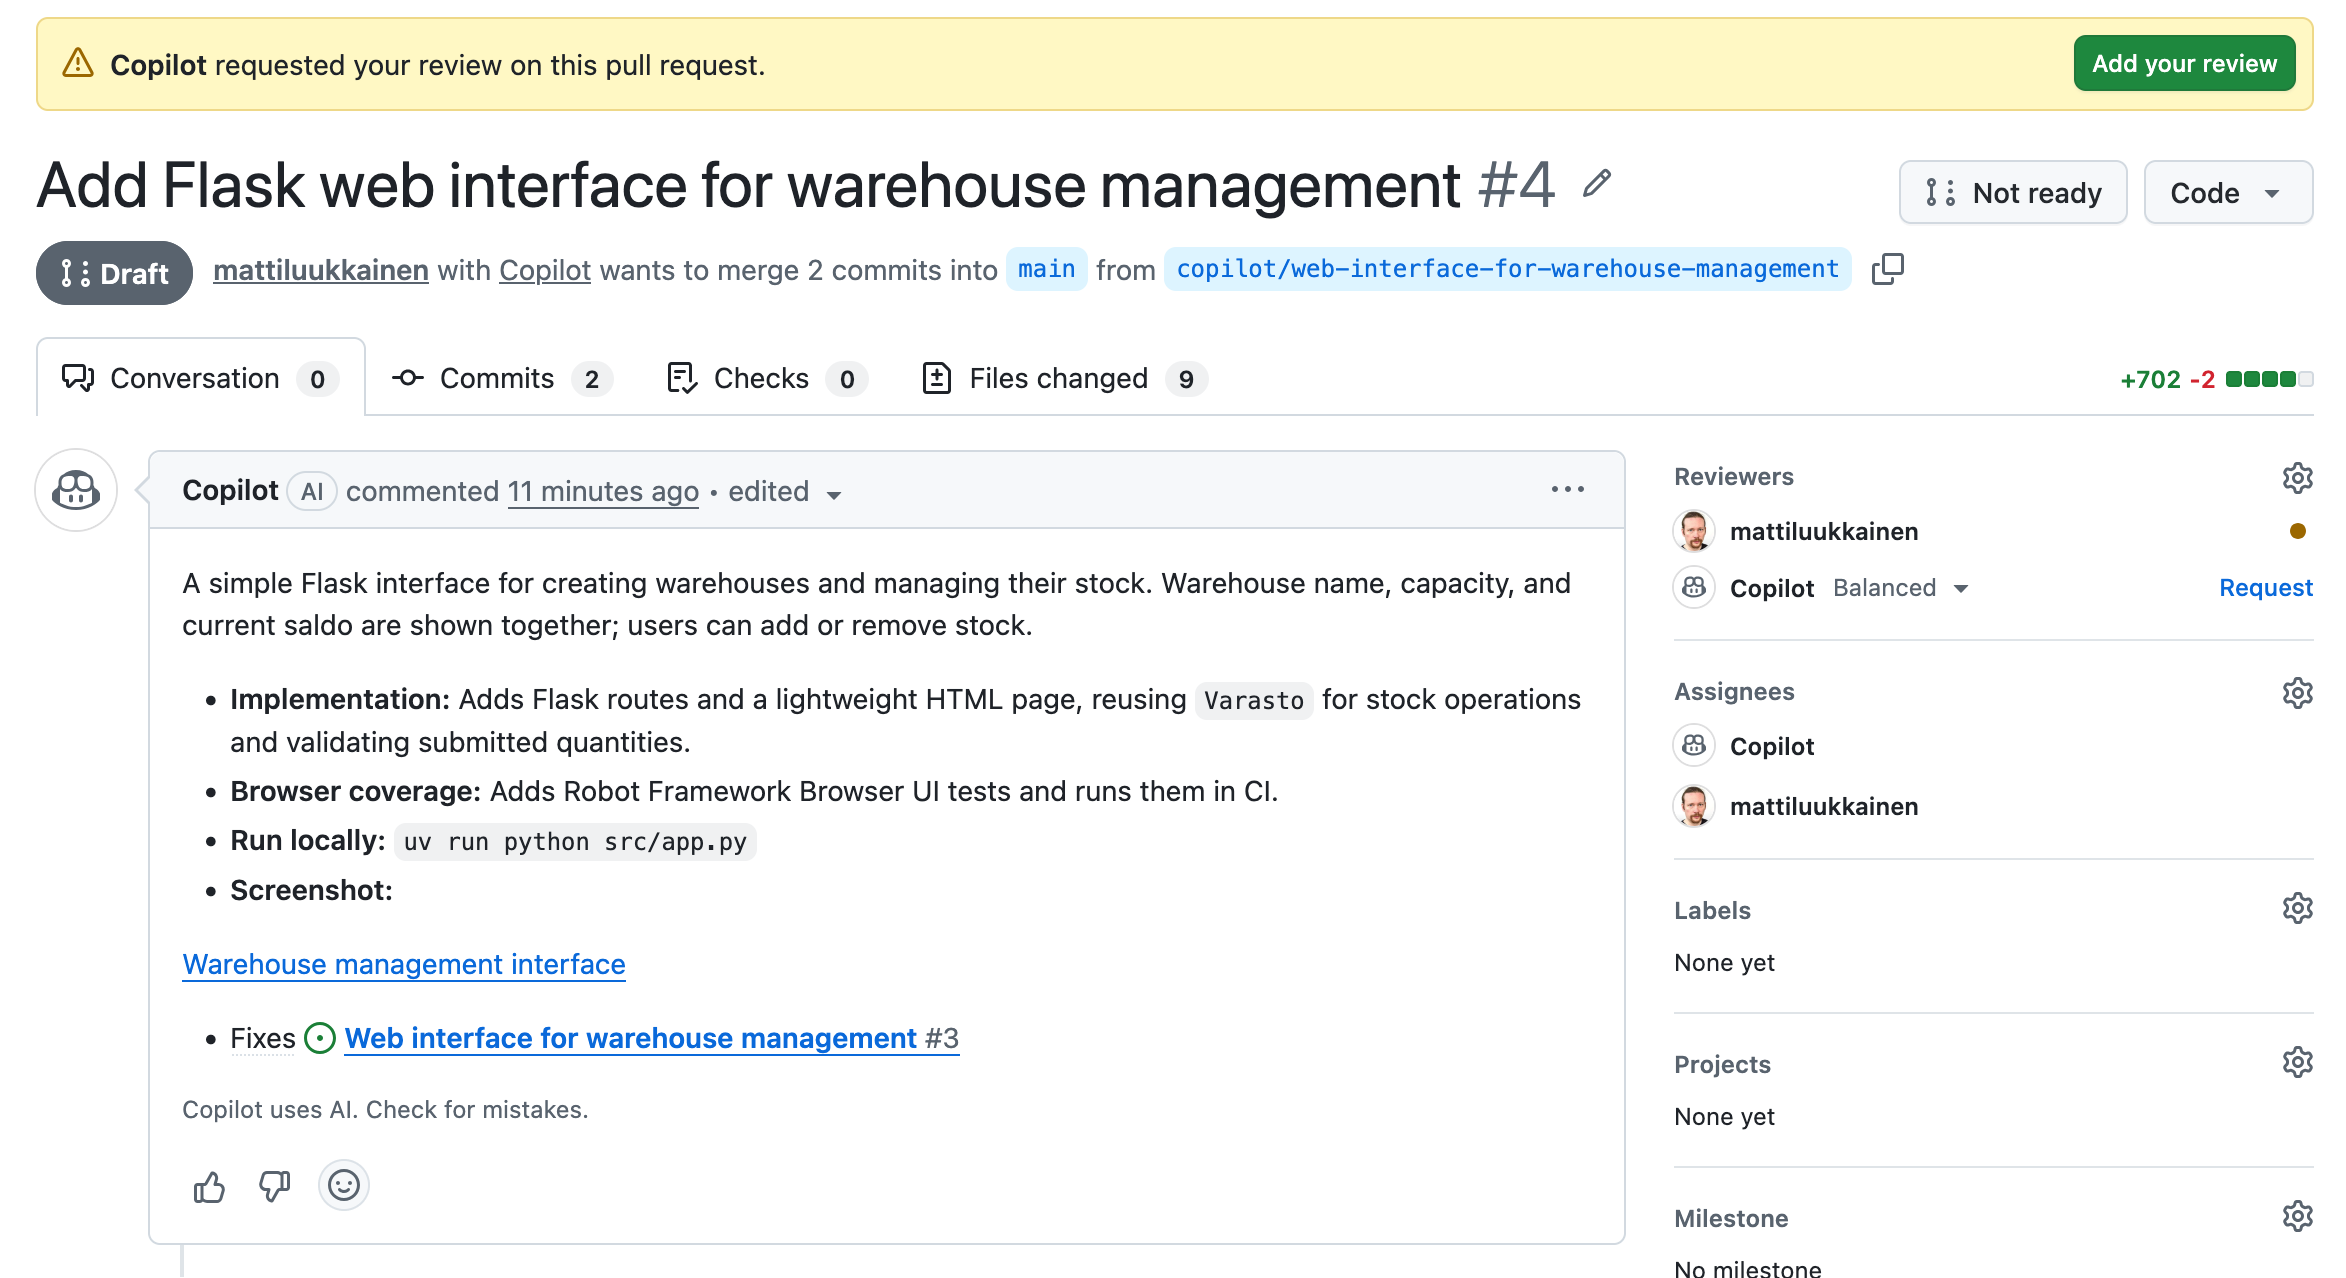
From the pull request’s description you can see what Copilot did and how to start the application. You can see the code created by Copilot on the Files changed tab.
The pull request is still a draft. Change its state by pressing the button Ready for review. The button is at the bottom of the Conversation tab. Alternatively you can press the button Not ready at the top right of the pull request’s page and select Ready for review from the panel that opens
Fetch the code of the pull request to your own machine
This is done with the commands git fetch and git checkout:
$ git fetch
remote: Enumerating objects: 38, done.
remote: Counting objects: 100% (36/36), done.
remote: Compressing objects: 100% (20/20), done.
remote: Total 25 (delta 9), reused 18 (delta 5), pack-reused 0 (from 0)
Unpacking objects: 100% (25/25), 13.12 KiB | 206.00 KiB/s, done.
From github.com:mattiluukkainen/ohtuvarasto26
 * [new branch]      copilot/add-web-interface-for-warehouses -> origin/copilot/add-web-interface-for-warehouses
$ git checkout copilot/add-web-interface-for-warehouses
branch 'copilot/add-web-interface-for-warehouses' set up to track 'origin/copilot/add-web-interface-for-warehouses'.
Switched to a new branch 'copilot/add-web-interface-for-warehouses'
You can copy the name of the branch from the Pull request’s page.
Make sure that the code works
Instructions for starting the application can be found in the project’s README file, which Copilot has updated. The instructions are also in the pull request’s description.
Study the code made by Copilot on your own machine in VS Code. If you come across something you do not understand, e.g. an unfamiliar library, how Flask works or the structure of the tests, ask Copilot to explain it. Use the chat’s Ask mode for this (selected from the menu at the bottom of the chat window, see this if needed), so that Copilot answers questions without changing the code
Doing a review requires that you understand what the code does. Code produced by an agent is not your own code, so checking it takes some effort.
Review the application on GitHub
You can start the review from the button “Add your review” at the top right of the Pull request’s page. You may have to reload the page for the button to appear
In the review, request some changes or extensions to the application:

Collect all change requests into the same review, since each request starts a new agent session, which consumes the AI credit quota. One round of fixes is enough.
So select Request changes on the form. The comments must mention @copilot for Copilot to agree to make the changes
Again follow Copilot’s progress with the button “View session”
Make sure once more on your own machine that the code works after the changes
Copilot pushes the changes to the same branch that you already fetched to your machine. You get the changes to your own machine with the command git pull when you are in that branch (check with the command git status if needed).
Create a new branch, e.g. git checkout -b web-ui
Start OpenCode in the project directory and give the issue description to the Build agent as a prompt
Turn on command approval if you do not want the agent to run commands without asking.
When the agent is done, make sure that the code works
Commit the changes and push the branch to GitHub
Create a pull request from the branch and write Fixes #<issuen numero> in its description, so that the issue is closed when the pull request is merged
Study the code made by the agent. If you come across something you do not understand, e.g. an unfamiliar library, how Flask works or the structure of the tests, ask the Plan agent to explain it. The Plan agent answers questions without changing the code
Doing a review requires that you understand what the code does. Code produced by an agent is not your own code, so checking it takes some effort.
Review the application on GitHub
You can start the review from the button “Add your review” at the top right of the Pull request’s page.
In the review, request some changes or extensions to the application. Select Request changes on the form
Ask the Build agent to make the changes from the review, make sure that the code works after the changes, and push the changes to the same branch. One round of fixes is enough
When you are satisfied, merge the Pull request into the main branch
The GitHub Actions workflow made in week 1 starts when something is pushed to the main branch, i.e. now after the merge. Make sure that CI passes. If Copilotthe agent has modified the workflow, e.g. added running the tests to it, also check that the changes make sense
Write a report on the review into a file vibe.md stored in the directory viikko5 of your submission repository
In the report, tell
- Did Copilotthe agent arrive at a working and good solution
- How did you make sure that the solution works?
- Did the agent write tests, and were they good?
- Was the code clear
- Did you learn something new while reading the code made by Copilotthe agent
In this extremely simple case vibe coding may produce a surprisingly good result. The situation is quite different with a real, larger system, though. Mere vibing, i.e. describing the desired functionality, is usually not enough to get a working and robust solution out.
Submitting the exercises
Push all the exercises you have done (except those that say the exercise is not submitted anywhere) to your submission repository on GitHub, and mark the exercises you have done in the submission app https://study.cs.helsinki.fi/stats/courses/ohtu-2026
Optional bonus exercise
In the directory viikko5/int-joukko of the course repository there is a beginner programmer’s solution to week 2 exercise 3 of the autumn 2011 course Ohjelmoinnin jatkokurssi (Advanced Programming). It was originally written in Java, but has now been translated into Python, staying faithful to the original style.
Copy the project to your submission repository, inside the directory viikko5.
The student in question has gone far in their career; they have worked e.g. at Google and at several high-profile Silicon Valley startups.
The code simulates an old-fashioned programming language such as C, where there is no ready-made data structure like Python’s list, only lists of fixed size that is defined when the list is created. In the code, lists are created with the method _luo_lista:
class IntJoukko:
    # this method is the only way to create lists
    def _luo_lista(self, koko):
        return [0] * koko

    def __init__(self, kapasiteetti=None, kasvatuskoko=None):
        # ...

        # create a list with the desired capacity
        self.ljono = self._luo_lista(self.kapasiteetti)
        self.alkioiden_lkm = 0
When enough new numbers are added to the set, the set’s internal list has to be grown. This is done by creating a new list with the method _luo_lista:
    def lisaa(self, n):
        # ...

        # no more room, create a new list to hold the numbers
        self.ljono = self._luo_lista(self.alkioiden_lkm + self.kasvatuskoko)
The internal quality of the code leaves something to be desired. Refactor the code of the class IntJoukko to be as clean and easy to maintain as possible:
Remove copy-paste
Reduce complexity
Give the variables clear names
Make the methods smaller and cohesive
Your solution must still work so that the size of the set’s internal list is fixed, and lists are created with the method _luo_lista, i.e. if the list fills up, a new list is created with the method.
The code has a set of unit tests that make refactoring easier.
NOTE: Refactor in as small steps as possible and keep the code working all the time. Run the tests after every refactoring step!